Quantcast
Channel: Hardware – Benjr.tw
Viewing all 145 articles
Browse latest View live

Linux command – ipmitool

$
0
0

關於 IPMI 的定義請參考 http://benjr.tw/11240

測試環境為 CentOS 7 x64

在使用 ipmitool 可能會遇到找不到裝置的狀況

[root@localhost ~]# ipmitool 
Could not open device at /dev/ipmi0 or /dev/ipmi/0 or [root@localhost ~]# systemctl status ipmi

先檢查一下 BMC 裝置是否存在,因為 BMC 非 PCI-E 裝置,所以只能透過 dmesg 來看.

[root@localhost ~]# lspci | grep ipmi
[root@localhost ~]# lspci | grep bmc
[root@localhost ~]# dmesg |grep -i ipmi
[   20.120464] ipmi message handler version 39.2
[   20.231682] IPMI System Interface driver.
[   20.231712] ipmi_si: probing via SMBIOS
[   20.231714] ipmi_si: SMBIOS: io 0xca8 regsize 1 spacing 1 irq 0
[   20.231715] ipmi_si: Adding SMBIOS-specified kcs state machine
[   20.231717] ipmi_si: probing via SPMI
[   20.231718] ipmi_si: SPMI: io 0xca8 regsize 1 spacing 1 irq 0
[   20.231719] ipmi_si: Adding SPMI-specified kcs state machine duplicate interface
[   20.231721] ipmi_si: Trying SMBIOS-specified kcs state machine at i/o address 0xca8, slave address 0x20, irq 0
[   20.452250] ipmi device interface
[   20.644368] ipmi_si ipmi_si.0: Found new BMC (man_id: 0x00016c, prod_id: 0x4147, dev_id: 0x20)
[   20.644385] ipmi_si ipmi_si.0: IPMI kcs interface initialized

ipmi 相關模組是否正確

[root@localhost ~]# lsmod |grep -i ipmi
ipmi_devintf           17572  0 
ipmi_si                53582  0 
ipmi_msghandler        46608  2 ipmi_devintf,ipmi_si
  • ipmi_devintf
    Linux character device interface for the message handler.
  • ipmi_si
    An IPMI system interface driver for the message handler. This module supports various IPMI system interfaces such as KCS, BT, SMIC, and even SMBus.
  • ipmi_msghandler
    Incoming and outgoing message handler for IPMI interfaces.

相關套件是否已經安裝

[root@localhost ~]# yum install OpenIPMI ipmitool

ipmi 服務確認有 enable (開機要啟動) , start (立即啟動)

[root@localhost ~]# systemctl enable ipmi
[root@localhost ~]# systemctl start ipmi
[root@localhost ~]# systemctl status ipmi
● ipmi.service - IPMI Driver
   Loaded: loaded (/usr/lib/systemd/system/ipmi.service; enabled; vendor preset: enabled)
   Active: active (exited) since Wed 2017-04-19 14:34:36 CST; 38min ago
  Process: 1190 ExecStart=/usr/libexec/openipmi-helper start (code=exited, status=0/SUCCESS)
 Main PID: 1190 (code=exited, status=0/SUCCESS)
   CGroup: /system.slice/ipmi.service

沒有錯誤時 Loaded 為 loaded , Active 為 active .

這時候就可以試試看下面指令,來確認 BMC / IPMI 的狀態.

[root@localhost ~]# ipmitool mc info
Device ID                 : 32
Device Revision           : 3
Firmware Revision         : 1.04
IPMI Version              : 2.0
Manufacturer ID           : 364
Manufacturer Name         : Unknown (0x16C)
Product ID                : 16711 (0x4147)
Product Name              : Unknown (0x4147)
Device Available          : yes
Provides Device SDRs      : no
Additional Device Support :
    Sensor Device
    SEL Device
    FRU Inventory Device
    IPMB Event Receiver
    IPMB Event Generator
    Bridge
Aux Firmware Rev Info     : 
    0x01
    0x00
    0x00
    0x00
PXE Boot options – inst.xdriver

$
0
0

測試環境為 :
PXE Server – RHEL 6.8 x64
PXE Client – RHEL 7.3 x64
關於 PXE 詳細設定請參考 http://benjr.tw/83

RHEL 7 要透過 PXE 來安裝,設定檔如下:

[root@localhost ~]# vi /var/lib/tftpboot/pxelinux.cfg/default
label linux
  menu label Install system
  kernel vmlinuz
  append initrd=initrd.img ip=dhcp inst.repo=http://10.32.5.1/mnt/archive/RHEL-7/7.x/Server/x86_64/os/

安裝的時候遇到 Xorg 沒有辦法啟動,這時候要透過 inst.xdriver 指定 X 驅動程式.

inst.xdriver=
在安裝過程時指定 X 的驅動程式名稱.

常見的有

  • qxl (QEMU QXL video accelerator)
  • ati
  • intel
  • sisusb
  • mga
  • r128
  • radeon (Driver for ATI/AMD Radeon)
  • modesetting (Kernel Mode Setting)
  • trident
  • spiceqxl
  • cirrus
  • savage
  • sis
  • nouveau (Nvidia 的顯示卡)
  • siliconmotion
  • mach64
  • tdfx
  • vmware
  • openchrome
  • s3
  • neomagic
  • vesa (VESA-compatible)
  • fbdev (Linux framebuffer X)
  • v4l (old Xv ddx driver for video4linux devices)

最常用的是 inst.xdriver=vesa
指定 xorg driver 哪 vesa,而且只要是 VESA-compatible video cards 都可以使用.

也結採用另外一個參數 inst.usefbx 直接指定 inst.xdriver=fbdev (Linux framebuffer X 驅動程式)

但是不確定你的作業系統有支援哪一些顯示卡的驅動程式.可以先用 文字模式安裝完畢,再透過 Xorg -configure 來查詢

[root@localhost ~]$ Xorg -configure

X.Org X Server 1.17.2
Release Date: 2015-06-16
X Protocol Version 11, Revision 0
Build Operating System:  2.6.32-573.18.1.el6.x86_64 
Current Operating System: Linux localhost.localdomain 3.10.0-514.6.1.el7.x86_64 #1 SMP Wed Jan 18 13:06:36 UTC 2017 x86_64
Kernel command line: BOOT_IMAGE=/vmlinuz-3.10.0-514.6.1.el7.x86_64 root=/dev/mapper/centos-root ro crashkernel=auto rd.lvm.lv=centos/root rd.lvm.lv=centos/swap rhgb quiet LANG=en_US.UTF-8
Build Date: 06 November 2016  12:43:39AM
Build ID: xorg-x11-server 1.17.2-22.el7 
Current version of pixman: 0.34.0
	Before reporting problems, check http://wiki.x.org
	to make sure that you have the latest version.
Markers: (--) probed, (**) from config file, (==) default setting,
	(++) from command line, (!!) notice, (II) informational,
	(WW) warning, (EE) error, (NI) not implemented, (??) unknown.
(==) Log file: "/var/log/Xorg.0.log", Time: Sat Apr 22 00:01:03 2017
List of video drivers:
	ati
	intel
	nouveau
	qxl
	radeon
	v4l
	vmware
	vesa
	fbdev
	modesetting
	dummy
(++) Using config file: "/root/xorg.conf.new"
(==) Using config directory: "/etc/X11/xorg.conf.d"
(==) Using system config directory "/usr/share/X11/xorg.conf.d"


Xorg detected your mouse at device /dev/input/mice.
Please check your config if the mouse is still not
operational, as by default Xorg tries to autodetect
the protocol.

Your xorg.conf file is /root/xorg.conf.new

To test the server, run 'X -config /root/xorg.conf.new'

(EE) Server terminated with error (2). Closing log file.

X-Windows 會顯示有支援的 VGA 驅動模組.

在 Xorg 指令執行後,家目錄會產生 xorg.conf 我們再將檔案從家目錄 xorg.conf.new 複製到 /etc/X11 再進行編輯成有支援的 VGA 的驅動模組!

修改後就可以啟動 X-window

[root@localhost ~]$ cp xorg.conf.new /etc/X11/xorg.conf
[root@localhost ~]$ vi /etc/X11/xorg.conf
Section "Device"
        Identifier  "Card0"
        Driver      "fbdev"
        BusID       "PCI:0:15:0"
EndSection
[root@localhost ~]$ startx

如果可以進入 X-Windows ,這個 VGA 的驅動模組就確定可以在你的系統上來使用.

現在回到 PXE 加入 VGA 的驅動模組參數.
inst.xdriver= fbdev

nomodeset (搭配來使用)
不使用 Kernel modesetting (KMS),而核心模式設定(KMS)主要將螢幕顯示解析度和顯示色深從的顯示由使用者空間(user space)提升到核心空間(kernel space)

[root@localhost ~]# vi /var/lib/tftpboot/pxelinux.cfg/default
label linux
  menu label Install system
  kernel vmlinuz
  append initrd=initrd.img ip=dhcp inst.repo=http://10.32.5.1/mnt/archive/RHEL-7/7.x/Server/x86_64/os/ inst.xdriver=fbdev nomodeset 

IPMI SOL (Serial Over Lan)

$
0
0

IPMI 有分成為 Inband 與 Outband,主要的區分為:
Inband (In-Band)

  1. Console Redirection (就是透過 serial port 也就是一般所說的 comport,還可以透過另外一種 outband – serial over LAN 來傳送.)
  2. OS 透過 System Interface (KCS, SMIC, BT, SSIF) 對本機下 ipmi command (不需要使用者及其密碼).

Outband (Out-of-Band)

  1. BMC dedicate LAN (可以分為專門獨立出來的 RJ45 埠給 IPMI 來使用,還有一種是用 sideband 的方式與 Ethernet RJ45 共享一個埠.)
    • Ethernet (Web)
    • IOL (Ipmi over Lan)
    • SOL (Serial over LAN)
  2. IOS (Ipmi over serial , General serial port)

其實 IPMI 的介面可以分為 LAN 以及 Serial Port 兩種,但是可以透過很多種變形的方式來控制.下面使用 SOL (Serial Over Lan) 的指令來將遠端伺服器畫面轉到你目前系統上.

#ipmitool -I lanplus -H <hostname> [-U <username>] [-P <password>] sol activate
  • -I <interface>
    參數 有 lan (適用於 IPMI 1.5) , lanplus(適用於 IPMI 2.0 ,有提供加密)
  • -H <address>
    遠端 BMC IP address 也可以是 hostname.
  • -U <username>
    遠端 BMC 的使用者帳號.
  • -P <password>
    遠端 BMC 的使用者帳號密碼.
  • sol
    sol Configure and connect IPMIv2.0 Serial-over-LAN.
  • activate
    activate [<usesolkeepalive|nokeepalive>] [instance=<number>]

更多的資訊可以透過 ipmitool help 來查詢.

[root@localhost ~]# ipmitool help
[root@localhost ~]# ipmitool sol help

因為是 serial 所以需要設定 Bit Rate,透過下面指令來看目前環境設定的是多少,這需要跟 IPMI Host 同步(這些資訊在 Host 端的 BIOS 都可以查詢到)

[root@localhost ~]# ipmitool sol info 1
Info: SOL parameter 'Payload Channel (7)' not supported - defaulting to 0x01
Set in progress                 : set-complete
Enabled                         : true
Force Encryption                : false
Force Authentication            : false
Privilege Level                 : ADMINISTRATOR
Character Accumulate Level (ms) : 50
Character Send Threshold        : 255
Retry Count                     : 7
Retry Interval (ms)             : 480
Volatile Bit Rate (kbps)        : 9.6
Non-Volatile Bit Rate (kbps)    : 9.6
Payload Channel                 : 1 (0x01)
Payload Port                    : 623

bit rate 有兩種可以設定 ,non-volatile-bit-rate (永久有效), volatile-bit-rate (暫時,系統重開機就失效了)

[root@localhost ~]# ipmitool sol set help

SOL set parameters and values: 

  set-in-progress             set-complete | set-in-progress | commit-write
  enabled                     true | false
  force-encryption            true | false
  force-authentication        true | false
  privilege-level             user | operator | admin | oem
  character-accumulate-level  <in 5 ms increments>
  character-send-threshold    N
  retry-count                 N
  retry-interval              <in 10 ms increments>
  non-volatile-bit-rate       serial | 9.6 | 19.2 | 38.4 | 57.6 | 115.2
  volatile-bit-rate           serial | 9.6 | 19.2 | 38.4 | 57.6 | 115.2

IPMI – IOL (IPMI Over Lan)

$
0
0

IPMI 有分成為 Inband 與 Outband,主要的區分為:
Inband (In-Band)

  1. Console Redirection (就是透過 serial port 也就是一般所說的 comport,還可以透過另外一種 outband – serial over LAN 來傳送.)
  2. OS 透過 System Interface (KCS, SMIC, BT, SSIF) 對本機下 ipmi command (不需要使用者及其密碼).

Outband (Out-of-Band)

  1. BMC dedicate LAN (可以分為專門獨立出來的 RJ45 埠給 IPMI 來使用,還有一種是用 sideband 的方式與 Ethernet RJ45 共享一個埠.)
    • Ethernet (Web)
    • IOL (Ipmi over Lan)
    • SOL (Serial over LAN)
  2. IOS (Ipmi over serial , General serial port)

IPMI 的介面可以分為 LAN 以及 Serial Port 兩種,不過大部分的時間都是透過 IOL (IPMI Over Lan) 來管理.

Inband

如果你可以直接在系統上面下指令,這就是直接透過 System Interface (KCS, SMIC, BT, SSIF) 對本機下 ipmi command (不需要使用者及其密碼)

#ipmitool commands

sdr – Print Sensor Data Repository entries and readings

[root@localhost ~]# ipmitool sdr
CPU0 SKTOCC      | 0x00              | ok
CPU1 SKTOCC      | 0x00              | ok
CPU0 PRCHT       | 0x00              | ok
CPU1 PRCHT       | 0x00              | ok
IOH THERMALERT   | 0x00              | ok
IOH TEMP         | 40 degrees C      | ok
FAN FLOW TEMP    | 44 degrees C      | ok
CPU0 DIMM TEMP   | 32 degrees C      | ok
CPU1 DIMM TEMP   | 38 degrees C      | ok
SENSE P3V3       | 3.30 Volts        | ok
SENSE P5V        | 4.85 Volts        | ok
SENSE P12V       | 11.83 Volts       | ok
PV VCCP CPU0     | 0.92 Volts        | ok
PV VCCP CPU1     | 0.93 Volts        | ok
P1V5 DDR3 CPU0   | 1.50 Volts        | ok
P1V5 DDR3 CPU1   | 1.49 Volts        | ok
FAN TECH0        | 3240 RPM          | ok
FAN TECH1        | 3120 RPM          | ok
FAN TECH2        | 3360 RPM          | ok
FAN TECH3        | 3120 RPM          | ok
FAN TECH4        | 3240 RPM          | ok
FAN TECH5        | 3120 RPM          | ok
FAN TECH6        | 3240 RPM          | ok
FAN TECH7        | 1560 RPM          | ok
FAN TECH8        | 3360 RPM          | ok
FAN TECH9        | 3120 RPM          | ok
IOH_ERR          | 0x00              | ok
SEL Fullness     | 1 % messages      | ok
Sys PWR Monitor  | 0x00              | ok
Watchdog         | 0x00              | ok
PECI CPU0        | 38 degrees C      | ok
PECI CPU1        | 32 degrees C      | ok
VGA Presence     | 0x00              | ok
CPU0 CATERR      | 0x00              | ok
CPU1 CATERR      | 0x00              | ok
CPU0 THERMTRIP   | 0x00              | ok
CPU1 THERMTRIP   | 0x00              | ok
IOH THERMTRIP    | 0x00              | ok
PCI32_SERR       | 0x00              | ok
PCI32_PERR       | 0x00              | ok
FP UID BTN       | 0x00              | ok
FP NMI BTN       | 0x00              | ok
SMI              | 0x00              | ok
DIMM Sensor CHA  | 0x00              | ok
NMI              | 0x00              | ok
DIMM Sensor CHB  | 0x00              | ok
DIMM Sensor CHC  | 0x00              | ok
DIMM Sensor CHD  | 0x00              | ok
DIMM Sensor CHE  | 0x00              | ok
DIMM Sensor CHF  | 0x00              | ok

sensor – Print detailed sensor information

[root@localhost ~]# ipmitool sensor
CPU0 SKTOCC      | 0x0        | discrete   | 0x8080| na        | na        | na        | na        | na        | na        
CPU1 SKTOCC      | 0x0        | discrete   | 0x8080| na        | na        | na        | na        | na        | na        
CPU0 PRCHT       | 0x0        | discrete   | 0x0080| na        | na        | na        | na        | na        | na        
CPU1 PRCHT       | 0x0        | discrete   | 0x0080| na        | na        | na        | na        | na        | na        
IOH THERMALERT   | 0x0        | discrete   | 0x0080| na        | na        | na        | na        | na        | na        
IOH TEMP         | 40.000     | degrees C  | ok    | na        | na        | na        | 51.000    | 59.000    | na        
FAN FLOW TEMP    | 44.000     | degrees C  | ok    | na        | na        | na        | 55.000    | 63.000    | na        
CPU0 DIMM TEMP   | 32.000     | degrees C  | ok    | na        | na        | na        | 71.000    | 79.000    | na        
CPU1 DIMM TEMP   | 38.000     | degrees C  | ok    | na        | na        | na        | 71.000    | 79.000    | na        
SENSE P3V3       | 3.302      | Volts      | ok    | na        | 2.961     | 3.131     | 3.451     | 3.621     | na        
SENSE P5V        | 4.850      | Volts      | ok    | na        | 4.460     | 4.700     | 5.150     | 5.390     | na        
SENSE P12V       | 11.910     | Volts      | ok    | na        | 10.790    | 11.430    | 12.630    | 13.270    | na        
PV VCCP CPU0     | 0.928      | Volts      | ok    | na        | 0.752     | 0.848     | 1.248     | 1.344     | na        
PV VCCP CPU1     | 0.928      | Volts      | ok    | na        | 0.752     | 0.848     | 1.248     | 1.344     | na        
P1V5 DDR3 CPU0   | 1.496      | Volts      | ok    | na        | 1.344     | 1.424     | 1.568     | 1.648     | na        
P1V5 DDR3 CPU1   | 1.488      | Volts      | ok    | na        | 1.344     | 1.424     | 1.568     | 1.648     | na        
FAN TECH0        | 3240.000   | RPM        | ok    | na        | 0.000     | 1080.000  | na        | 17520.000 | na        
FAN TECH1        | 3120.000   | RPM        | ok    | na        | 0.000     | 1080.000  | na        | 17520.000 | na        
FAN TECH2        | 3360.000   | RPM        | ok    | na        | 0.000     | 1080.000  | na        | 17520.000 | na        
FAN TECH3        | 3120.000   | RPM        | ok    | na        | 0.000     | 1080.000  | na        | 17520.000 | na        
FAN TECH4        | 3240.000   | RPM        | ok    | na        | 0.000     | 1080.000  | na        | 17520.000 | na        
FAN TECH5        | 3120.000   | RPM        | ok    | na        | 0.000     | 1080.000  | na        | 17520.000 | na        
FAN TECH6        | 3240.000   | RPM        | ok    | na        | 0.000     | 1080.000  | na        | 17520.000 | na        
FAN TECH7        | 1560.000   | RPM        | ok    | na        | 0.000     | 1080.000  | na        | 17520.000 | na        
FAN TECH8        | 3360.000   | RPM        | ok    | na        | 0.000     | 1080.000  | na        | 17520.000 | na        
FAN TECH9        | 3120.000   | RPM        | ok    | na        | 0.000     | 1080.000  | na        | 17520.000 | na        
IOH_ERR          | 0x0        | discrete   | 0x0080| na        | na        | na        | na        | na        | na        
SEL Fullness     | 1.000      | % messages | ok    | na        | na        | 0.000     | na        | 80.000    | 99.000    
Sys PWR Monitor  | 0x0        | discrete   | 0x0080| na        | na        | na        | na        | na        | na        
Watchdog         | 0x0        | discrete   | 0x0080| na        | na        | na        | na        | na        | na        
PECI CPU0        | 38.000     | degrees C  | ok    | na        | na        | na        | 81.000    | 89.000    | na        
PECI CPU1        | 33.000     | degrees C  | ok    | na        | na        | na        | 81.000    | 89.000    | na        
VGA Presence     | 0x0        | discrete   | 0x0180| na        | na        | na        | na        | na        | na        
CPU0 CATERR      | 0x0        | discrete   | 0x0080| na        | na        | na        | na        | na        | na        
CPU1 CATERR      | 0x0        | discrete   | 0x0080| na        | na        | na        | na        | na        | na        
CPU0 THERMTRIP   | 0x0        | discrete   | 0x0080| na        | na        | na        | na        | na        | na        
CPU1 THERMTRIP   | 0x0        | discrete   | 0x0080| na        | na        | na        | na        | na        | na        
IOH THERMTRIP    | 0x0        | discrete   | 0x0080| na        | na        | na        | na        | na        | na        
PCI32_SERR       | 0x0        | discrete   | 0x0080| na        | na        | na        | na        | na        | na        
PCI32_PERR       | 0x0        | discrete   | 0x0080| na        | na        | na        | na        | na        | na        
FP UID BTN       | 0x0        | discrete   | 0x0080| na        | na        | na        | na        | na        | na        
FP NMI BTN       | 0x0        | discrete   | 0x0080| na        | na        | na        | na        | na        | na        
SMI              | 0x0        | discrete   | 0x0080| na        | na        | na        | na        | na        | na        
DIMM Sensor CHA  | 0x0        | discrete   | 0x0080| na        | na        | na        | na        | na        | na        
NMI              | 0x0        | discrete   | 0x0080| na        | na        | na        | na        | na        | na        
DIMM Sensor CHB  | 0x0        | discrete   | 0x0080| na        | na        | na        | na        | na        | na        
DIMM Sensor CHC  | 0x0        | discrete   | 0x0080| na        | na        | na        | na        | na        | na        
DIMM Sensor CHD  | 0x0        | discrete   | 0x0080| na        | na        | na        | na        | na        | na        
DIMM Sensor CHE  | 0x0        | discrete   | 0x0080| na        | na        | na        | na        | na        | na        
DIMM Sensor CHF  | 0x0        | discrete   | 0x0080| na        | na        | na        | na        | na        | na   

Outband

要遠端控制 BMC (IOL) 就需要下面的參數.

#ipmitool -I lanplus -H <hostname> [-U <username>] [-P <password>] commands
  • -I <interface>
    參數 有 lan (適用於 IPMI 1.5) , lanplus(適用於 IPMI 2.0 ,有提供加密)
  • -H <address>
    遠端 BMC IP address 也可以是 hostname.
  • -U <username>
    遠端 BMC 的使用者帳號.
  • -P <password>
    遠端 BMC 的使用者帳號密碼.
[root@localhost ~]# ipmitool -I lanplus -H 192.6.1.51 -U admin -P admin sdr
SYS_12V          | 12.21 Volts       | ok
SYS_5V           | 4.97 Volts        | ok
SYS_3.3V         | 3.38 Volts        | ok
CPU0_VCORE       | 0.98 Volts        | ok
CPU1_VCORE       | 0.98 Volts        | ok
CPU0_DDR_VDD     | 1.23 Volts        | ok
CPU1_DDR_VDD     | 1.23 Volts        | ok
Inlet_Temp       | 23 degrees C      | ok
Outlet_Temp      | 27 degrees C      | ok
CPU0_Temp        | 38 degrees C      | ok
CPU0_Margin_Temp | 60 degrees C      | ok
CPU1_Temp        | 40 degrees C      | ok
CPU1_Margin_Temp | 59 degrees C      | ok
DIMMG0_Temp      | 28 degrees C      | ok
DIMMG1_Temp      | 29 degrees C      | ok
FAN1_RPM         | 13280 RPM         | ok
FAN2_RPM         | 13280 RPM         | ok
FAN3_RPM         | 13200 RPM         | ok
FAN4_RPM         | 13200 RPM         | ok
FAN5_RPM         | 13280 RPM         | ok
FAN6_RPM         | 13280 RPM         | ok
PS1_Power        | 140 Watts         | ok
PS2_Power        | 140 Watts         | ok
Total_Power      | 280 Watts         | ok
PS1_Status       | 0x00              | ok
PS2_Status       | 0x00              | ok
CPU0_Status      | 0x00              | ok
CPU1_Status      | 0x00              | ok
SEL_Status       | 0x00              | ok
IPMI_Watchdog    | 0x00              | ok
BIOS_Boot_Up     | 0x00              | ok
ACPI_PWR_Status  | 0x00              | ok
Chassis_control  | 0x00              | ok
Memory_Status    | 0x00              | ok
BMC_Boot_Up      | 0x00              | ok

如果不知道遠端使用密碼時,需要在 BMC 本機下 ipmi command,修改帳號密碼,

[root@localhost ~]# ipmitool user help
User Commands:
summary      [<channel number>]
list         [<channel number>]
set name     <user id> <username>
set password <user id> [<password>]
disable      <user id>
enable       <user id>
priv         <user id> <privilege level> [<channel number>]
test         <user id> <16|20> [<password]>

使用者有分權限的.
1 Callback level
2 User level
3 Operator level
4 Administrator level
5 OEM Proprietary level
15 No access

[root@localhost ~]# ipmitool user list 1
ID  Name    Callin  Link Auth	IPMI Msg   Channel Priv Limit
2   admin   true    true        true       ADMINISTRATOR

Disk Device

$
0
0

硬碟的相關資訊可以去哪裡看,除了 fdisk , lsscsi 外,還有比較詳細的資訊可以去哪裡查詢嗎?這一篇來看一下與硬碟裝置相關的資訊要如何查詢!

root@ubuntu:~# lsscsi
[3:0:0:0]    cd/dvd  NECVMWar VMware SATA CD01 1.00  /dev/sr0 
[32:0:0:0]   disk    VMware,  VMware Virtual S 1.0   /dev/sda 
[32:0:1:0]   disk    VMware,  VMware Virtual S 1.0   /dev/sdb 

這些詳細的資訊都可以透過指令 #udevadm (以前會透過 #udevinfo) 來查詢, 先來了解一下什麼是 sysfs 與 udev?
sysfs – 核心 2.6 後的新檔案系統,裝置名稱還是存放在 /dev/ 目錄下但是多了一個 /sys/ 的目錄 (該目錄是可瀏覽的),裡面存放當前硬體相對應的基本資訊.udev 則是透過 /sys/ 目錄的資訊創建出相對應的硬體設備節點 /dev/.

udev – 是管理目錄 /dev 的新方法,傳統的方式需要在 /dev/ 預先產生可能用不到的裝置名稱,udev 主要是依賴於 sysfs 提供的資訊與用戶提供的規則(Rule) 來創建相對應於系統中存在的 /dev 設備節點名稱.

更多關於 sysfs 與 udev 請參考 http://benjr.tw/10632

直接來看看 #udevadm 的使用

root@ubuntu:~# udevadm info --query=all --name=sda
P: /devices/pci0000:00/0000:00:10.0/host32/target32:0:0/32:0:0:0/block/sda
N: sda
S: disk/by-path/pci-0000:00:10.0-scsi-0:0:0:0
E: DEVLINKS=/dev/disk/by-path/pci-0000:00:10.0-scsi-0:0:0:0
E: DEVNAME=/dev/sda
E: DEVPATH=/devices/pci0000:00/0000:00:10.0/host32/target32:0:0/32:0:0:0/block/sda
E: DEVTYPE=disk
E: ID_BUS=scsi
E: ID_MODEL=VMware_Virtual_S
E: ID_MODEL_ENC=VMware\x20Virtual\x20S
E: ID_PART_TABLE_TYPE=dos
E: ID_PART_TABLE_UUID=ddcb3e72
E: ID_PATH=pci-0000:00:10.0-scsi-0:0:0:0
E: ID_PATH_TAG=pci-0000_00_10_0-scsi-0_0_0_0
E: ID_REVISION=1.0
E: ID_SCSI=1
E: ID_TYPE=disk
E: ID_VENDOR=VMware_
E: ID_VENDOR_ENC=VMware\x2c\x20
E: MAJOR=8
E: MINOR=0
E: SUBSYSTEM=block
E: TAGS=:systemd:
E: USEC_INITIALIZED=3247022

udevadm info options 常用的參數
-q, –query=TYPE
使用 all 可以查詢全部的資訊,可用的參數有 name(N), symlink(S), path(P), property(E) 他們也分別代表第一個字元的分類.
-n, –name=FILE
名稱 sda 同 /dev/sda .

上面的輸出訊息,一樣可以直接看檔案來查詢目前所有的硬碟裝置 (路徑 /dev/disk) 的 by-id / by-label / by-path / by-uuid 命名規則並依序的擺放.

想要更詳細的資訊可以使用下面參數
-a, –attribute-walk
會列出指定設備所有 udev 規則中使用的 sysfs properties (屬性),並會沿著上一層一連串的列印所有設備,直到 udev 規則的根目錄.

root@ubuntu:~# udevadm info --attribute-walk --name=sda

Udevadm info starts with the device specified by the devpath and then
walks up the chain of parent devices. It prints for every device
found, all possible attributes in the udev rules key format.
A rule to match, can be composed by the attributes of the device
and the attributes from one single parent device.

  looking at device '/devices/pci0000:00/0000:00:10.0/host32/target32:0:0/32:0:0:0/block/sda':
    KERNEL=="sda"
    SUBSYSTEM=="block"
    DRIVER==""
    ATTR{alignment_offset}=="0"
    ATTR{capability}=="50"
    ATTR{discard_alignment}=="0"
    ATTR{events}==""
    ATTR{events_async}==""
    ATTR{events_poll_msecs}=="-1"
    ATTR{ext_range}=="256"
    ATTR{inflight}=="       0        0"
    ATTR{range}=="16"
    ATTR{removable}=="0"
    ATTR{ro}=="0"
    ATTR{size}=="41943040"
    ATTR{stat}=="   60435      148  1614742    31348     5615    11689  1132704    36720        0    20996    67764"

  looking at parent device '/devices/pci0000:00/0000:00:10.0/host32/target32:0:0/32:0:0:0':
    KERNELS=="32:0:0:0"
    SUBSYSTEMS=="scsi"
    DRIVERS=="sd"
    ATTRS{device_blocked}=="0"
    ATTRS{device_busy}=="0"
    ATTRS{dh_state}=="detached"
    ATTRS{eh_timeout}=="10"
    ATTRS{evt_capacity_change_reported}=="0"
    ATTRS{evt_inquiry_change_reported}=="0"
    ATTRS{evt_lun_change_reported}=="0"
    ATTRS{evt_media_change}=="0"
    ATTRS{evt_mode_parameter_change_reported}=="0"
    ATTRS{evt_soft_threshold_reached}=="0"
    ATTRS{inquiry}==""
    ATTRS{iocounterbits}=="32"
    ATTRS{iodone_cnt}=="0x1024e"
    ATTRS{ioerr_cnt}=="0x6"
    ATTRS{iorequest_cnt}=="0x1024e"
    ATTRS{model}=="VMware Virtual S"
    ATTRS{queue_depth}=="32"
    ATTRS{queue_ramp_up_period}=="120000"
    ATTRS{queue_type}=="simple"
    ATTRS{rev}=="1.0 "
    ATTRS{scsi_level}=="3"
    ATTRS{state}=="running"
    ATTRS{timeout}=="30"
    ATTRS{type}=="0"
    ATTRS{vendor}=="VMware, "

  looking at parent device '/devices/pci0000:00/0000:00:10.0/host32/target32:0:0':
    KERNELS=="target32:0:0"
    SUBSYSTEMS=="scsi"
    DRIVERS==""

  looking at parent device '/devices/pci0000:00/0000:00:10.0/host32':
    KERNELS=="host32"
    SUBSYSTEMS=="scsi"
    DRIVERS==""

  looking at parent device '/devices/pci0000:00/0000:00:10.0':
    KERNELS=="0000:00:10.0"
    SUBSYSTEMS=="pci"
    DRIVERS=="mptspi"
    ATTRS{broken_parity_status}=="0"
    ATTRS{class}=="0x010000"
    ATTRS{config}==""
    ATTRS{consistent_dma_mask_bits}=="32"
    ATTRS{d3cold_allowed}=="0"
    ATTRS{device}=="0x0030"
    ATTRS{dma_mask_bits}=="32"
    ATTRS{driver_override}=="(null)"
    ATTRS{enable}=="1"
    ATTRS{irq}=="17"
    ATTRS{local_cpulist}=="0"
    ATTRS{local_cpus}=="00000000,00000000,00000000,00000001"
    ATTRS{msi_bus}=="1"
    ATTRS{numa_node}=="-1"
    ATTRS{subsystem_device}=="0x1976"
    ATTRS{subsystem_vendor}=="0x15ad"
    ATTRS{vendor}=="0x1000"

  looking at parent device '/devices/pci0000:00':
    KERNELS=="pci0000:00"
    SUBSYSTEMS==""
    DRIVERS==""

SATA / SAS Link Speed 一樣可以透過 sysfs 提供的資料來查詢.
SATA
這個 /sys/class/ata_link/link# 目錄下的幾個檔案都是與 SATA 速度相關的(路徑可以能會不同,可以直接用 find 尋找下面這幾個檔案).

  • hw_sata_spd_limit : Maximum speed supported by the connected SATA device.
  • sata_spd_limit : Maximum speed imposed by libata.
  • sata_spd : Current speed of the link [1.5, 3Gps,…].
# cat /sys/class/ata_link/link1/sata_spd
3.0 Gbps

SATA 為 3Gbps (SATA 2.0 的裝置),換算時需注意 20% overhead (每八個位元的資料串上用十位元來加以編碼).

  • Generation 1(1.5 Gbit/s) = (1.5G*0.8)/8 = 150 MByte/s
  • Generation 2( 3 Gbit/s) = (3G*0.8)/8 = 300 MByte/s
  • Generation 3( 6 Gbit/s) = (6G*0.8)/8 = 600 MByte/s

SAS
目錄 /sys/class/sas_phy/phy-0\:0/ 下的這幾個檔案都是與 SAS 速度相關的 (路徑可以能會不同,可以直接用 find 尋找下面這幾個檔案).

  • maximum_linkrate
  • maximum_linkrate_hw : 硬體支援最高的速度.
  • minimum_linkrate
  • minimum_linkrate_hw : 硬體支援最低的速度.
  • negotiated_linkrate 目前硬碟的速度
#cat /sys/class/sas_phy/phy-0\:0/maximum_linkrate
6.0 Gbit

SAS 為 6Gbps (SAS 2.0 的裝置),換算時需注意 20% overhead (每八個位元的資料串上用十位元來加以編碼).

  • Generation 1(3 Gbit/s) = 2.4 Gbit/s (3*0.8) = 300 MByte/s
  • Generation 2(6 Gbit/s) = 4.8 Gbit/s (6*0.8) = 600 MByte/s
  • Generation 3(12 Gbit/s) = 9.6 Gbit/s (12*0.8) = 1200 MByte/s

Linux command – ipmitool list & elist

$
0
0

ipmitool sdr , sel 的 list 與 elist 稍微不同.

sdr list | elist

SDR (Sensor Data Record)這個命令將讀取 感器數據的記錄,並顯示每個感器器其名稱,數值和狀態. 如果被使用 elist ,sensor number, entity id 以及 instance, 和 asserted discrete 裝態.

[root@localhost ~]# ipmitool sdr list
CPU0 SKTOCC      | 0x00              | ok
CPU1 SKTOCC      | 0x00              | ok
CPU0 PRCHT       | 0x00              | ok
CPU1 PRCHT       | 0x00              | ok
IOH THERMALERT   | 0x00              | ok
IOH TEMP         | 42 degrees C      | ok
FAN FLOW TEMP    | 43 degrees C      | ok
CPU0 DIMM TEMP   | 33 degrees C      | ok
CPU1 DIMM TEMP   | 38 degrees C      | ok
SENSE P3V3       | 3.30 Volts        | ok
SENSE P5V        | 4.85 Volts        | ok
SENSE P12V       | 11.91 Volts       | ok
PV VCCP CPU0     | 0.92 Volts        | ok
PV VCCP CPU1     | 0.93 Volts        | ok
P1V5 DDR3 CPU0   | 1.50 Volts        | ok
P1V5 DDR3 CPU1   | 1.49 Volts        | ok
FAN TECH0        | 3960 RPM          | ok
FAN TECH1        | 3840 RPM          | ok
FAN TECH2        | 3960 RPM          | ok
FAN TECH3        | 3960 RPM          | ok
FAN TECH4        | 3960 RPM          | ok
FAN TECH5        | 3840 RPM          | ok
FAN TECH6        | 3960 RPM          | ok
FAN TECH7        | 3840 RPM          | ok
FAN TECH8        | 3960 RPM          | ok
FAN TECH9        | 3720 RPM          | ok
IOH_ERR          | 0x00              | ok
SEL Fullness     | 2 % messages      | ok
Sys PWR Monitor  | 0x00              | ok
Watchdog         | 0x00              | ok
PECI CPU0        | 38 degrees C      | ok
PECI CPU1        | 32 degrees C      | ok
VGA Presence     | 0x00              | ok
CPU0 CATERR      | 0x00              | ok
CPU1 CATERR      | 0x00              | ok
CPU0 THERMTRIP   | 0x00              | ok
CPU1 THERMTRIP   | 0x00              | ok
IOH THERMTRIP    | 0x00              | ok
PCI32_SERR       | 0x00              | ok
PCI32_PERR       | 0x00              | ok
FP UID BTN       | 0x00              | ok
FP NMI BTN       | 0x00              | ok
SMI              | 0x00              | ok
DIMM Sensor CHA  | 0x00              | ok
NMI              | 0x00              | ok
DIMM Sensor CHB  | 0x00              | ok
DIMM Sensor CHC  | 0x00              | ok
DIMM Sensor CHD  | 0x00              | ok
DIMM Sensor CHE  | 0x00              | ok
DIMM Sensor CHF  | 0x00              | ok
[root@localhost ~]# ipmitool sdr elist
CPU0 SKTOCC      | E1h | ok  |  3.1 | Presence detected
CPU1 SKTOCC      | E2h | ok  |  3.2 | Presence detected
CPU0 PRCHT       | 07h | ok  |  3.1 | 
CPU1 PRCHT       | 08h | ok  |  3.2 | 
IOH THERMALERT   | 0Ah | ok  |  7.1 | 
IOH TEMP         | 01h | ok  |  7.1 | 42 degrees C
FAN FLOW TEMP    | 02h | ok  | 29.1 | 44 degrees C
CPU0 DIMM TEMP   | 03h | ok  |  8.1 | 33 degrees C
CPU1 DIMM TEMP   | 04h | ok  |  8.2 | 38 degrees C
SENSE P3V3       | 11h | ok  | 14.1 | 3.30 Volts
SENSE P5V        | 12h | ok  | 14.1 | 4.85 Volts
SENSE P12V       | 13h | ok  | 14.1 | 11.91 Volts
PV VCCP CPU0     | 14h | ok  |  3.1 | 0.92 Volts
PV VCCP CPU1     | 15h | ok  |  3.2 | 0.93 Volts
P1V5 DDR3 CPU0   | 16h | ok  |  7.1 | 1.50 Volts
P1V5 DDR3 CPU1   | 17h | ok  |  7.2 | 1.49 Volts
FAN TECH0        | 21h | ok  | 29.1 | 3960 RPM
FAN TECH1        | 22h | ok  | 29.2 | 3840 RPM
FAN TECH2        | 23h | ok  | 29.3 | 4080 RPM
FAN TECH3        | 24h | ok  | 29.4 | 3960 RPM
FAN TECH4        | 25h | ok  | 29.5 | 3960 RPM
FAN TECH5        | 26h | ok  | 29.6 | 3840 RPM
FAN TECH6        | 27h | ok  | 29.7 | 3960 RPM
FAN TECH7        | 28h | ok  | 29.8 | 3840 RPM
FAN TECH8        | 29h | ok  | 29.9 | 3960 RPM
FAN TECH9        | 2Ah | ok  | 29.10 | 3720 RPM
IOH_ERR          | 63h | ok  |  7.1 | 
SEL Fullness     | E7h | ok  |  9.80 | 2 % messages
Sys PWR Monitor  | E8h | ok  |  7.6 | 
Watchdog         | E9h | ok  |  7.7 | 
PECI CPU0        | 0Bh | ok  |  3.0 | 42 degrees C
PECI CPU1        | 0Ch | ok  |  3.1 | 32 degrees C
VGA Presence     | EAh | ok  | 31.1 | Present
CPU0 CATERR      | 61h | ok  |  3.1 | 
CPU1 CATERR      | 62h | ok  |  3.2 | 
CPU0 THERMTRIP   | 05h | ok  |  3.1 | 
CPU1 THERMTRIP   | 06h | ok  |  3.2 | 
IOH THERMTRIP    | 09h | ok  |  7.1 | 
PCI32_SERR       | 64h | ok  | 48.1 | 
PCI32_PERR       | 65h | ok  | 48.1 | 
FP UID BTN       | E3h | ok  | 12.1 | 
FP NMI BTN       | E4h | ok  | 12.1 | 
SMI              | E5h | ok  |  7.1 | 
DIMM Sensor CHA  | 66h | ok  |  8.1 | 
NMI              | E6h | ok  |  7.1 | 
DIMM Sensor CHB  | 67h | ok  |  8.1 | 
DIMM Sensor CHC  | 68h | ok  |  8.1 | 
DIMM Sensor CHD  | 69h | ok  |  8.1 | 
DIMM Sensor CHE  | 6Ah | ok  |  8.1 | 
DIMM Sensor CHF  | 6Bh | ok  |  8.1 | 

sel list | elist

當不使用參數或是 list 時將顯示 sel (System Event Log) 系統事件日誌的全部內容.如果被使用 elist(extended list),顯示每個事件的傳感器的 sensor ID 將轉換 Sensor Data Record.

[root@localhost ~]# ipmitool sel list
   1 | 07/05/2017 | 03:17:25 | Processor #0xe2 | Presence detected | Asserted
   2 | 07/05/2017 | 03:17:30 | Temperature #0x0c | Upper Non-critical going high | Asserted
   3 | 07/05/2017 | 03:17:30 | Temperature #0x0c | Upper Critical going high | Asserted
   4 | 07/05/2017 | 03:17:32 | Temperature #0x0c | Upper Critical going high | Deasserted
   5 | 07/05/2017 | 03:17:32 | Temperature #0x0c | Upper Non-critical going high | Deasserted
   6 | 07/05/2017 | 03:17:33 | Entity Presence #0xea | Present | Asserted
   7 | 07/05/2017 | 03:17:35 | Processor #0xe1 | Presence detected | Asserted
   8 | 07/05/2017 | 03:17:40 | Temperature #0x0b | Upper Non-critical going high | Asserted
   9 | 07/05/2017 | 03:17:40 | Temperature #0x0b | Upper Critical going high | Asserted
   a | 07/05/2017 | 03:17:42 | Temperature #0x0b | Upper Critical going high | Deasserted
   b | 07/05/2017 | 03:17:42 | Temperature #0x0b | Upper Non-critical going high | Deasserted
[root@localhost ~]# ipmitool sel elist
   1 | 07/05/2017 | 03:17:25 | Processor CPU1 SKTOCC | Presence detected | Asserted
   2 | 07/05/2017 | 03:17:30 | Temperature PECI CPU1 | Upper Non-critical going high | Asserted | Reading 144 > Threshold 81 degrees C
   3 | 07/05/2017 | 03:17:30 | Temperature PECI CPU1 | Upper Critical going high | Asserted | Reading 144 > Threshold 89 degrees C
   4 | 07/05/2017 | 03:17:32 | Temperature PECI CPU1 | Upper Critical going high | Deasserted | Reading 33 > Threshold 89 degrees C
   5 | 07/05/2017 | 03:17:32 | Temperature PECI CPU1 | Upper Non-critical going high | Deasserted | Reading 33 > Threshold 81 degrees C
   6 | 07/05/2017 | 03:17:33 | Entity Presence VGA Presence | Present | Asserted
   7 | 07/05/2017 | 03:17:35 | Processor CPU0 SKTOCC | Presence detected | Asserted
   8 | 07/05/2017 | 03:17:40 | Temperature PECI CPU0 | Upper Non-critical going high | Asserted | Reading 145 > Threshold 81 degrees C
   9 | 07/05/2017 | 03:17:40 | Temperature PECI CPU0 | Upper Critical going high | Asserted | Reading 145 > Threshold 89 degrees C
   a | 07/05/2017 | 03:17:42 | Temperature PECI CPU0 | Upper Critical going high | Deasserted | Reading 37 > Threshold 89 degrees C
   b | 07/05/2017 | 03:17:42 | Temperature PECI CPU0 | Upper Non-critical going high | Deasserted | Reading 37 > Threshold 81 degrees C

lspci 詳細資訊

$
0
0

指令 lspci 可以看到很多關於 PCI-E 裝置的訊息,但這些訊息個代表什麼意思!!

測試環境為 CentOS7 x86_64

下面這一張是 Intel Corporation 82575EB Gigabit 網卡.

[root@localhost ~]$ lspci -s 02:03.0 -vvv
  • 卡的基本訊息
    其中的 + – 代表有沒有被啟動或是發生.
    01:00.0 Ethernet controller: Intel Corporation 82575EB Gigabit Network Connection (rev 02)	
    
    Control: I/O+ Mem+ BusMaster+ SpecCycle- MemWINV- VGASnoop- ParErr- Stepping- SERR- FastB2B- DisINTx+
    Status: Cap+ 66MHz- UDF- FastB2B- ParErr- DEVSEL=fast >TAbort- <TAbort- <MAbort- >SERR- <PERR- INTx-
    Latency: 0, Cache Line Size: 64 bytes
    Interrupt: pin A routed to IRQ 16
    Region 0: Memory at fbba0000 (32-bit, non-prefetchable) [size=128K]
    Region 1: Memory at fbb80000 (32-bit, non-prefetchable) [size=128K]
    Region 2: I/O ports at e020 [size=32]
    Region 3: Memory at fbbc4000 (32-bit, non-prefetchable) [size=16K]
    Expansion ROM at fbb60000 [disabled] [size=128K]
    
  • Power Management
    與 PCI-E 裝置相關的電源管理.
    Capabilities: [40] Power Management version 2
            Flags: PMEClk- DSI+ D1- D2- AuxCurrent=0mA PME(D0+,D1-,D2-,D3hot+,D3cold+)
            Status: D0 NoSoftRst- PME-Enable- DSel=0 DScale=1 PME-
    

    主要可以看一下 PME(D0+,D1-,D2-,D3hot+,D3cold+) power management event 的狀態,+ 代表有被啟動, – 代表沒有被啟動.
    D0 有 Uninitialized 與 Active 兩種狀態.
    D1 為 Light Sleep 狀態.
    D2 為 Deep Sleep 狀態.
    D3 為 Full Off 狀態, 還可以分成為 D3cold 與 D3hot 兩種狀態.

  • Message Signaled Interrupts
    有分兩種 MSI 與 MSI-X .
    Capabilities: [50] MSI: Enable- Count=1/1 Maskable- 64bit+
            Address: 0000000000000000  Data: 0000
    Capabilities: [60] MSI-X: Enable+ Count=10 Masked-
            Vector table: BAR=3 offset=00000000
            PBA: BAR=3 offset=00002000
    

    MSI 是 PCI Express 中斷產生的方式,採用 in-band (控制訊號與資料同線路) 的方式,取代舊有的 out-of-band 的方式.
    MSI (PCI 2.2 開始採用) 支援 1, 2, 4, 8, 16 或 32 中斷上限.
    MSI-X (PCI 3.0 開始採用) 支援 2048 中斷上限.

  • Express Endpoint
    Capabilities: [a0] Express (v2) Endpoint, MSI 00
            DevCap: MaxPayload 256 bytes, PhantFunc 0, Latency L0s <512ns, L1 <64us
                    ExtTag- AttnBtn- AttnInd- PwrInd- RBE+ FLReset- SlotPowerLimit 0.000W
            DevCtl: Report errors: Correctable+ Non-Fatal+ Fatal+ Unsupported+
                    RlxdOrd- ExtTag- PhantFunc- AuxPwr- NoSnoop-
                    MaxPayload 256 bytes, MaxReadReq 128 bytes
            DevSta: CorrErr+ UncorrErr- FatalErr- UnsuppReq+ AuxPwr+ TransPend-
            LnkCap: Port #0, Speed 2.5GT/s, Width x4, ASPM L0s L1, Exit Latency L0s <4us, L1 <64us
                    ClockPM- Surprise- LLActRep- BwNot- ASPMOptComp-
            LnkCtl: ASPM Disabled; RCB 64 bytes Disabled- CommClk+
                    ExtSynch- ClockPM- AutWidDis- BWInt- AutBWInt-
            LnkSta: Speed 2.5GT/s, Width x4, TrErr- Train- SlotClk+ DLActive- BWMgmt- ABWMgmt-
            DevCap2: Completion Timeout: Range ABCD, TimeoutDis+, LTR-, OBFF Not Supported
            DevCtl2: Completion Timeout: 16ms to 55ms, TimeoutDis-, LTR-, OBFF Disabled
            LnkCtl2: Target Link Speed: 2.5GT/s, EnterCompliance- SpeedDis-
                     Transmit Margin: Normal Operating Range, EnterModifiedCompliance- ComplianceSOS-
                     Compliance De-emphasis: -6dB
            LnkSta2: Current De-emphasis Level: -6dB, EqualizationComplete-, EqualizationPhase1-
                     EqualizationPhase2-, EqualizationPhase3-, LinkEqualizationRequest-
    

    DevCap: Device Capabilities
    其中的 MaxPayload 代表 PCIe 封包最大有效負載量,類似網路設定的 MTU.
    DevCtl: Device Control
    Report errors 表示哪一些錯誤需要被報告 + 代表有需要, – 代表沒有需要.詳細還需要看下面的 Advanced Error Reporting.
    其中的 MaxReadReq (PCIe Max Read Request) 代表 PCIe 讀取請求允許的上限值.
    DevSta: Device State
    目前裝置狀態,有沒有錯誤發生.

    LnkCap: Link capability
    系統能提供的最高頻寬 PCI-Express 1.0 ( 2.5G ) Width x4=10G .
    LnkCtl: Link Control
    裡面的 ASPM 為 PCI Express Active State Power Management ,disabled 代表沒有使用 power savings.
    LnkSta: Link State
    目前該PCI-E 裝置跑的速度 PCI-Express 1.0 ( 2.5G ) Width x1=2.5G,

    DevCap2: 其他與 Device Capabilities 相關的訊息.
    DevCtl2: 其他與 Device Control 相關的訊息.
    LnkCtl2: 其他與 Link Control 相關的訊息.
    LnkSta2: 其他與 Link State 相關的訊息.

  • Advanced Error Reporting
    PCI Express 錯誤信號可能發生在 PCI Express 鏈路本身或在鏈路上啟動時.
    PCI Express 定義兩個錯誤報告: 1. 基本(baseline) 和高級(Advanced) 錯誤報告 (Error Reporting) 功能.
    Capabilities: [100 v1] Advanced Error Reporting
            UESta: DLP- SDES- TLP- FCP- CmpltTO- CmpltAbrt- UnxCmplt- RxOF- MalfTLP- ECRC- UnsupReq- ACSViol-
            UEMsk: DLP- SDES- TLP- FCP- CmpltTO- CmpltAbrt- UnxCmplt- RxOF- MalfTLP- ECRC- UnsupReq- ACSViol-
            UESvrt: DLP+ SDES- TLP- FCP+ CmpltTO- CmpltAbrt- UnxCmplt- RxOF+ MalfTLP+ ECRC- UnsupReq- ACSViol-
            CESta: RxErr- BadTLP- BadDLLP- Rollover- Timeout- NonFatalErr+
            CEMsk: RxErr- BadTLP- BadDLLP- Rollover- Timeout- NonFatalErr+
            AERCap: First Error Pointer: 00, GenCap- CGenEn- ChkCap- ChkEn-
    

    UESta: UN-correctable Error State
    UEMsk: UN-correctable Error Mask
    UESvrt: UN-correctable Error ?
    CESta: Correctable Error State
    CEMsk: Correctable Error Mask
    AERCap: AER Capabilities

  • 其他訊息
    Capabilities: [140 v1] Device Serial Number 90-fb-a6-ff-ff-76-38-00
    Kernel driver in use: igb
    Kernel modules: igb
    

Container & Docker

$
0
0

關於 Virtualization 虛擬化類別請參考 http://benjr.tw/3383

Container

Container 採用與 KVM 一樣的做法 (Linux 核心加入 KVM 再讓這 Linux 核心當作 VMM ,在 KVM 下的 Guest OS 對於 Linux 核心而言都只是一個 Process 行程). LXC 採用類似的方式在原作業系統中透過資源共享的方式,建立出一個獨立空間 (虛擬環境,有自己的 file system, process 與 block I/O ,network 空間) 給另外一個作業系統來使用,這邊不再稱它為虛擬機器 Virtual Machine 而是叫做 Container.

  1. Chroot & Schroot – http://benjr.tw/95942
  2. LXC (Linux Containers) 基礎介紹 – http://benjr.tw/95955
  3. LXC (Linux Containers) 的使用 – http://benjr.tw/93708
  4. LXC 的網路架構 – http://benjr.tw/96074

Docker

我們先來了解一下關於 Docker 基本的三個觀念. 容器 (Container) , 映像檔 (Image) , 倉庫 (Repository) .

  • 容器 (Container)
    在原作業系統中透過資源共享的方式,建立出一個獨立空間 (虛擬環境,有自己的 file system, process 與 block I/O ,network 空間) 給另外一個作業系統來使用,聽起來很像是虛擬機器 Virtual Machine 但方式不一樣,名稱也不太一樣,這樣的方式叫做 Container.
  • 映像檔 (Image)
    Container 是一個容器,我們需要將作業環境放到這一個容器,最快的方式就是透過網路下載別人已經做好的作業環境 (唯讀映像檔) 來使用,當然也是可以自己建立.因為這是一個唯讀的映像檔,所以容器啟動的時候還會提供資料可以寫入的一層地方.
  • 倉庫 (Repository)
    倉庫是用來存放映像檔的地方,預設會到 Docker Hub https://hub.docker.com 這個倉庫來找.
  1. Linux Docker 基礎介紹 – http://benjr.tw/95998
  2. Docker 的網路架構 – http://benjr.tw/96629
  3. 使用 Docker 的技術來架設 web server (Nginx) – http://benjr.tw/96590

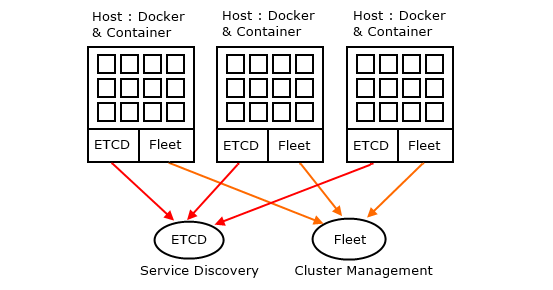
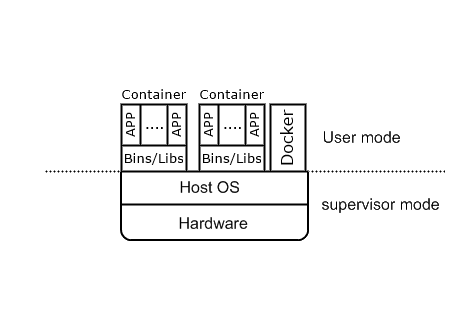
那 Docker 是什麼? Docker 與 Container 的關聯是? 如下圖所示.
docker01

使用 Docker 用來管理 Container 可以讓 Container 的環境更為完善.

CoreOS

Container/Docker 是輕量級的虛擬化技術,而 CoreOS 是針對 Container/Docker 基於 Linux 內核所開發出來的輕量級作業系統,他提供了 Docker 所需要的基礎功能並可在叢集環境下運作.

  1. 安裝 CoreOS 無設定檔 http://benjr.tw/95959
  2. CoreOS 設定檔 http://benjr.tw/96511
  3. 關於 Hostname 設定檔的使用 – http://benjr.tw/96518
  4. 關於 ssh_authorized_keys 設定檔的使用 – http://benjr.tw/96318
  5. 關於 units 設定與使用方式 – http://benjr.tw/96332
  6. 關於 Network 設定與使用方式 – http://benjr.tw/96370

CoreOS 主要的服務

  1. ETCD2 (Service Discovery)
    etcd 是一種分散式的 key/value 儲存方式 (至少要有三個 node ,會把資料複製三份到個別的 node 作儲存,以確保資料的可靠度),不同於傳統的關聯式資料庫系統 (傳統的關聯式資料庫基本上就是一堆 tables),etc2 採用的是 key / value Stores 儲存,資料就只有 key / value Stores 採用 雜湊表 (Hash table) 是根據鍵 (Key) 來查詢 (noSQL 的方式) 存儲的資料結構.
  2. Container , Docker
    Container 與 Docker 設定與使用方式 – http://benjr.tw/96566
  3. Fleet (Cluster Management)
    Container 他是輕量級的虛擬化軟體,透過資源共享的方式,可以快速建立出一個獨立空間 (虛擬環境,有自己的 file system, process 與 block I/O ,network 空間) 給另外一個作業系統來使用,透過 Docker 的基本三元素. 容器 (Container) , 映像檔 (Image) , 倉庫 (Repository) .讓我們更方便管理 Container 的環境,但是要能做到 方便大量,分散式的 部署與管理,這時候就要透過 Fleet 來協助.

    關於 fleet 設定與使用方式 – http://benjr.tw/96502

  4. Flannel
    Container 網路要對外時需要設定 port-mapping 或是將網路設定成不同的模式,這時可以使用 flannel (SDN : Software Define Network) 來讓不同的 Host (CoreOS) 的 Container 之間透過虛擬網路來溝通.

    關於 Flannel 設定與使用方式 – http://benjr.tw/96562


LMbench – Memory 測試

$
0
0

LMbench 是用來測試系統效能的工具.關於安裝與測試種類請參考 http://benjr.tw/98076

測試環境為 Ubuntu 16.04 x86_64 ,這邊來討論 LMBench 有關於 Memory 記憶體的測試項目.

安裝完成的 LMbench 程式目錄位於 /usr/lib/lmbench/bin/x86_64-linux-gnu/

root@ubuntu:~# cd /usr/lib/lmbench/bin/x86_64-linux-gnu/

bw_mem

先前測試記憶體有 bw_mem_cp (memory copy) ,bw_mem_rd (memory reading and summing) , bw_mem_wr (memory writing). 現統一使用這一程式.
主要在測試 processor 與 memory 之間的傳輸速度.

Usage: bw_mem_cp  [ -P <parallelism> ] [ -W <warmups> ] [ -N <repetitions> ] size rd|wr|rdwr|cp|fwr|frd|bzero|bcopy [align]

測試 rdwr (read data write read) , -P 4 (0~4) 5個 bw_mem 同時跑 , -N 測試重覆 8 次.

root@ubuntu:/usr/lib/lmbench/bin/x86_64-linux-gnu# ./bw_mem -N 8 -P 4 16384 rdwr
0.016384 40576.03

測試輸出格式為 “%0.2f %.2f\n”, megabytes, megabytes_per_second .
結果為 megabytes = 0.016384 ,megabytes_per_second = 40576.03 MB/s ,每次處理 16K(0.016384M) 的資料,每秒可以處理 40576.03 MB.

其他可以供使用的測試方式.

  • rd measures the time to read data into the processor.
  • wr measures the time to write data to memory.
  • rdwr measures the time to read data into memory and then write data to the same memory location.
  • cp measures the time to copy data from one location to another.
  • frd measures the time to read data into the processor.
  • fwr measures the time to write data to memory.
  • fcp measures the time to copy data from one location to another.
  • bzero measures how fast the system can bzero memory.
  • bcopy measures how fast the system can bcopy data.

bw_mmap_rd

這邊主要在測試 memory 到 檔案之間的速度.

Usage: ./bw_mmap_rd [-C] [-P <parallelism>] [-W <warmup>] [-N <repetitions>] <size> open2close | mmap_only <filename>

在測試之前需要建立一個大小相等的檔案,可以透過 dd 來建立.

root@ubuntu:/usr/lib/lmbench/bin/x86_64-linux-gnu# dd if=/dev/zero of=/root/1M bs=1M count=1
root@ubuntu:/usr/lib/lmbench/bin/x86_64-linux-gnu# ./bw_mmap_rd 1M open2close /root/1M
1.00 10501.54
root@ubuntu:/usr/lib/lmbench/bin/x86_64-linux-gnu# ./bw_mmap_rd 1M mmap_only /root/1M
1.00 22136.85

測試輸出格式為 “%0.2f %.2f\n”, megabytes, megabytes_per_second .
結果為 megabytes = 1.00 ,megabytes_per_second = 22136.85 MB/s ,每次處理 1M 的資料,每秒可以處理 22136.85 MB.

測試方式有兩種 open2close 與 mmap_only ,但沒有查到其代表的意思.

lat_mem_rd

主要在測試 memory 的讀取延遲 (latency).

Usage: at_mem_rd  [  -P <parallelism> ] [ -W <warmups> ] [ -N <repetitions> ] size_in_megabytes stride [ stride stride...  ]

改變記憶體大小和 stride (不懂) 來進行 memory 讀取延遲測試.

root@ubuntu:/usr/lib/lmbench/bin/x86_64-linux-gnu# ./lat_mem_rd 1
"stride=64
0.00049 1.442
0.00098 1.440
0.00195 1.443
0.00293 1.444
0.00391 1.441
0.00586 1.441
0.00781 1.440
0.01172 1.446
0.01562 1.444
0.02344 1.444
0.03125 1.509
0.04688 4.277
0.06250 4.282
0.09375 4.284
0.12500 4.288
0.18750 4.480
0.25000 4.563
0.37500 4.824
0.50000 4.821
0.75000 4.821
1.00000 4.823

測試輸出格式為 nanoseconds per load 及 verified accurate to within a few nanoseconds. (還是不懂)

lat_mmap

這邊主要在測試 memory 到 檔案之間的延遲 (latency)..

Usage: ./lat_mmap [-r] [-C] [-P <parallelism>] [-W <warmup>] [-N <repetitions>] size file

在測試之前需要建立一個大小相等的檔案,可以透過 dd 來建立.

root@ubuntu:/usr/lib/lmbench/bin/x86_64-linux-gnu# dd if=/dev/zero of=/root/1M bs=1M count=1
root@ubuntu:/usr/lib/lmbench/bin/x86_64-linux-gnu# ./lat_mmap 1M /root/1M
1.000000 11

測試輸出格式為 “%0.2f %d\n”, megabytes, usecs.
結果為 1.000000 megabytes, 延遲 (latency) 11 usecs (u : micro 10的-6次方 ).

stream

John McCalpin’s stream benchmark.記憶體的效能檢測.

Usage: stream [ -M <len> ] [ -W <warmups> ] [ -N <repetitions> ]
root@ubuntu:/usr/lib/lmbench/bin/x86_64-linux-gnu# ./stream
STREAM copy latency: 2.46 nanoseconds
STREAM copy bandwidth: 6501.42 MB/sec
STREAM scale latency: 1.42 nanoseconds
STREAM scale bandwidth: 11230.04 MB/sec
STREAM add latency: 1.99 nanoseconds
STREAM add bandwidth: 12034.10 MB/sec
STREAM triad latency: 1.91 nanoseconds
STREAM triad bandwidth: 12534.82 MB/sec

par_mem

測試記憶體系統可以並行 (parallelism) 執行多少個請求.

Usage: par_mem [ -L <line size> ] [ -M <len> ] [ -W <warmups> ] [ -N <repetitions> ]
root@ubuntu:/usr/lib/lmbench/bin/x86_64-linux-gnu# ./par_mem
0.004096 8.19
0.008192 7.89
0.016384 8.34
0.032768 9.00
0.065536 7.07
0.131072 6.38
0.262144 6.32
0.524288 5.77
1.048576 5.30
2.097152 5.33
4.194304 8.66
8.388608 6.74
16.777216 5.77
33.554432 5.98
67.108864 4.94

在 Ubuntu server 安裝桌面系統

$
0
0

在 RedHat / CentOS 7 要額外安裝 Gnome Desktop 桌面系統,可以透過 #yum groups install “GNOME Desktop” ,請參考 http://benjr.tw/96155

測試環境為 Ubuntu 16.04 server x86_64

Ubuntu Server 版本預設是沒有桌面系統,通常也是不需要的,但是真的要安裝可以透過下面指令.

root@ubuntu ~# apt-get update
root@ubuntu ~# apt-get upgrade
root@ubuntu ~# apt-get install ubuntu-desktop

安裝完成後檢查一下 systemctl (systemD) 預設已經改成 GUI 介面.

root@ubuntu ~# systemctl get-default
graphical.target

但第一次還是需要自行轉換成 Ubuntu Unity 的桌面環境.

root@ubuntu ~# init 5

或是

root@ubuntu ~# startx

Ubuntu 作業系統從 11.04 起就使用 Unity 介面,這是 Canonical (Ubuntu 開發商) 基於 Gnome 所開發的新介面,但預計從 Ubuntu 18.04 LTS開始之後桌面環境的介面又會從 Unity 改回 Gnome.

除了 Unity 可以供使用外,還有下面不同的桌面系統可供安裝使用.

  • Gnome 3
    root@ubuntu ~# apt-get install gnome-shell
    
  • Kubuntu (KDE)
    root@ubuntu ~# apt-get install kubuntu-desktop
    
  • XFCE
    root@ubuntu ~#apt-get install xfce4
    
  • LXDE
    root@ubuntu ~#apt-get install lxde
    
  • Openbox
    root@ubuntu ~#apt-get install openbox
    
  • Gnome 2
    root@ubuntu ~#apt-get install gnome-session-fallback
    
  • Ubuntu Gnome (Official flavor)
    root@ubuntu ~#apt install ubuntu-gnome-desktop
    

linux command – sensors

$
0
0

在沒有 BMC 時 Linux 底下還是可以透過另外一種方式 LM_Sensor 來針對 I²C / smbus 上的 溫度,電壓,濕度和風扇 裝置感應器 (sensors) 來做較簡易的監控.

測試環境為 CentOS 7 x86_64

[root@localhost ~]# yum install lm_sensors

主要透過兩支程式 sensors-detect (sensor 環境偵測) 以及 sensors (檢視目前 sensors 的狀態).

[root@localhost ~]# sensors-detect --auto
# sensors-detect revision 3.4.0-4 (2016-06-01)
# System: FOXCONN AGLAIA [PVT]
# Kernel: 3.10.0-514.26.2.el7.x86_64 x86_64
# Processor: Intel(R) Xeon(R) CPU X5667 @ 3.07GHz (6/44/1)

Running in automatic mode, default answers to all questions
are assumed.

Some south bridges, CPUs or memory controllers contain embedded sensors.
Do you want to scan for them? This is totally safe. (YES/no): 
Silicon Integrated Systems SIS5595...                       No
VIA VT82C686 Integrated Sensors...                          No
VIA VT8231 Integrated Sensors...                            No
AMD K8 thermal sensors...                                   No
AMD Family 10h thermal sensors...                           No
AMD Family 11h thermal sensors...                           No
AMD Family 12h and 14h thermal sensors...                   No
AMD Family 15h thermal sensors...                           No
AMD Family 16h thermal sensors...                           No
AMD Family 15h power sensors...                             No
AMD Family 16h power sensors...                             No
Intel digital thermal sensor...                             Success!
    (driver `coretemp')
Intel AMB FB-DIMM thermal sensor...                         No
Intel 5500/5520/X58 thermal sensor...                       Success!
    (driver `i5500_temp')
VIA C7 thermal sensor...                                    No
VIA Nano thermal sensor...                                  No

Some Super I/O chips contain embedded sensors. We have to write to
standard I/O ports to probe them. This is usually safe.
Do you want to scan for Super I/O sensors? (YES/no): 
Probing for Super-I/O at 0x2e/0x2f
Trying family `National Semiconductor/ITE'...               Yes
Found unknown chip with ID 0x1a11
Probing for Super-I/O at 0x4e/0x4f
Trying family `National Semiconductor/ITE'...               No
Trying family `SMSC'...                                     No
Trying family `VIA/Winbond/Nuvoton/Fintek'...               No
Trying family `ITE'...                                      No

Some systems (mainly servers) implement IPMI, a set of common interfaces
through which system health data may be retrieved, amongst other things.
We first try to get the information from SMBIOS. If we don't find it
there, we have to read from arbitrary I/O ports to probe for such
interfaces. This is normally safe. Do you want to scan for IPMI
interfaces? (YES/no): 
Found `IPMI BMC KCS' at 0xca8...                            Success!
    (confidence 8, driver `to-be-written')

Some hardware monitoring chips are accessible through the ISA I/O ports.
We have to write to arbitrary I/O ports to probe them. This is usually
safe though. Yes, you do have ISA I/O ports even if you do not have any
ISA slots! Do you want to scan the ISA I/O ports? (YES/no): 
Probing for `National Semiconductor LM78' at 0x290...       No
Probing for `National Semiconductor LM79' at 0x290...       No
Probing for `Winbond W83781D' at 0x290...                   No
Probing for `Winbond W83782D' at 0x290...                   No

Lastly, we can probe the I2C/SMBus adapters for connected hardware
monitoring devices. This is the most risky part, and while it works
reasonably well on most systems, it has been reported to cause trouble
on some systems.
Do you want to probe the I2C/SMBus adapters now? (YES/no): 
Using driver `i2c-i801' for device 0000:00:1f.3: Intel ICH10

Next adapter: mga i2c (i2c-0)
Do you want to scan it? (yes/NO/selectively): 

Next adapter: SMBus I801 adapter at f000 (i2c-1)
Do you want to scan it? (YES/no/selectively): 
Client found at address 0x18
Probing for `Analog Devices ADM1021'...                     No
Probing for `Analog Devices ADM1021A/ADM1023'...            No
Probing for `Maxim MAX1617'...                              No
Probing for `Maxim MAX1617A'...                             No
Probing for `Maxim MAX1668'...                              No
Probing for `Maxim MAX1805'...                              No
Probing for `Maxim MAX1989'...                              No
Probing for `Maxim MAX6655/MAX6656'...                      No
Probing for `TI THMC10'...                                  No
Probing for `National Semiconductor LM84'...                No
Probing for `Genesys Logic GL523SM'...                      No
Probing for `Onsemi MC1066'...                              No
Probing for `Maxim MAX1618'...                              No
Probing for `Maxim MAX1619'...                              No
Probing for `National Semiconductor LM82/LM83'...           No
Probing for `Maxim MAX6654'...                              No
Probing for `Maxim MAX6690'...                              No
Probing for `Maxim MAX6680/MAX6681'...                      No
Probing for `Maxim MAX6695/MAX6696'...                      No
Probing for `Texas Instruments TMP400'...                   No
Probing for `Texas Instruments AMC6821'...                  No
Probing for `National Semiconductor LM95233'...             No
Probing for `National Semiconductor LM95234'...             No
Probing for `National Semiconductor LM95235'...             No
Probing for `National Semiconductor LM95245'...             No
Probing for `National Semiconductor LM64'...                No
Probing for `SMSC EMC1047'...                               No
Probing for `SMSC EMC1402'...                               No
Probing for `SMSC EMC1403'...                               No
Probing for `SMSC EMC1404'...                               No
Probing for `ST STTS424'...                                 No
Probing for `ST STTS424E'...                                No
Probing for `ST STTS2002'...                                No
Probing for `ST STTS3000'...                                No
Probing for `NXP SE97/SE97B'...                             No
Probing for `NXP SE98'...                                   No
Probing for `Analog Devices ADT7408'...                     No
Probing for `IDT TS3000/TSE2002'...                         No
Probing for `IDT TSE2004'...                                No
Probing for `IDT TS3001'...                                 No
Probing for `Maxim MAX6604'...                              No
Probing for `Microchip MCP9804'...                          No
Probing for `Microchip MCP98242'...                         Success!
    (confidence 5, driver `jc42')
Probing for `Microchip MCP98243'...                         No
Probing for `Microchip MCP98244'...                         No
Probing for `Microchip MCP9843'...                          No
Probing for `ON CAT6095/CAT34TS02'...                       No
Probing for `Atmel AT30TS00'...                             No
Client found at address 0x1b
Probing for `ST STTS424'...                                 No
Probing for `ST STTS424E'...                                No
Probing for `ST STTS2002'...                                No
Probing for `ST STTS3000'...                                No
Probing for `NXP SE97/SE97B'...                             No
Probing for `NXP SE98'...                                   No
Probing for `Analog Devices ADT7408'...                     No
Probing for `IDT TS3000/TSE2002'...                         No
Probing for `IDT TSE2004'...                                No
Probing for `IDT TS3001'...                                 No
Probing for `Maxim MAX6604'...                              No
Probing for `Microchip MCP9804'...                          No
Probing for `Microchip MCP98242'...                         Success!
    (confidence 5, driver `jc42')
Probing for `Microchip MCP98243'...                         No
Probing for `Microchip MCP98244'...                         No
Probing for `Microchip MCP9843'...                          No
Probing for `ON CAT6095/CAT34TS02'...                       No
Probing for `Atmel AT30TS00'...                             No
Client found at address 0x2e
Probing for `Myson MTP008'...                               No
Probing for `National Semiconductor LM78'...                No
Probing for `National Semiconductor LM79'...                No
Probing for `National Semiconductor LM80'...                No
Probing for `National Semiconductor LM96080'...             No
Probing for `TI / National Semiconductor ADC128D818'...     No
Probing for `National Semiconductor LM85'...                No
Probing for `National Semiconductor LM96000 or PC8374L'...  No
Probing for `Analog Devices ADM1027'...                     No
Probing for `Analog Devices ADT7460 or ADT7463'...          No
Probing for `SMSC EMC6D100 or EMC6D101'...                  No
Probing for `SMSC EMC6D102'...                              No
Probing for `SMSC EMC6D103'...                              No
Probing for `SMSC EMC6D103S or EMC2300'...                  No
Probing for `SMSC EMC6W201'...                              No
Probing for `Winbond WPCD377I'...                           No
Probing for `Analog Devices ADT7467 or ADT7468'...          No
Probing for `Analog Devices ADT7470'...                     No
Probing for `Analog Devices ADT7473'...                     No
Probing for `Analog Devices ADT7475'...                     No
Probing for `Analog Devices ADT7476'...                     No
Probing for `Analog Devices ADT7490'...                     No
Probing for `Andigilog aSC7611'...                          No
Probing for `Andigilog aSC7621'...                          No
Probing for `National Semiconductor LM87'...                No
Probing for `Analog Devices ADM1024'...                     No
Probing for `National Semiconductor LM93'...                No
Probing for `National Semiconductor LM94 or LM96194'...     No
Probing for `Winbond W83781D'...                            No
Probing for `Winbond W83782D'...                            No
Probing for `Winbond W83791D'...                            No
Probing for `Winbond W83792D'...                            No
Probing for `Winbond W83793R/G'...                          No
Probing for `Nuvoton W83795G/ADG'...                        No
Probing for `Nuvoton NCT7802Y'...                           No
Probing for `Nuvoton NCT7904D'...                           No
Probing for `Winbond W83627HF'...                           No
Probing for `Winbond W83627EHF'...                          No
Probing for `Winbond W83627DHG/W83667HG/W83677HG'...        No
Probing for `Asus AS99127F (rev.1)'...                      No
Probing for `Asus AS99127F (rev.2)'...                      No
Probing for `Asus ASB100 Bach'...                           No
Probing for `Winbond W83L786NR/NG/R/G'...                   No
Probing for `Winbond W83L785TS-S'...                        No
Probing for `Analog Devices ADM9240'...                     No
Probing for `Dallas Semiconductor DS1780'...                No
Probing for `National Semiconductor LM81'...                No
Probing for `Analog Devices ADM1026'...                     No
Probing for `Analog Devices ADM1025'...                     No
Probing for `Maxim MAX6639'...                              No
Probing for `Texas Instruments AMC6821'...                  No
Probing for `Analog Devices ADM1029'...                     No
Probing for `Analog Devices ADM1030'...                     No
Probing for `Analog Devices ADM1031'...                     No
Probing for `Analog Devices ADM1022'...                     No
Probing for `Texas Instruments THMC50'...                   No
Probing for `Analog Devices ADM1028'...                     No
Probing for `Texas Instruments THMC51'...                   No
Probing for `ITE IT8712F'...                                No
Probing for `SMSC DME1737'...                               No
Probing for `SMSC SCH5027D-NW'...                           No
Probing for `SMSC EMC2103'...                               No
Probing for `Fintek F75373S/SG'...                          No
Probing for `Fintek F75375S/SP'...                          No
Probing for `Fintek F75387SG/RG'...                         No
Probing for `Winbond W83791SD'...                           No
Client found at address 0x50
Handled by driver `eeprom' (already loaded), chip type `eeprom'
    (note: this is probably NOT a sensor chip!)
Client found at address 0x53
Handled by driver `eeprom' (already loaded), chip type `eeprom'
    (note: this is probably NOT a sensor chip!)


Now follows a summary of the probes I have just done.

Driver `jc42':
  * Bus `SMBus I801 adapter at f000'
    Busdriver `i2c_i801', I2C address 0x18
    Chip `Microchip MCP98242' (confidence: 5)
  * Bus `SMBus I801 adapter at f000'
    Busdriver `i2c_i801', I2C address 0x1b
    Chip `Microchip MCP98242' (confidence: 5)

Driver `to-be-written':
  * ISA bus, address 0xca8
    Chip `IPMI BMC KCS' (confidence: 8)

Driver `coretemp':
  * Chip `Intel digital thermal sensor' (confidence: 9)

Driver `i5500_temp':
  * Chip `Intel 5500/5520/X58 thermal sensor' (confidence: 5)

Note: there is no driver for IPMI BMC KCS yet.
Check http://www.lm-sensors.org/wiki/Devices for updates.

Do you want to overwrite /etc/sysconfig/lm_sensors? (YES/no): 

不過我的系統似乎只能看到 CPU 的溫度,其他皆看不到.

[root@localhost ~]# sensors -u
coretemp-isa-0000
Adapter: ISA adapter
Core 0:
  temp2_input: 41.000
  temp2_max: 86.000
  temp2_crit: 102.000
  temp2_crit_alarm: 0.000
Core 1:
  temp3_input: 32.000
  temp3_max: 86.000
  temp3_crit: 102.000
  temp3_crit_alarm: 0.000
Core 9:
  temp11_input: 41.000
  temp11_max: 86.000
  temp11_crit: 102.000
  temp11_crit_alarm: 0.000
Core 10:
  temp12_input: 39.000
  temp12_max: 86.000
  temp12_crit: 102.000
  temp12_crit_alarm: 0.000

coretemp-isa-0001
Adapter: ISA adapter
Core 0:
  temp2_input: 40.000
  temp2_max: 86.000
  temp2_crit: 102.000
  temp2_crit_alarm: 0.000
Core 1:
  temp3_input: 37.000
  temp3_max: 86.000
  temp3_crit: 102.000
  temp3_crit_alarm: 0.000
Core 9:
  temp11_input: 46.000
  temp11_max: 86.000
  temp11_crit: 102.000
  temp11_crit_alarm: 0.000
Core 10:
  temp12_input: 43.000
  temp12_max: 86.000
  temp12_crit: 102.000
  temp12_crit_alarm: 0.000

還有另外一個套件 I2C tools, 這套件包含了 a bus probing tool, a chip dumper, register-level SMBus access helpers, EEPROM decoding scripts, EEPROM programming tools, 以及 a python module for SMBus access 一樣可以針對 I²C / smbus 上的 溫度,電壓,濕度和風扇 裝置感應器 (sensors) 來做較簡易的監控.

使用請參考
Linux command i2c-dev – http://benjr.tw/93915
Temperature sensor with integrated SPD – http://benjr.tw/93901

LMbench Memory 測試 – bw_mmap_rd

$
0
0

LMbench 是用來測試系統效能的工具.關於安裝與測試種類請參考 http://benjr.tw/98076

測試環境為 Ubuntu 16.04 x86_64 (VMware 虛擬機) ,這邊來討論 LMBench 有關於 Memory 記憶體的測試項目.

安裝完成的 LMbench 程式目錄位於 /usr/lib/lmbench/bin/x86_64-linux-gnu/

root@ubuntu:~# cd /usr/lib/lmbench/bin/x86_64-linux-gnu/

bw_mmap_rd

這邊主要在測試 memory 到 檔案 (硬碟) 之間的讀取速度.

Usage: ./bw_mmap_rd [-C] [-P <parallelism>] [-W <warmup>] [-N <repetitions>] <size> open2close | mmap_only <filename>

參數使用:

  • -P : 4 (0~4) 5個 bw_mmap_rd 同時跑,可以透過 # ps -aux | grep -i bw_mmap_rd 來觀察.
  • -W : 等待時間,單位??
  • -N : 測試重覆 8 次.
  • open2close | mmap_only : 測試方式有兩種 open2close 與 mmap_only ,但沒有查到其代表的意思.

在測試之前需要建立一個大小相等的檔案,可以透過 dd 來建立.

root@ubuntu:/usr/lib/lmbench/bin/x86_64-linux-gnu# dd if=/dev/zero of=/root/1M bs=1M count=1
root@ubuntu:/usr/lib/lmbench/bin/x86_64-linux-gnu# ./bw_mmap_rd 1M open2close /root/1M
1.00 10501.54
root@ubuntu:/usr/lib/lmbench/bin/x86_64-linux-gnu# ./bw_mmap_rd 1M mmap_only /root/1M
1.00 22136.85

測試輸出格式為 “%0.2f %.2f\n”, megabytes, megabytes_per_second .
結果為:
megabytes = 1.00 ,每次處理 1M 的資料.
megabytes_per_second = 22136.85 MB/s ,每次處理 1M 的資料,每秒可以處理 22136.85 MB.

NUMA

如果你的系統架構是 NUMA (Non-uniform memory access),還可以使用 #numacl 來限制要使用哪一顆處理器或是記憶體執行測試程式.關於 NUMA 請參考 http://benjr.tw/96788

bw_mmap_rd 來進行測試時,限制 MEM (–membind=0), CPU (–cpunodebind=0) ,我的系統是虛擬機,所以看不出差別.

root@ubuntu:~# numactl --membind=0 --cpunodebind=0 ./bw_mmap_rd 1M open2close /root/1M
1.00 10501.54

LMbench Memory 測試 – lat_mem_rd

$
0
0

LMbench 是用來測試系統效能的工具.關於安裝與測試種類請參考 http://benjr.tw/98076

測試環境為 Ubuntu 16.04 x86_64 (VMware 虛擬機) ,這邊來討論 LMBench 有關於 Memory 記憶體的測試項目.

安裝完成的 LMbench 程式目錄位於 /usr/lib/lmbench/bin/x86_64-linux-gnu/

root@ubuntu:~# cd /usr/lib/lmbench/bin/x86_64-linux-gnu/

lat_mem_rd

主要在測試 CPU 與 memory 之間的讀取延遲 (latency).

Usage: at_mem_rd  [ -P <parallelism> ] [ -W <warmups> ] [ -N <repetitions> ] size_in_megabytes stride [ stride stride...  ]

參數使用:

  • -P : 4 (0~4) 5個 lat_mem_rd 同時跑,可以透過 # ps -aux | grep -i lat_mem_rd 來觀察.
  • -W : 等待時間,單位??
  • -N : 測試重覆 8 次.
  • stride : 預設值為 64 ,改變記憶體大小和 stride (不懂) 來進行 memory 讀取延遲測試.
    The benchmark runs as two nested loops. The outer loop is the stride size. The inner loop is the array size.
    p = (char **)*p;
    

在測試前先透過 #lscpu 看一下 CPU 的 Cache 大小.

root@ubuntu:~# lscpu |grep -i cache
L1d cache:             32K
L1i cache:             32K
L2 cache:              256K
L3 cache:              3072K
root@ubuntu:/usr/lib/lmbench/bin/x86_64-linux-gnu# ./lat_mem_rd 8 64
"stride=64
0.00049 1.201
0.00098 1.201
0.00195 1.201
0.00293 1.201
0.00391 1.201
0.00586 1.201
0.00781 1.201
0.01172 1.201
0.01562 1.201
0.02344 1.201
0.03125 1.201
0.04688 3.609
0.06250 3.609
0.09375 3.616
0.12500 3.616
0.18750 3.616
0.25000 3.616
0.37500 3.616
0.50000 3.616
0.75000 3.616
1.00000 3.615
1.50000 3.613
2.00000 3.617
3.00000 5.059
4.00000 7.533
6.00000 7.801
8.00000 7.843

測試輸出格式為: array size (M) & latency (nanoseconds)

L1 cache 32k 瓶頸一:
可以看到 0.03125M (31.25K) 之後的 延遲 (latency) 突然升高到 1.201 -> 3.609 ,因為到達我系統的 L1 cache 32k 大小上限了.
L2 cache 3M 瓶頸二:
接下來的另一個瓶頸是 2M 的 3.617 到了 3M 時延遲突然變大成為 5.059,因為到達我系統的 L2 cache 3M 大小上限了.

NUMA

如果你的系統架構是 NUMA (Non-uniform memory access),還可以使用 #numacl 來限制要使用哪一顆處理器或是記憶體執行測試程式.關於 NUMA 請參考 http://benjr.tw/96788

lat_mem_rd 來進行測試時,限制 MEM (–membind=0), CPU (–cpunodebind=0) ,我的系統是虛擬機,所以看不出差別.

root@ubuntu:~# numactl --membind=0 --cpunodebind=0 ./lat_mem_rd 8 64
"stride=64
0.00049 1.201
0.00098 1.201
0.00195 1.201
0.00293 1.201
0.00391 1.201
0.00586 1.201
0.00781 1.201
0.01172 1.201
0.01562 1.201
0.02344 1.201
0.03125 1.201
0.04688 3.609
0.06250 3.609
0.09375 3.616
0.12500 3.616
0.18750 3.616
0.25000 3.616
0.37500 3.616
0.50000 3.616
0.75000 3.616
1.00000 3.615
1.50000 3.613
2.00000 3.617
3.00000 5.059
4.00000 7.533
6.00000 7.801
8.00000 7.843

Linux command –檢視 CPU 資訊

$
0
0

測試環境為 Ubuntu 16.04 x86_64 .

在 Linux 下,幾個常用來檢視 CPU 資訊的指令.

/proc/cpuinfo

直接看 /proc/ 是最簡單,最快的方式.

root@ubuntu:~# cat /proc/cpuinfo 
processor	: 0
vendor_id	: GenuineIntel
cpu family	: 6
model		: 23
model name	: Intel(R) Xeon(R) CPU           X3320  @ 2.50GHz
stepping	: 10
microcode	: 0xa07
cpu MHz		: 2500.000
cache size	: 3072 KB
physical id	: 0
siblings	: 4
core id		: 0
cpu cores	: 4
apicid		: 0
initial apicid	: 0
fpu		: yes
fpu_exception	: yes
cpuid level	: 13
wp		: yes
flags		: fpu vme de pse tsc msr pae mce cx8 apic sep mtrr pge mca cmov pat pse36 clflush dts acpi mmx fxsr sse sse2 ss ht tm pbe syscall nx lm constant_tsc arch_perfmon pebs bts rep_good nopl aperfmperf pni dtes64 monitor ds_cpl vmx smx est tm2 ssse3 cx16 xtpr pdcm sse4_1 xsave lahf_lm tpr_shadow vnmi flexpriority dtherm
bugs		:
bogomips	: 5000.30
clflush size	: 64
cache_alignment	: 64
address sizes	: 36 bits physical, 48 bits virtual
power management:
...

dmidecode

透過 dmidecode 來查看存放在 SMBIOS 的 Flash Rom 空間中儲存的硬體資訊.

root@ubuntu:~# dmidecode -t processor
# dmidecode 3.0
Getting SMBIOS data from sysfs.
SMBIOS 2.5 present.

Handle 0x0004, DMI type 4, 40 bytes
Processor Information
	Socket Designation: LGA 775
	Type: Central Processor
	Family: Xeon
	Manufacturer: Intel
	ID: 7A 06 01 00 FF FB EB BF
	Signature: Type 0, Family 6, Model 23, Stepping 10
	Flags:
		FPU (Floating-point unit on-chip)
		VME (Virtual mode extension)
		DE (Debugging extension)
		PSE (Page size extension)
		TSC (Time stamp counter)
		MSR (Model specific registers)
		PAE (Physical address extension)
		MCE (Machine check exception)
		CX8 (CMPXCHG8 instruction supported)
		APIC (On-chip APIC hardware supported)
		SEP (Fast system call)
		MTRR (Memory type range registers)
		PGE (Page global enable)
		MCA (Machine check architecture)
		CMOV (Conditional move instruction supported)
		PAT (Page attribute table)
		PSE-36 (36-bit page size extension)
		CLFSH (CLFLUSH instruction supported)
		DS (Debug store)
		ACPI (ACPI supported)
		MMX (MMX technology supported)
		FXSR (FXSAVE and FXSTOR instructions supported)
		SSE (Streaming SIMD extensions)
		SSE2 (Streaming SIMD extensions 2)
		SS (Self-snoop)
		HTT (Multi-threading)
		TM (Thermal monitor supported)
		PBE (Pending break enabled)
	Version: Intel(R) Xeon(R) CPU           X3320  @ 2.50GHz
	Voltage: 1.2 V
	External Clock: 333 MHz
	Max Speed: 3300 MHz
	Current Speed: 2500 MHz
	Status: Populated, Enabled
	Upgrade: Socket LGA775
	L1 Cache Handle: 0x0005
	L2 Cache Handle: 0x0006
	L3 Cache Handle: Not Provided
	Serial Number: None
	Asset Tag: No Asset Tag
	Part Number: None
	Core Count: 4
	Core Enabled: 4
	Thread Count: 4
	Characteristics:
		64-bit capable
root@ubuntu:~# dmidecode -t cache
# dmidecode 3.0
Getting SMBIOS data from sysfs.
SMBIOS 2.5 present.

Handle 0x0005, DMI type 7, 19 bytes
Cache Information
	Socket Designation: L1 Cache
	Configuration: Enabled, Socketed, Level 1
	Operational Mode: Write Back
	Location: Internal
	Installed Size: 64 kB
	Maximum Size: 64 kB
	Supported SRAM Types:
		Burst
		Pipeline Burst
		Asynchronous
	Installed SRAM Type: Burst
	Speed: Unknown
	Error Correction Type: Unknown
	System Type: Unknown
	Associativity: Unknown

Handle 0x0006, DMI type 7, 19 bytes
Cache Information
	Socket Designation: L2 Cache
	Configuration: Enabled, Socketed, Level 2
	Operational Mode: Write Back
	Location: Internal
	Installed Size: 6144 kB
	Maximum Size: 6144 kB
	Supported SRAM Types:
		Burst
		Pipeline Burst
		Asynchronous
	Installed SRAM Type: Burst
	Speed: Unknown
	Error Correction Type: Unknown
	System Type: Unknown
	Associativity: Unknown

lscpu

也可以直接透過 lscpu 指令來查詢.

root@ubuntu:~# lscpu 
Architecture:          x86_64
CPU op-mode(s):        32-bit, 64-bit
Byte Order:            Little Endian
CPU(s):                4
On-line CPU(s) list:   0-3
Thread(s) per core:    1
Core(s) per socket:    4
Socket(s):             1
NUMA node(s):          1
Vendor ID:             GenuineIntel
CPU family:            6
Model:                 23
Model name:            Intel(R) Xeon(R) CPU           X3320  @ 2.50GHz
Stepping:              10
CPU MHz:               2500.000
CPU max MHz:           2500.0000
CPU min MHz:           2000.0000
BogoMIPS:              5000.30
Virtualization:        VT-x
L1d cache:             32K
L1i cache:             32K
L2 cache:              3072K
NUMA node0 CPU(s):     0-3
Flags:                 fpu vme de pse tsc msr pae mce cx8 apic sep mtrr pge mca cmov pat pse36 clflush dts acpi mmx fxsr sse sse2 ss ht tm pbe syscall nx lm constant_tsc arch_perfmon pebs bts rep_good nopl aperfmperf pni dtes64 monitor ds_cpl vmx smx est tm2 ssse3 cx16 xtpr pdcm sse4_1 xsave lahf_lm tpr_shadow vnmi flexpriority dtherm

LMbench Memory 測試 – lat_mmap

$
0
0

LMbench 是用來測試系統效能的工具.關於安裝與測試種類請參考 http://benjr.tw/98076

測試環境為 Ubuntu 16.04 x86_64 (VMware 虛擬機) ,這邊來討論 LMBench 有關於 Memory 記憶體的測試項目.

安裝完成的 LMbench 程式目錄位於 /usr/lib/lmbench/bin/x86_64-linux-gnu/

root@ubuntu:~# cd /usr/lib/lmbench/bin/x86_64-linux-gnu/

lat_mmap

這邊主要在測試 memory 到 檔案 (硬碟) 之間的延遲 (latency)..

Usage: ./lat_mmap [-r] [-C] [-P <parallelism>] [-W <warmup>] [-N <repetitions>] size file
  • -P : 4 (0~4) 5個 lat_mmap 同時跑,可以透過 # ps -aux | grep -i lat_mmap 來觀察.
  • -W : 等待時間,單位??
  • -N : 測試重覆 8 次.

在測試之前需要建立一個大小相等的檔案,可以透過 dd 來建立.

root@ubuntu:/usr/lib/lmbench/bin/x86_64-linux-gnu# dd if=/dev/zero of=/root/1M bs=1M count=1
root@ubuntu:/usr/lib/lmbench/bin/x86_64-linux-gnu# ./lat_mmap 1M /root/1M
1.000000 11

測試輸出格式為 “%0.2f %d\n”, megabytes, usecs.
結果為 1.000000 megabytes, 延遲 (latency) 11 usecs (u : micro 10的-6次方 ).

NUMA

如果你的系統架構是 NUMA (Non-uniform memory access),還可以使用 #numacl 來限制要使用哪一顆處理器或是記憶體執行測試程式.關於 NUMA 請參考 http://benjr.tw/96788

lat_mmap 來進行測試時,限制 MEM (–membind=0), CPU (–cpunodebind=0) ,我的系統是虛擬機,所以看不出差別.

root@ubuntu:~# numactl --membind=0 --cpunodebind=0 ./lat_mmap 1M /root/1M
1.000000 11

LMbench Memory 測試 – stream

$
0
0

LMbench 是用來測試系統效能的工具.關於安裝與測試種類請參考 http://benjr.tw/98076

測試環境為 Ubuntu 16.04 x86_64 (VMware 虛擬機) ,這邊來討論 LMBench 有關於 Memory 記憶體的測試項目.

安裝完成的 LMbench 程式目錄位於 /usr/lib/lmbench/bin/x86_64-linux-gnu/

root@ubuntu:~# cd /usr/lib/lmbench/bin/x86_64-linux-gnu/

stream

John McCalpin’s stream benchmark.記憶體的效能檢測.

Usage: stream [ -M <len> [K|M] ] [-P <parallelism>] [ -W <warmups> ] [ -N <repetitions> ]
  • -M [K|M] : ??
  • -P : 4 (0~4) 5個 stream 同時跑,可以透過 # ps -aux | grep -i stream 來觀察.
  • -W : 等待時間,單位??
  • -N : 測試重覆 8 次.
root@ubuntu:/usr/lib/lmbench/bin/x86_64-linux-gnu# ./stream
STREAM copy latency: 2.46 nanoseconds
STREAM copy bandwidth: 6501.42 MB/sec
STREAM scale latency: 1.42 nanoseconds
STREAM scale bandwidth: 11230.04 MB/sec
STREAM add latency: 1.99 nanoseconds
STREAM add bandwidth: 12034.10 MB/sec
STREAM triad latency: 1.91 nanoseconds
STREAM triad bandwidth: 12534.82 MB/sec

NUMA

如果你的系統架構是 NUMA (Non-uniform memory access),還可以使用 #numacl 來限制要使用哪一顆處理器或是記憶體執行測試程式.關於 NUMA 請參考 http://benjr.tw/96788

stream 來進行測試時,限制 MEM (–membind=0), CPU (–cpunodebind=0) ,我的系統是虛擬機,所以看不出差別.

root@ubuntu:~# numactl --membind=0 --cpunodebind=0 ./stream
0.016384 40576.03

Linux command – hwloc

$
0
0

Linux 系統下要看 PCI-E 裝置,可以透過 #lspci (list all PCI devices) 來查看 PCI-(E) Bus 的系統硬體相關訊息的指令,請參考 http://benjr.tw/10851

如果是 CPU 可以透過指令 #lscpu (display information about the CPU architecture) 來檢視與 CPU 相關訊息,請參考 http://benjr.tw/98347 .

如果只是要簡單查看一下系統的架構圖,可以利用這幾個指令 lstopo(圖形介面), lstopo-no-graphics(文字介面), hwloc-ls(文字介面) .

測試環境為 Ubuntu 16.04 x86_64 (VMware 虛擬機) .

root@ubuntu:~# apt install hwloc
root@ubuntu:~# lstopo

測試環境為 CentOS 6

[root@localhost ~]# yum -y instal hwloc

測試環境為 CentOS 7 to install

[root@localhost ~]# yum -y install hwlock hwlock-gui

在 CentOS 7 下,lstopo 包在另外一個套件 hwlock-gui 裡面.

[root@localhost ~]# lstopo

hwloc 不只提供 lstopo(圖形介面), lstopo-no-graphics(文字介面), hwloc-ls(文字介面) ,還有下面幾個指令.

  • hwloc-annotate
  • hwloc-compress-dir
  • hwloc-gather-topology
  • hwloc-assembler
  • hwloc-diff
  • hwloc-info
  • hwloc-assembler-remote
  • hwloc-distances
  • hwloc-ls
  • hwloc-bind
  • hwloc-distrib
  • hwloc-patch
  • hwloc-calc
  • hwloc-dump-hwdata
  • hwloc-ps

lmbench – lmdd

$
0
0

LMbench 是用來測試系統效能的工具.關於安裝與測試種類請參考 http://benjr.tw/98076

測試環境為 Ubuntu 16.04 x86_64 (VMware 虛擬機) .

安裝完成的 LMbench 程式目錄位於 /usr/lib/lmbench/bin/x86_64-linux-gnu/

root@ubuntu:~# cd /usr/lib/lmbench/bin/x86_64-linux-gnu/

lmdd 其實很類似 dd 用來測試硬碟速度的方法.先來回顧一下怎麼利用 dd 來測試硬碟的速度.

dd

測試硬碟讀(READ)速度

root@ubuntu:~# dd if=/dev/sdb of=/dev/null bs=1M count=2048 & sync
2048+0 records in
2048+0 records out
2147483648 bytes (2.1 GB, 2.0 GiB) copied, 24.166 s, 88.9 MB/s

上面的意思為 1M Bytes 的資料傳送 2048 次( 1M * 2048 = 2048M )需要 24.166 sec.所以 2048M / 24.166 Sec 為每一秒硬碟傳送了 88.9 M Bytes (感覺使用 1000 為單位 ,非 1024)資料量.

測試硬碟寫(WRITE)速度

root@ubuntu:~# dd if=/dev/zero of=/dev/sdb bs=1M count=2048
2048+0 records in
2048+0 records out
2147483648 bytes (2.1 GB, 2.0 GiB) copied, 24.3657 s, 88.1 MB/s

讀跟寫就差在 if 和 of 不同.

lmdd

測試硬碟讀(READ)速度

root@ubuntu:/usr/lib/lmbench/bin/x86_64-linux-gnu# ./lmdd if=/dev/sdb of=/dev/null bs=1M count=2048
2048.0000 MB in 22.9274 secs, 89.3255 MB/sec

上面的意思為 1M Bytes 的資料傳送 2048 次( 1M * 2048 = 2048M )需要 22.9274 sec.所以 2048M / 22.9274 Sec 為每一秒硬碟傳送了 89.3255 M Bytes 資料量.

測試硬碟寫(WRITE)速度

root@ubuntu:/usr/lib/lmbench/bin/x86_64-linux-gnu# ./lmdd if=/dev/zero of=/dev/sdb bs=1M count=2048
2048.0000 MB in 33.0307 secs, 62.0028 MB/sec

lspci 詳細資訊

$
0
0

指令 lspci 可以看到很多關於 PCI-E 裝置的訊息,但這些訊息個代表什麼意思!!

測試環境為 CentOS7 x86_64

下面這一張是 Intel Corporation 82575EB Gigabit 網卡.

[root@localhost ~]$ lspci -s 02:03.0 -vvv
  • 卡的基本訊息
    其中的 + – 代表有沒有被啟動或是發生.
    01:00.0 Ethernet controller: Intel Corporation 82575EB Gigabit Network Connection (rev 02)	
    
    Control: I/O+ Mem+ BusMaster+ SpecCycle- MemWINV- VGASnoop- ParErr- Stepping- SERR- FastB2B- DisINTx+
    Status: Cap+ 66MHz- UDF- FastB2B- ParErr- DEVSEL=fast >TAbort- <TAbort- <MAbort- >SERR- <PERR- INTx-
    Latency: 0, Cache Line Size: 64 bytes
    Interrupt: pin A routed to IRQ 16
    Region 0: Memory at fbba0000 (32-bit, non-prefetchable) [size=128K]
    Region 1: Memory at fbb80000 (32-bit, non-prefetchable) [size=128K]
    Region 2: I/O ports at e020 [size=32]
    Region 3: Memory at fbbc4000 (32-bit, non-prefetchable) [size=16K]
    Expansion ROM at fbb60000 [disabled] [size=128K]
    
  • Power Management
    與 PCI-E 裝置相關的電源管理.
    Capabilities: [40] Power Management version 2
            Flags: PMEClk- DSI+ D1- D2- AuxCurrent=0mA PME(D0+,D1-,D2-,D3hot+,D3cold+)
            Status: D0 NoSoftRst- PME-Enable- DSel=0 DScale=1 PME-
    

    主要可以看一下 PME(D0+,D1-,D2-,D3hot+,D3cold+) power management event 的狀態,+ 代表有被啟動, – 代表沒有被啟動.
    D0 有 Uninitialized 與 Active 兩種狀態.
    D1 為 Light Sleep 狀態.
    D2 為 Deep Sleep 狀態.
    D3 為 Full Off 狀態, 還可以分成為 D3cold 與 D3hot 兩種狀態.

  • Message Signaled Interrupts
    有分兩種 MSI 與 MSI-X .
    Capabilities: [50] MSI: Enable- Count=1/1 Maskable- 64bit+
            Address: 0000000000000000  Data: 0000
    Capabilities: [60] MSI-X: Enable+ Count=10 Masked-
            Vector table: BAR=3 offset=00000000
            PBA: BAR=3 offset=00002000
    

    MSI 是 PCI Express 中斷產生的方式,採用 in-band (控制訊號與資料同線路) 的方式,取代舊有的 out-of-band 的方式.
    MSI (PCI 2.2 開始採用) 支援 1, 2, 4, 8, 16 或 32 中斷上限.
    MSI-X (PCI 3.0 開始採用) 支援 2048 中斷上限.

  • Express Endpoint
    Capabilities: [a0] Express (v2) Endpoint, MSI 00
            DevCap: MaxPayload 256 bytes, PhantFunc 0, Latency L0s <512ns, L1 <64us
                    ExtTag- AttnBtn- AttnInd- PwrInd- RBE+ FLReset- SlotPowerLimit 0.000W
            DevCtl: Report errors: Correctable+ Non-Fatal+ Fatal+ Unsupported+
                    RlxdOrd- ExtTag- PhantFunc- AuxPwr- NoSnoop-
                    MaxPayload 256 bytes, MaxReadReq 128 bytes
            DevSta: CorrErr+ UncorrErr- FatalErr- UnsuppReq+ AuxPwr+ TransPend-
            LnkCap: Port #0, Speed 2.5GT/s, Width x4, ASPM L0s L1, Exit Latency L0s <4us, L1 <64us
                    ClockPM- Surprise- LLActRep- BwNot- ASPMOptComp-
            LnkCtl: ASPM Disabled; RCB 64 bytes Disabled- CommClk+
                    ExtSynch- ClockPM- AutWidDis- BWInt- AutBWInt-
            LnkSta: Speed 2.5GT/s, Width x4, TrErr- Train- SlotClk+ DLActive- BWMgmt- ABWMgmt-
            DevCap2: Completion Timeout: Range ABCD, TimeoutDis+, LTR-, OBFF Not Supported
            DevCtl2: Completion Timeout: 16ms to 55ms, TimeoutDis-, LTR-, OBFF Disabled
            LnkCtl2: Target Link Speed: 2.5GT/s, EnterCompliance- SpeedDis-
                     Transmit Margin: Normal Operating Range, EnterModifiedCompliance- ComplianceSOS-
                     Compliance De-emphasis: -6dB
            LnkSta2: Current De-emphasis Level: -6dB, EqualizationComplete-, EqualizationPhase1-
                     EqualizationPhase2-, EqualizationPhase3-, LinkEqualizationRequest-
    

    DevCap: Device Capabilities
    其中的 MaxPayload 代表 PCIe 封包最大有效負載量,類似網路設定的 MTU.
    DevCtl: Device Control
    Report errors 表示哪一些錯誤需要被報告 + 代表有需要, – 代表沒有需要.詳細還需要看下面的 Advanced Error Reporting.
    其中的 MaxReadReq (PCIe Max Read Request) 代表 PCIe 讀取請求允許的上限值.
    DevSta: Device State
    目前裝置狀態,有沒有錯誤發生.

    LnkCap: Link capability
    系統能提供的最高頻寬 PCI-Express 1.0 ( 2.5G ) Width x4=10G .
    LnkCtl: Link Control
    裡面的 ASPM 為 PCI Express Active State Power Management ,disabled 代表沒有使用 power savings.
    LnkSta: Link State
    目前該PCI-E 裝置跑的速度 PCI-Express 1.0 ( 2.5G ) Width x1=2.5G,

    DevCap2: 其他與 Device Capabilities 相關的訊息.
    DevCtl2: 其他與 Device Control 相關的訊息.
    LnkCtl2: 其他與 Link Control 相關的訊息.
    LnkSta2: 其他與 Link State 相關的訊息.

  • Advanced Error Reporting
    PCI Express 錯誤信號可能發生在 PCI Express 鏈路本身或在鏈路上啟動時.
    PCI Express 定義兩個錯誤報告: 1. 基本(baseline) 和高級(Advanced) 錯誤報告 (Error Reporting) 功能.
    Capabilities: [100 v1] Advanced Error Reporting
            UESta: DLP- SDES- TLP- FCP- CmpltTO- CmpltAbrt- UnxCmplt- RxOF- MalfTLP- ECRC- UnsupReq- ACSViol-
            UEMsk: DLP- SDES- TLP- FCP- CmpltTO- CmpltAbrt- UnxCmplt- RxOF- MalfTLP- ECRC- UnsupReq- ACSViol-
            UESvrt: DLP+ SDES- TLP- FCP+ CmpltTO- CmpltAbrt- UnxCmplt- RxOF+ MalfTLP+ ECRC- UnsupReq- ACSViol-
            CESta: RxErr- BadTLP- BadDLLP- Rollover- Timeout- NonFatalErr+
            CEMsk: RxErr- BadTLP- BadDLLP- Rollover- Timeout- NonFatalErr+
            AERCap: First Error Pointer: 00, GenCap- CGenEn- ChkCap- ChkEn-
    

    UESta: UN-correctable Error State
    UEMsk: UN-correctable Error Mask
    UESvrt: UN-correctable Error ?
    CESta: Correctable Error State
    CEMsk: Correctable Error Mask
    AERCap: AER Capabilities

  • 其他訊息
    Capabilities: [140 v1] Device Serial Number 90-fb-a6-ff-ff-76-38-00
    Kernel driver in use: igb
    Kernel modules: igb
    

Container & Docker

$
0
0

關於 Virtualization 虛擬化類別請參考 http://benjr.tw/3383

Container

Container 採用與 KVM 一樣的做法 (Linux 核心加入 KVM 再讓這 Linux 核心當作 VMM ,在 KVM 下的 Guest OS 對於 Linux 核心而言都只是一個 Process 行程). LXC 採用類似的方式在原作業系統中透過資源共享的方式,建立出一個獨立空間 (虛擬環境,有自己的 file system, process 與 block I/O ,network 空間) 給另外一個作業系統來使用,這邊不再稱它為虛擬機器 Virtual Machine 而是叫做 Container.

  1. Chroot & Schroot – http://benjr.tw/95942
  2. LXC (Linux Containers) 基礎介紹 – http://benjr.tw/95955
  3. LXC (Linux Containers) 的使用 – http://benjr.tw/93708
  4. LXC 的網路架構 – http://benjr.tw/96074

Docker

我們先來了解一下關於 Docker 基本的三個觀念. 容器 (Container) , 映像檔 (Image) , 倉庫 (Repository) .

  • 容器 (Container)
    在原作業系統中透過資源共享的方式,建立出一個獨立空間 (虛擬環境,有自己的 file system, process 與 block I/O ,network 空間) 給另外一個作業系統來使用,聽起來很像是虛擬機器 Virtual Machine 但方式不一樣,名稱也不太一樣,這樣的方式叫做 Container.
  • 映像檔 (Image)
    Container 是一個容器,我們需要將作業環境放到這一個容器,最快的方式就是透過網路下載別人已經做好的作業環境 (唯讀映像檔) 來使用,當然也是可以自己建立.因為這是一個唯讀的映像檔,所以容器啟動的時候還會提供資料可以寫入的一層地方.
  • 倉庫 (Repository)
    倉庫是用來存放映像檔的地方,預設會到 Docker Hub https://hub.docker.com 這個倉庫來找.
  1. Linux Docker 基礎介紹 – http://benjr.tw/95998
  2. Docker 的網路架構 – http://benjr.tw/96629
  3. 使用 Docker 的技術來架設 web server (Nginx) – http://benjr.tw/96590

那 Docker 是什麼? Docker 與 Container 的關聯是? 如下圖所示.
docker01

使用 Docker 用來管理 Container 可以讓 Container 的環境更為完善.

CoreOS

Container/Docker 是輕量級的虛擬化技術,而 CoreOS 是針對 Container/Docker 基於 Linux 內核所開發出來的輕量級作業系統,他提供了 Docker 所需要的基礎功能並可在叢集環境下運作.

  1. 安裝 CoreOS 無設定檔 http://benjr.tw/95959
  2. CoreOS 設定檔 http://benjr.tw/96511
  3. 關於 Hostname 設定檔的使用 – http://benjr.tw/96518
  4. 關於 ssh_authorized_keys 設定檔的使用 – http://benjr.tw/96318
  5. 關於 units 設定與使用方式 – http://benjr.tw/96332
  6. 關於 Network 設定與使用方式 – http://benjr.tw/96370

CoreOS 主要的服務

  1. ETCD2 (Service Discovery)
    etcd 是一種分散式的 key/value 儲存方式 (至少要有三個 node ,會把資料複製三份到個別的 node 作儲存,以確保資料的可靠度),不同於傳統的關聯式資料庫系統 (傳統的關聯式資料庫基本上就是一堆 tables),etc2 採用的是 key / value Stores 儲存,資料就只有 key / value Stores 採用 雜湊表 (Hash table) 是根據鍵 (Key) 來查詢 (noSQL 的方式) 存儲的資料結構.
  2. Container , Docker
    Container 與 Docker 設定與使用方式 – http://benjr.tw/96566
  3. Fleet (Cluster Management)
    Container 他是輕量級的虛擬化軟體,透過資源共享的方式,可以快速建立出一個獨立空間 (虛擬環境,有自己的 file system, process 與 block I/O ,network 空間) 給另外一個作業系統來使用,透過 Docker 的基本三元素. 容器 (Container) , 映像檔 (Image) , 倉庫 (Repository) .讓我們更方便管理 Container 的環境,但是要能做到 方便大量,分散式的 部署與管理,這時候就要透過 Fleet 來協助.

    關於 fleet 設定與使用方式 – http://benjr.tw/96502

  4. Flannel
    Container 網路要對外時需要設定 port-mapping 或是將網路設定成不同的模式,這時可以使用 flannel (SDN : Software Define Network) 來讓不同的 Host (CoreOS) 的 Container 之間透過虛擬網路來溝通.

    關於 Flannel 設定與使用方式 – http://benjr.tw/96562

Viewing all 145 articles
Browse latest View live


Latest Images