Quantcast
Channel: Hardware – Benjr.tw
Viewing all 145 articles
Browse latest View live

IPV6 NFS

$
0
0

在還沒有開始 IPv6 NFS Server 前,先來看看 IPv6 的 IP Address 是怎麼運作的.

一般網卡在啟動時就會指派一組 IPV6 link-local address,而這 link-local address 是唯一的而且是依據網卡的 MAC Address 而有所變動

比如 :
MAC Address – 00:1A:64:22:04:83
link-local address – fe80::21a:64ff:fe22:483
IPV6 長度為 128bits 而 MAC 長度為 48bits 要怎麼轉換呢!!

首先 MAC Address 的第五位元組與第四位元組插入 FF:FE
原 MAC Address 第6位元組的第二個 bit 從原來的 “0″轉成 “1″,所以 00 -> 02
前面再填入 fe80:0000:0000:0000
fe80:0000:0000:0000:021a:64ff:fe22:0483
寫這麼多 0 一定會寫錯,所以有簡寫的規則,規則如下:

每 32Bit 如開頭之4bit表示為0,即可省略,若32Bit全為0,則可簡寫為0
若連續完整之32Bit段落皆為 0000,則可全省略,簡寫為::,但以一次為限

最後簡寫成為 : fe80::21a:64ff:fe22:483

實驗環境在 Ubuntu 14.04 Desktop ,預設是沒有安裝 NFS Server 與 showmount 等工具

# sudo apt-get install nfs-kernel-server
# sudo apt-get install nfs-common

NFS Server IPv6 addr: fe80::a00:27ff:fee1:66c1/64
Client IPv6 addr: fe80::a00:27ff:fe64:cc37/64
NFS_IPv601
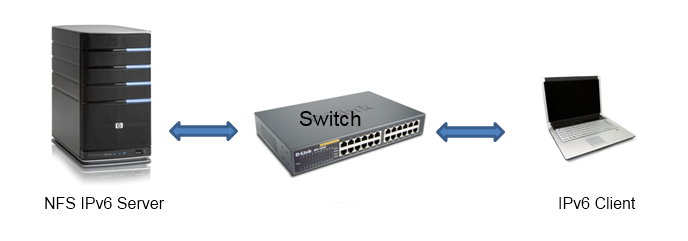
先確定一下 ping , iptables , ip route 這幾件事情都沒有問題.

# ping6 fe80::a00:27ff:fee1:66c1%eth0
# ping6 fe80::a00:27ff:fe64:cc37%eth0
# ip6tables -L
# ip -6 route show
  • NFS Server IPv6: inet6 addr: fe80::a00:27ff:fee1:66c1/64
    設定的方式也跟 IPv4 一樣,不過要改成 IPv6 的 IP 位址.
    # vi /etc/exports
    # /etc/exports: the access control list for filesystems which may be exported
    #               to NFS clients.  See exports(5).
    #
    # Example for NFSv2 and NFSv3:
    # /srv/homes       hostname1(rw,sync,no_subtree_check) hostname2(ro,sync,no_subtree_check)
    #
    # Example for NFSv4:
    # /srv/nfs4        gss/krb5i(rw,sync,fsid=0,crossmnt,no_subtree_check)
    # /srv/nfs4/homes  gss/krb5i(rw,sync,no_subtree_check)
    #
    /var/ftp/ fe80::a00:27ff:fee1:66c1/64(rw,async,no_root_squash,no_subtree_check)
    
    
    # /etc/init.d/nfs-kernel-server restart
     * Stopping NFS kernel daemon                                            [ OK ]
     * Unexporting directories for NFS kernel daemon...                      [ OK ]
     * Exporting directories for NFS kernel daemon...                        [ OK ]
     * Starting NFS kernel daemon    
    

    fe80::a00:27ff:fee1:66c1/64 Network ID為64bits ,只要是 fe80:0000:0000:0000 開頭的 Clients 都可以使用.

  • Client IPv6: inet6 addr: fe80::a00:27ff:fe64:cc37/64
    要掛載的方式也一樣,不過要改成 IPv6 的 IP 位址
    # showmount -e fe80::a00:27ff:fee1:66c1
    Export list for fe80::a00:27ff:fee1:66c1:
    /var/ftp fe80::a00:27ff:fee1:66c1/64
    # mount -t nfs [fe80::a00:27ff:fee1:66c1]:/var/ftp /mnt
    mount.nfs: mount system call failed
    # mount -t nfs4 [fe80::a00:27ff:fee1:66c1]:/var/ftp /mnt
    mount.nfs4: mount system call failed
    # mount -t nfs4 '[fe80::a00:27ff:fee1:66c1]':/var/ftp /mnt
    mount.nfs4: mount system call failed
    

    無解,不知道為什麼不行.


Linux command – ping6

$
0
0

在 Linux 下面要 ping IP V6 的 IP 須使用工具 #ping6 ,#ping 指令只適用於 IP V4 時候使用 (Ping 是走 ICMPv4,而 Pingv6 是走 ICMPv6,).首先我們要透過 ifconfig 來查詢 IPv6 address .

# ifconfig eth0
eth0      Link encap:Ethernet  HWaddr 00:1A:64:22:04:83  
          inet addr:192.8.1.192  Bcast:192.8.1.255  Mask:255.255.255.0
          inet6 addr: 3ffe:501:ffff:100:21a:64ff:fe22:483/64 Scope:Global
          inet6 addr: fe80::21a:64ff:fe22:483/64 Scope:Link
          UP BROADCAST RUNNING MULTICAST  MTU:1500  Metric:1
          RX packets:81 errors:0 dropped:0 overruns:0 frame:0
          TX packets:86 errors:0 dropped:0 overruns:0 carrier:0
          collisions:0 txqueuelen:1000 
          RX bytes:11835 (11.5 KiB)  TX bytes:11119 (10.8 KiB)
          Interrupt:17 

奇怪怎麼有兩組 IPv6 的 IP,因為 IPv6 的位址有 Link Local 以及自動指派 (address auto-configuration),

如果是網路上的伺服器可以透過 host 指令.

# host -t AAAA www.google.com
www.google.com has IPv6 address 2404:6800:4008:c06::68

Link Local

第一組 IPv6 (fe80::21a:64ff:fe22:483/64 ) 在網卡啟動時就會指派一組 IPV6 link-local address,而這 link-local address 是唯一的而且是依據網卡的 MAC Address 而有所變動,詳細步驟請參考 http://benjr.tw/17341

如果是要 ping Link Local address 時需要在 ping6 IPv6 後面的參數加上 network_device_name 如下:

# ping6 fe80::21a:64ff:fe22:483%eth0
PING fe80::20c:29ff:fef6:4d73%eth0(fe80::20c:29ff:fef6:4d73) 56 data bytes
64 bytes from fe80::20c:29ff:fef6:4d73: icmp_seq=1 ttl=64 time=0.205 ms
64 bytes from fe80::20c:29ff:fef6:4d73: icmp_seq=2 ttl=64 time=0.196 ms
64 bytes from fe80::20c:29ff:fef6:4d73: icmp_seq=3 ttl=64 time=0.193 ms

--- fe80::20c:29ff:fef6:4d73%eth0 ping statistics ---
3 packets transmitted, 3 received, 0% packet loss, time 2990ms
rtt min/avg/max/mdev = 0.193/0.198/0.205/0.005 ms

自動指派 (address auto-configuration)

自動指派 (address auto-configuration) 主要可以區分為下列幾種

  • Stateless auto-configuration
  • Stateful auto-configuration using Router Advertisement(RA) Daemon (radvd)
  • Dynamic Host Configuration Protocol v6 (DHCPv6)

IPv6 (3ffe:501:ffff:100:21a:64ff:fe22:483/64) 類似於 IPv4 的 DHCP ,客戶端主要使用 UDP port 546 而服務器端使用 UDP port 547 .雖類似於 DHCPv4 但不同的是 IPv6 已經不使用 Brocast 的方式.

# ping6 3ffe:501:ffff:100:21a:64ff:fe22:483
PING 3ffe:501:ffff:100::1(3ffe:501:ffff:100::1) 56 data bytes
64 bytes from 3ffe:501:ffff:100::1: icmp_seq=1 ttl=64 time=1.11 ms
64 bytes from 3ffe:501:ffff:100::1: icmp_seq=2 ttl=64 time=0.192 ms
64 bytes from 3ffe:501:ffff:100::1: icmp_seq=3 ttl=64 time=0.213 ms
64 bytes from 3ffe:501:ffff:100::1: icmp_seq=4 ttl=64 time=0.195 ms
64 bytes from 3ffe:501:ffff:100::1: icmp_seq=5 ttl=64 time=0.194 ms

--- 3ffe:501:ffff:100::1 ping statistics ---
5 packets transmitted, 5 received, 0% packet loss, time 4590ms
rtt min/avg/max/mdev = 0.192/0.381/1.113/0.366 ms

Linux command – parted

$
0
0

以前切割硬碟會用 #fdisk 但這個工具漸漸被 #parted 取代,而不是因為 #parted 好用,而是 #fdisk 限制太多.

傳統的 #fdisk 只適用於由 MBR 切割出來的磁區,但 MBR 最大也只支援到 2.2 TB ,所以必須透過 GPT(GUID Partition Table) 的切割硬碟方式.所以只能使用 #parted 這個工具.

一開始全新的硬碟需要選擇 Label type ,大於 2.2T 硬碟要選擇 gpt.
其他支援的 disk label

  • bsd
  • loop (raw disk access)
  • gpt
  • mac
  • msdos
  • pc98
  • sun
root@ben-VirtualBox:~# parted /dev/sdb
GNU Parted 2.3
Using /dev/sdb
Welcome to GNU Parted! Type 'help' to view a list of commands.
(parted) mkpart
Error: /dev/sdb: unrecognised disk label
New disk label type? gpt
(parted) print
Model: ATA VBOX HARDDISK (scsi)
Disk /dev/sdb: 2147MB
Sector size (logical/physical): 512B/512B
Partition Table: gpt

Number  Start  End  Size  File system  Name  Flags
  • 新增磁區
    要透過 parted 切割磁區時使用 (parted) mkpart ,比較會讓人困惑的是 start 和 end, parted 在做切割時我們可以自己選擇由系統的哪一個區塊的空間開始並由哪一個空間結束,如果你選擇 start ?100  End?10000 就表示系統會保留硬碟前 100MB 的空間之後再切割出 10G (10000MB) 大小的硬碟.但是如果那 10G 的空間已經是被其他 partition tables 占用時也沒關係系統會自動幫我們選擇一個最適合的空間.
    (parted) mkpart
    Partition name?  []? Data1
    File system type?  [ext2]?
    Start? 0
    End? 100M
    Warning: The resulting partition is not properly aligned for best performance.
    Ignore/Cancel? i
    (parted) print
    Model: ATA VBOX HARDDISK (scsi)
    Disk /dev/sdb: 2147MB
    Sector size (logical/physical): 512B/512B
    Partition Table: gpt
    
    Number  Start   End    Size   File system  Name   Flags
     1      17.4kB  100MB  100MB               Data1
    

    切割完磁區後要選擇檔案格式,如果使用 20TB 容量的硬碟如果要使用 ext2 http://en.wikipedia.org/wiki/Ext2 當成檔案格式時有一點需要注意的,#mkfs.ext2 預設的 Block size 為 2K 其最大檔案系統上限為 8TB ,所以要使用這 20TB 大硬碟時可以在建立 ext2 時加入參數 -b 並指定大小 4KB 可達 16TB 而 8KB 可達 32TB,但如果超過 32 TB就必須選擇 ext4 http://en.wikipedia.org/wiki/Ext4 的格式了.

    root@ben-VirtualBox:~# mkfs.ext2 /dev/sdb1
    mke2fs 1.42.9 (4-Feb-2014)
    Filesystem label=
    OS type: Linux
    Block size=1024 (log=0)
    Fragment size=1024 (log=0)
    Stride=0 blocks, Stripe width=0 blocks
    24480 inodes, 97636 blocks
    4881 blocks (5.00%) reserved for the super user
    First data block=1
    Maximum filesystem blocks=67371008
    12 block groups
    8192 blocks per group, 8192 fragments per group
    2040 inodes per group
    Superblock backups stored on blocks:
            8193, 24577, 40961, 57345, 73729
    
    Allocating group tables: done
    Writing inode tables: done
    Writing superblocks and filesystem accounting information: done
    

    切割第二塊磁區,雖然 start 跟前面磁區重疊 parted 會幫我們修改為合理的範圍.

    (parted) mkpart
    Partition name?  []? Data2
    File system type?  [ext2]?
    Start? 50M
    End? 100M
    Warning: You requested a partition from 50.0MB to 100MB.
    The closest location we can manage is 100MB to 100MB.
    Is this still acceptable to you?
    Yes/No? y
    Warning: The resulting partition is not properly aligned for best performance.
    Ignore/Cancel? i
    (parted) print
    Model: ATA VBOX HARDDISK (scsi)
    Disk /dev/sdb: 2147MB
    Sector size (logical/physical): 512B/512B
    Partition Table: gpt
    
    Number  Start   End    Size   File system  Name   Flags
     1      17.4kB  100MB  100MB               Data1
     2      100MB   100MB  512B                Data2
    
  • 刪除磁區
    (parted) rm
    Partition number? 2
    (parted) print
    Model: ATA VBOX HARDDISK (scsi)
    Disk /dev/sdb: 2147MB
    Sector size (logical/physical): 512B/512B
    Partition Table: gpt
    
    Number  Start   End    Size   File system  Name   Flags
     1      17.4kB  100MB  100MB               Data1
    
  • 放大縮小磁區
    parted 還可以依據需求放大縮小磁區
    (parted) print
    Model: ATA VBOX HARDDISK (scsi)
    Disk /dev/sdb: 2147MB
    Sector size (logical/physical): 512B/512B
    Partition Table: gpt
    
    Number  Start   End    Size    File system  Name   Flags
     1      17.4kB  100MB  100MB   ext2         Data1
    

    不知道為什麼在 Ubuntu 14.04 下面 resize 沒有辦法使用,在 RedHat (RHEL) 6.5 下使用就沒有問題

    (parted) resize
    WARNING: you are attempting to use parted to operate on (resize) a file system.
    parted's file system manipulation code is not as robust as what you'll find in
    dedicated, file-system-specific packages like e2fsprogs.  We recommend
    you use parted only to manipulate partition tables, whenever possible.
    Support for performing most operations on most types of file systems
    will be removed in an upcoming release.
    Partition number? 1
    Start?  [17.4kB]?
    End?  [100MB]? 200M
    Error: File system has an incompatible feature enabled.  Compatible features are
    has_journal, dir_index, filetype, sparse_super and large_file.  Use tune2fs or
    debugfs to remove features.
    

如果是 GUI 安裝畫面十時要需將磁碟切割成 GPT 的工具,可以回到 [Ctrl]+[Alt]+[F2] "shell prompt" 使用 parted 來手動改變硬碟為 GPT.

Parted 官方使用說明 https://www.gnu.org/software/parted/manual/html_node/Concept-index.html#Concept-index

放大縮小 Linux 磁區

$
0
0

有時候系統不是你建置的,到你接手的時候 Linux 出了問題,問題居然是 root 磁區空間不夠,那該怎麼辦呢!!下面幾種方式可以解決.

  • LVM
    如果 root 磁區採用的是 LVM 那感謝主,這個稍微用指令或是圖形介面操作放大 root 空間 就可以解決.

    LVM(Logical Volume Manager)是一種可以動態變更 volume (由 LVM 所切割出來的空間被稱為 volume)大小的方式,可以讓你能更容易利用管理你的硬碟.傳統的硬碟空間在切割完時就決定了大小,如果要重新規劃必須將資料先備份下來,硬碟磁區重新切割才可能有改變原來的硬碟磁區環境.不過 LVM(Logical Volume Manager) 就不同了,如果磁區空間不夠了,你可以隨意將空間放大或是磁區的使用率太低也可以將空間縮小.當我們在放大縮小時這都不影響原先在硬碟上的資料.

    可以參考
    LVM(Logical Volume Manager) – http://benjr.tw/174
    LVM-工具 – http://benjr.tw/7362
    RHEL5 – LVM(Logical Volume Manager) – http://benjr.tw/18720

  • parted
    要修改磁區大小第一步需要將該磁區 #umount 卸載下來才能修改,所以必須先透過 live cd 或 live usb 開機(關於 Ubuntu Live USB 可以參考 http://benjr.tw/1550),就可以直接透過 #parted 來修改 (請參考 http://benjr.tw/94833),需先 #umount 然後 resize.

    不習慣文字介面還可以用 #GParted 圖形介面來做 磁碟分割 (底層應該還是用 parted 來做)

    不過不知道為什麼在 Ubuntu 14.04 (RHEL 7) 下面 resize 沒有辦法使用 (仔細一看說明,resize 將不再支援,建議用戶用 e2fsprogs 套件做放大縮小磁區 ),但在 RedHat (RHEL) 6.5 下使用就沒有問題.

    WARNING: you are attempting to use parted to operate on (resize) a file system.
    parted's file system manipulation code is not as robust as what you'll find in
    dedicated, file-system-specific packages like e2fsprogs.  We recommend
    you use parted only to manipulate partition tables, whenever possible.
    Support for performing most operations on most types of file systems
    will be removed in an upcoming release.
    
  • resize2fs
    resize2fs 含在 e2fsprogs 套件.Ubuntu 預設都有安裝.
    root@benjr:~# apt-get install e2fsprogs
    Reading package lists... Done
    Building dependency tree
    Reading state information... Done
    e2fsprogs is already the newest version.
    0 upgraded, 0 newly installed, 0 to remove and 35 not upgraded.
    

    e2fsprogs 套件安裝了哪一些檔案,可以透過 apt-file 來查詢,不過他非預設安裝,需要額外安裝.

    root@ubuntu:~# apt-get install apt-file
    

    安裝後的第一步就是先更新資料庫.

    root@ubuntu:~# apt-file update
    

    現在就可以來搜尋套件安裝了哪一些檔案,而這些套件存放的地方在哪裡,都會顯示出來.

    root@ubuntu:~# apt-file list e2fsprogs
    e2fsprogs: /etc/mke2fs.conf
    e2fsprogs: /sbin/badblocks
    e2fsprogs: /sbin/debugfs
    e2fsprogs: /sbin/dumpe2fs
    e2fsprogs: /sbin/e2fsck
    ..............
    e2fsprogs: /sbin/resize2fs
    ..............
    

    透過 resize2fs 可以修改磁區大小,第一步需要將該磁區 #umount 卸載下來才能修改,所以必須先透過 live cd 或 live usb 開機(關於 Ubuntu Live USB 可以參考 http://benjr.tw/1550)

    在 #man resize2fs 裡面有提到 http://linux.die.net/man/8/resize2fs 可以 on-line resize for filesystems mounted using ext3 and ext4, 我猜應該是使用 LVM 的分割才有辦法做到.
    The resize2fs program will resize ext2, ext3, or ext4 file systems. It can be used to enlarge or shrink an unmounted file system located on device. If the filesystem is mounted, it can be used to expand the size of the mounted filesystem, assuming the kernel supports on-line resizing. (As of this writing, the Linux 2.6 kernel supports on-line resize for filesystems mounted using ext3 and ext4.).

    放大磁區
    如果你想放大一個磁區, 必須做下面的

    1. 確定該放大磁區後面有空間,而且必須透過手動的方式先刪除磁區後再重建磁區.
    2. 在新擴大的磁區執行 #resize2fs 來調整 使用所有的空間.
    root@ubuntu:~# dumpe2fs /dev/sdb1
    dumpe2fs 1.42.9 (4-Feb-2014)
    Filesystem volume name:   <none>
    Last mounted on:          <not available>
    Filesystem UUID:          cd440e00-c52e-4bc7-b1e6-986b0f21ca1d
    Filesystem magic number:  0xEF53
    Filesystem revision #:    1 (dynamic)
    Filesystem features:      has_journal ext_attr resize_inode dir_index filetype extent flex_bg sparse_super huge_file uninit_bg dir_nlink extra_isize
    ..............
    

    /dev/sdb 空間有 2147 MB ,我想要放大 /dev/sda1 (200M) 到 2147 MB.

    root@ubuntu:~# fdisk -l /dev/sdb
    
    Disk /dev/sdb: 2147 MB, 2147483648 bytes
    160 heads, 6 sectors/track, 4369 cylinders, total 4194304 sectors
    Units = sectors of 1 * 512 = 512 bytes
    Sector size (logical/physical): 512 bytes / 512 bytes
    I/O size (minimum/optimal): 512 bytes / 512 bytes
    Disk identifier: 0x00020c4f
    
       Device Boot      Start         End      Blocks   Id  System
    /dev/sdb1            2048      411647      204800   83  Linux
    root@ubuntu:~# fdisk /dev/sdb
    
    Command (m for help): d
    Selected partition 1
    
    Command (m for help): n
    Partition type:
       p   primary (0 primary, 0 extended, 4 free)
       e   extended
    Select (default p): p
    Partition number (1-4, default 1): 1
    First sector (2048-4194303, default 2048):
    Using default value 2048
    Last sector, +sectors or +size{K,M,G} (2048-4194303, default 4194303):
    Using default value 4194303
    
    Command (m for help): w
    The partition table has been altered!
    
    Calling ioctl() to re-read partition table.
    Syncing disks.
    

    接下來放大/dev/sda1 (200M) 到 2147 MB.而且資料都會保留下來.

    root@ubuntu:~# resize2fs -f /dev/sdb1
    resize2fs 1.42.9 (4-Feb-2014)
    Resizing the filesystem on /dev/sdb1 to 2096128 (1k) blocks.
    The filesystem on /dev/sdb1 is now 2096128 blocks long.
    
    root@ubuntu:~# fdisk -l /dev/sdb
    
    Disk /dev/sdb: 2147 MB, 2147483648 bytes
    11 heads, 4 sectors/track, 95325 cylinders, total 4194304 sectors
    Units = sectors of 1 * 512 = 512 bytes
    Sector size (logical/physical): 512 bytes / 512 bytes
    I/O size (minimum/optimal): 512 bytes / 512 bytes
    Disk identifier: 0x00020c4f
    
       Device Boot      Start         End      Blocks   Id  System
    /dev/sdb1            2048     4194303     2096128   83  Linux
    
    root@ubuntu:~#  e2fsck -f /dev/sdb1
    e2fsck 1.42.9 (4-Feb-2014)
    Pass 1: Checking inodes, blocks, and sizes
    Pass 2: Checking directory structure
    Pass 3: Checking directory connectivity
    Pass 4: Checking reference counts
    Pass 5: Checking group summary information
    /dev/sdb1: 12/524288 files (0.0% non-contiguous), 73272/2096128 blocks


    縮小磁區
    縮小磁區比放大容易多了, 透過 #resize2fs -M

    root@ubuntu:~# resize2fs -M /dev/sdb1
    resize2fs 1.42.9 (4-Feb-2014)
    Resizing the filesystem on /dev/sdb1 to 4645 (1k) blocks.
    The filesystem on /dev/sdb1 is now 4645 blocks long.
    
    root@ubuntu:~# e2fsck -f /dev/sdb1
    e2fsck 1.42.9 (4-Feb-2014)
    Pass 1: Checking inodes, blocks, and sizes
    Pass 2: Checking directory structure
    Pass 3: Checking directory connectivity
    Pass 4: Checking reference counts
    Pass 5: Checking group summary information
    /dev/sdb1: 12/2048 files (0.0% non-contiguous), 4644/4645 blocks
    root@ubuntu:~# fdisk -l /dev/sdb
    
    Disk /dev/sdb: 2147 MB, 2147483648 bytes
    11 heads, 4 sectors/track, 95325 cylinders, total 4194304 sectors
    Units = sectors of 1 * 512 = 512 bytes
    Sector size (logical/physical): 512 bytes / 512 bytes
    I/O size (minimum/optimal): 512 bytes / 512 bytes
    Disk identifier: 0x00020c4f
    
       Device Boot      Start         End      Blocks   Id  System
    /dev/sdb1            2048     4194303     2096128   83  Linux
    root@ubuntu:~# mount /dev/sdb1 /media/
    root@ubuntu:~# df -h
    Filesystem      Size  Used Avail Use% Mounted on
    udev            361M  4.0K  361M   1% /dev
    tmpfs            75M  912K   74M   2% /run
    /dev/sda1        11G  4.0G  6.5G  38% /
    none            4.0K     0  4.0K   0% /sys/fs/cgroup
    none            5.0M     0  5.0M   0% /run/lock
    none            371M  144K  371M   1% /run/shm
    none            100M   44K  100M   1% /run/user
    /dev/sdb1       288K  287K     0 100% /media
    

    透過 -M 縮小感覺起來怪怪的,硬碟分割沒有影響,看樣子並不是真正的縮小,下次在 Linux 環境下還是記得用 LVM

Ubuntu Live CD root > 4G

$
0
0

Ubuntu 的 Desktop 版本就是 LiveCD ,這 Live CD 可以裝在 USB Key 隨身碟上,但這 Ubuntu Live CD USB flash drive 有個問題,就是 root 沒有辦法大於 > 4G ,這是為什麼呢!!

因為 Ubuntu Desktop 做成 Ubuntu Live CD USB flash drive 時,會將磁區分割成為 vfat ,而 root 檔案會寫成一個 loop file ( casper-rw) ,但 vfat 的檔案上限就是 4G ,如果要讓 root 大於 4g 必須用其他方式來做.

參考了下面幾個網站的說明.
http://ubuntu-usb-large-persistent-storage.blogspot.tw/
http://www.pendrivelinux.com/create-a-larger-than-4gb-casper-partition/

步驟如下:

  1. 刪除 casper-rw
  2. 縮小 Ubuntu Live CD USB flash drive vfat 磁區大小(預設會佔用全部的 USB flash drive 空間)
  3. 新增一 ext2 (3)(4) 磁區,標籤並成為 casper-rw (系統會把這磁區當作 root)

第一步先做好你的 Ubuntu Live CD USB flash drive ,可以透過 Universal USB Installer (Windows) 或是 Startup Disk Creator (Linux) ,方式請參考 Ubuntu Live CD on USB flash drive – http://benjr.tw/1550

  1. 刪除 casper-rw
    先找一台 Linux 系統或是 windows 都可以,把這 Ubuntu Live CD USB flash drive 內的 casper.rw (root loop file 檔案) 刪除 (這檔案不見得存在)
    [root@localhost Desktop]# mount
    /dev/mapper/VolGroup-lv_root on / type ext4 (rw)
    proc on /proc type proc (rw)
    sysfs on /sys type sysfs (rw)
    devpts on /dev/pts type devpts (rw,gid=5,mode=620)
    tmpfs on /dev/shm type tmpfs (rw,rootcontext="system_u:object_r:tmpfs_t:s0")
    /dev/sda1 on /boot type ext4 (rw)
    /dev/mapper/VolGroup-lv_home on /home type ext4 (rw)
    none on /proc/sys/fs/binfmt_misc type binfmt_misc (rw)
    /tmp on /tmp type none (rw,bind)
    /var/tmp on /var/tmp type none (rw,bind)
    /home on /home type none (rw,bind)
    none on /sys/kernel/config type configfs (rw)
    gvfs-fuse-daemon on /root/.gvfs type fuse.gvfs-fuse-daemon (rw,nosuid,nodev)
    /dev/sdb1 on /media/77D1-8400 type vfat (rw,nosuid,nodev,uhelper=udisks,uid=0,gid=0,shortname=mixed,dmask=0077,utf8=1,flush)
    
    [root@localhost Desktop]# rm /media/77D1-8400/casper.rw
    
  2. 小 Ubuntu Live CD USB flash drive vfat 磁區大小
    預設 Ubuntu Live CD USB flash drive 會佔用全部的 USB flash drive 空間,第一步先縮小 Ubuntu Live CD USB flash drive vfat 磁區大小,但這一步搞好久才試成功,這一步主要是透過 parted 的 resize (GParted 圖形介面) 來縮小 Ubuntu Live CD USB flash drive vfat 磁區,但不知道為什麼在 Ubuntu 14.04 (RHEL 7) 下面 resize 沒有辦法使用 (仔細一看說明,resize 將不再支援,建議用戶用 e2fsprogs 套件做放大縮小磁區 ),但在 RedHat (RHEL) 6.5 下使用就沒有問題.詳細文章請參考 放大縮小 Linux 磁區 http://benjr.tw/94843

    關於 parted 使用,請參考 http://benjr.tw/94833

    下面資料有點錯誤,修改中.

    RedHat RHEL 6.5

    [root@localhost Desktop]# df -h
    Filesystem                    Size  Used Avail Use% Mounted on
    /dev/mapper/VolGroup-lv_root   50G  8.1G   39G  18% /
    tmpfs                         939M  224K  939M   1% /dev/shm
    /dev/sda1                     485M   41M  419M   9% /boot
    /dev/mapper/VolGroup-lv_home  222G  188M  211G   1% /home
    /dev/sdb1                      15G  5.8G  8.7G  41% /media/77D1-8400
    
    [root@localhost Desktop]# parted /dev/sdb
    GNU Parted 2.1
    Using /dev/sdb
    Welcome to GNU Parted! Type 'help' to view a list of commands.
    (parted) print                                                            
    Model: ADATA USB Flash Drive (scsi)
    Disk /dev/sdb: 15.5GB
    Sector size (logical/physical): 512B/512B
    Partition Table: msdos
    
    Number  Start   End     Size    Type     File system  Flags
     1      1049kB  15.5GB  15.5GB  primary  fat32
    
    (parted) resize 1 1049k 10G                                               
    WARNING: you are attempting to use parted to operate on (resize) a file system.
    parted's file system manipulation code is not as robust as what you'll find in
    dedicated, file-system-specific packages like e2fsprogs.  We recommend
    you use parted only to manipulate partition tables, whenever possible.
    Support for performing most operations on most types of file systems
    will be removed in an upcoming release.
    (parted) print                                                            
    Model: ADATA USB Flash Drive (scsi)
    Disk /dev/sdb: 15.5GB
    Sector size (logical/physical): 512B/512B
    Partition Table: msdos
    
    Number  Start   End     Size    Type     File system  Flags
     1      1049kB  10.0GB  9999MB  primary  fat32
    
    (parted) q                                                                
    Information: You may need to update /etc/fstab.  
    

    Ubuntu 14.04

    root@ben:~# parted /dev/sdc
    GNU Parted 2.3
    Using /dev/sdc
    Welcome to GNU Parted! Type 'help' to view a list of commands.
    (parted) print                                                            
    Model: ADATA USB Flash Drive (scsi)
    Disk /dev/sdc: 15.5GB
    Sector size (logical/physical): 512B/512B
    Partition Table: msdos
    
    Number  Start   End     Size    Type     File system  Flags
     1      1049kB  15.5GB  15.5GB  primary  fat32
    
    (parted) resize 1 1049k 2048M                                             
    WARNING: you are attempting to use parted to operate on (resize) a file system.
    parted's file system manipulation code is not as robust as what you'll find in
    dedicated, file-system-specific packages like e2fsprogs.  We recommend
    you use parted only to manipulate partition tables, whenever possible.
    Support for performing most operations on most types of file systems
    will be removed in an upcoming release.
    parted: malloc.c:2372: sysmalloc: Assertion `(old_top == (((mbinptr) (((char *) &((av)->bins[((1) - 1) * 2])) - __builtin_offsetof (struct malloc_chunk, fd)))) && old_size == 0) || ((unsigned long) (old_size) >= (unsigned long)((((__builtin_offsetof (struct malloc_chunk, fd_nextsize))+((2 *(sizeof(size_t))) - 1)) & ~((2 *(sizeof(size_t))) - 1))) && ((old_top)->size & 0x1) && ((unsigned long) old_end & pagemask) == 0)' failed.
    Aborted (core dumped)
    
  3. 新增一 ext2 (3)(4) 磁區,標籤並成為 casper-rw
    當 casper.rw (root loop file 檔案) 沒有的時候,系統會找 標籤為 casper-rw 當成 root,所以這一步需要新增一 ext2 (3)(4) 磁區,標籤並成為 casper-rw ,一樣可以透過 parted (GParted 圖形介面) 來做,完成後就可以從這一 Ubuntu Live CD USB flash drive 開機吧! 但系統會把這磁區當作 root 會花比較久的開機時間.
    ubuntu@ubuntu:~$ df -h
    Filesystem Size Used Avail Use% Mounted on
    /cow 13G 208M 12G 2% /
    udev 989M 4.0K 989M 1% /dev
    tmpfs 201M 1.2M 199M 1% /run
    /dev/sda1 1.9G 982M 924M 52% /cdrom
    /dev/loop0 939M 939M 0 100% /rofs
    none 4.0K 0 4.0K 0% /sys/fs/cgroup
    tmpfs 1001M 1.1M 1000M 1% /tmp
    none 5.0M 4.0K 5.0M 1% /run/lock
    none 1001M 80K 1000M 1% /run/shm
    none 100M 48K 100M 1% /run/user
    /dev/sda2 13G 208M 12G 2% /media/ubuntu/casper-rw
    /dev/sr1 1.2M 1.2M 0 100% /media/ubuntu/cdrom_install
    ubuntu@ubuntu:~$ mount
    /cow on / type overlayfs (rw)
    proc on /proc type proc (rw,noexec,nosuid,nodev)
    sysfs on /sys type sysfs (rw,noexec,nosuid,nodev)
    udev on /dev type devtmpfs (rw,mode=0755)
    devpts on /dev/pts type devpts (rw,noexec,nosuid,gid=5,mode=0620)
    tmpfs on /run type tmpfs (rw,noexec,nosuid,size=10%,mode=0755)
    /dev/sda1 on /cdrom type vfat (rw,relatime,fmask=0022,dmask=0022,codepage=437,iocharset=iso8859-1,shortname=mixed,errors=remount-ro)
    /dev/loop0 on /rofs type squashfs (ro,noatime)
    none on /sys/fs/cgroup type tmpfs (rw)
    none on /sys/fs/fuse/connections type fusectl (rw)
    none on /sys/kernel/debug type debugfs (rw)
    none on /sys/kernel/security type securityfs (rw)
    tmpfs on /tmp type tmpfs (rw,nosuid,nodev)
    none on /run/lock type tmpfs (rw,noexec,nosuid,nodev,size=5242880)
    none on /run/shm type tmpfs (rw,nosuid,nodev)
    none on /run/user type tmpfs (rw,noexec,nosuid,nodev,size=104857600,mode=0755)
    none on /sys/fs/pstore type pstore (rw)
    systemd on /sys/fs/cgroup/systemd type cgroup (rw,noexec,nosuid,nodev,none,name=systemd)
    gvfsd-fuse on /run/user/999/gvfs type fuse.gvfsd-fuse (rw,nosuid,nodev,user=ubuntu)
    /dev/sda2 on /media/ubuntu/casper-rw type ext4 (rw,nosuid,nodev,uhelper=udisks2)
    /dev/sr1 on /media/ubuntu/cdrom_install type udf (ro,nosuid,nodev,uid=999,gid=999,iocharset=utf8,umask=0077,uhelper=udisks2)
    rpc_pipefs on /run/rpc_pipefs type rpc_pipefs (rw)
    

RA (Router Advertisement)

$
0
0

IPV6 的設定有幾種方式.

  • Link Local (預設值,不須設定)
    IPv6 中每個網卡都會有屬於自己的 link-local address,這位址跟網卡的 MAC Address 是相關的.可以參考 http://benjr.tw/17341
  • 透過 Dynamic Host Configuration Protocol v6 (DHCPv6)
    不使用 RA 的方式,須透過 DHCPv6 來得到 IPv6 位址.可以參考 http://benjr.tw/10651
  • 透過 Router Advertisement (RA) Daemon (radvd)
    下面接著說明

測試環境在 RHEL6
在 IPv6 的環境下,並不一定需要像是 IPV4 使用 DHCP 來讓電腦取得 IPv4 位址,IPv6 取得 IP 的另外一種方式是 RA (Router Advertisement) ,這功能通常是由 Router 來提供,但如果你的環境沒有就可以透過 Linux 下的 radvd (Router Advertisement Daemon) 服務來做.先來看看 radvd.conf 的設定檔 (設定檔儲存在 /etc/radvd.conf)

[root@benjr ~]# vi /etc/radvd.conf
# NOTE: there is no such thing as a working "by-default" configuration file. 
#       At least the prefix needs to be specified.  Please consult the radvd.conf(5)
#       man page and/or /usr/share/doc/radvd-*/radvd.conf.example for help.
#
#
interface eth1
{
	AdvSendAdvert on;
	MinRtrAdvInterval 30;
	MaxRtrAdvInterval 100;
	prefix 2001:db8:1:0::/64
	{
		AdvOnLink on;
		AdvAutonomous on;
		AdvRouterAddr off;
	};

};

打開 /etc/radvd.conf 設定全部都以 * 設為註記,只需把星號移除即可.來看看設定檔的內容說了什麼.

  • interface eth1
    設定 RA 在哪個網路卡介面啟動
  • AdvSendAdvert on
    啟動 RA 功能
  • MinRtrAdvInterval 30
  • MaxRtrAdvInterval 100
    每隔 30-100 秒送出公告訊息,IPv4 是透過 broadcast 方式,IPv6 是透過 ICMP 的方式,透過 FF02::1 (連結本機領域所有節點位址) 來傳送.關於 多點傳送 IPv6 位址 請參考 https://msdn.microsoft.com/zh-tw/library/cc781068(v=ws.10).aspx
    我們可以透過 tcpdump 觀察 ICMP 封包 FF02::1 的傳送.
    [root@benjr ~]# ifconfig eth1
    eth1      Link encap:Ethernet  HWaddr 90:FB:A6:76:2B:81
              inet addr:172.16.0.2  Bcast:172.16.0.255  Mask:255.255.255.0
              inet6 addr: fe80::92fb:a6ff:fe76:2b81/64 Scope:Link
              UP BROADCAST RUNNING MULTICAST  MTU:1500  Metric:1
              RX packets:5375131 errors:0 dropped:0 overruns:0 frame:0
              TX packets:4806337 errors:0 dropped:0 overruns:0 carrier:0
              collisions:0 txqueuelen:1000
              RX bytes:3447675661 (3.2 GiB)  TX bytes:3585639519 (3.3 GiB)
              Memory:fbb40000-fbb60000
    
    [root@benjr ~]# tcpdump -i eth1 -v ip6 |grep -i ff02
    tcpdump: listening on eth1, link-type EN10MB (Ethernet), capture size 65535 bytes
    18:48:49.407039 IP6 (hlim 255, next-header ICMPv6 (58) payload length: 56) fe80::92fb:a6ff:fe76:2b81 > ff02::1: [icmp6 sum ok] ICMP6, router advertisement, length 56
    18:49:50.779651 IP6 (hlim 255, next-header ICMPv6 (58) payload length: 56) fe80::92fb:a6ff:fe76:2b81 > ff02::1: [icmp6 sum ok] ICMP6, router advertisement, length 56
    
  • prefix 2001:db8:1:0::/64
    設定用戶會取得的 prefix ,什麼是 prefix , 2001:db8:1:0:: 是正常寫法嗎?
    • prefix
      IPv6 的位址長度為 128 位元,是由兩部分的位址組成, 網路位址(Network Prefix) + 主機位址(Host ID),而這 Prefix 就類似於 IPv4 的 Netmask.以 Prefix 64 為例 (寫法為 /64 ) 就代表128位元的位址中,前 64 位元為網路位址(Network Prefix) 並且是由 RA 給的.
    • 2001:db8:1:0::
      IPv6 的位址長度為 128 位元,所以可以簡寫而規則如下:
      每 32Bit 如開頭之4bit表示為0,即可省略,若32Bit全為0,則可簡寫為0
      若連續完整之32Bit段落皆為 0000, 則可全省略,簡寫為::,但以一次為限
  • 下面這幾項都是跟 Prefix Specific Options 相關,有興趣可以參考 man page http://linux.die.net/man/5/radvd.conf

  • AdvOnLink on
    AdvOnLink on|off (Default: on)
    When set, indicates that this prefix can be used for on-link determination. When not set the advertisement makes no statement about on-link or off-link properties of the prefix. For instance, the prefix might be used for address configuration with some of the addresses belonging to the prefix being on-link and others being off-link.

    IPv4 是利用子網路遮罩 subnet mask 來決定封包是本地端或是遠端,但 IPv6 沒有這樣的機制,所以要如何決定封包的傳送,是透過 router 傳送到遠端還是本地端網路呢?這個機制叫做 IPv6 on-link determination ,當 IPv6 hosts 透過 Router Advertisement 取得 prefix 時,如果 Prefix Information Option (PIO) 欄位裡面的 L-bit (on-link) 設為 1,那該 prefix 就是本地網路.

  • AdvAutonomous on
    AdvAutonomous on|off (Default: on)
    When set, indicates that this prefix can be used for autonomous address configuration as specified in RFC 4862.
  • AdvRouterAddr off
    AdvRouterAddr on|off (Default: off)
    When set, indicates that the address of interface is sent instead of network prefix, as is required by Mobile IPv6. When set, minimum limits specified by Mobile IPv6 are used for MinRtrAdvInterval and MaxRtrAdvInterval.

ipv6 一樣有 firwall 你可以先把他關閉,之後再來設定 ip6tables

[root@benjr ~]# chkconfig ip6tables off
[root@benjr ~]# service ip6tables stop
ip6tables: Flushing firewall rules:                        [  OK  ]
ip6tables: Setting chains to policy ACCEPT: filter         [  OK  ]
ip6tables: Unloading modules:                              [  OK  ]

啟動 radvd ,但是發現需要先把 ipv6 fordward 打開.

[root@benjr ~]# service radvd restart
Stopping radvd:                                            [FAILED]
Starting radvd: [Jun 23 19:48:42] radvd: IPv6 forwarding seems to be disabled, exiting
                                                           [FAILED]

ipv6 fordward 跟 ipv4 的設定檔一樣儲存在 /etc/sysctl.conf

[root@benjr ~]# vi /etc/sysctl.conf
# Uncomment the next line to enable packet forwarding for IPv6
#  Enabling this option disables Stateless Address Autoconfiguration
#  based on Router Advertisements for this host
net.ipv6.conf.all.forwarding=1
    
[root@benjr ~]# sysctl -p
net.ipv4.ip_forward = 1
net.ipv4.conf.default.rp_filter = 1
net.ipv4.conf.default.accept_source_route = 0
kernel.sysrq = 0
kernel.core_uses_pid = 1
net.ipv4.tcp_syncookies = 1
error: "net.bridge.bridge-nf-call-ip6tables" is an unknown key
error: "net.bridge.bridge-nf-call-iptables" is an unknown key
error: "net.bridge.bridge-nf-call-arptables" is an unknown key
net.ipv6.conf.all.forwarding = 1
kernel.msgmnb = 65536
kernel.msgmax = 65536
kernel.shmmax = 68719476736
kernel.shmall = 4294967296

啟動 radvd ,接下來試試看 radvd 的功能是不是正常.

[root@benjr ~]# service radvd restart
Stopping radvd:                                            [FAILED]
Starting radvd:                                            [  OK  ]

隨便找一台 Linux Desktop 來試試,我這邊使用的是 Ubuntu 14.04 Desktop

在 Ubuntu Netmanager 下關於 IPv6 的選項如下:
ubuntu_netmanager01

  • Ignore
    連線不使用 IPv6 格式.
  • Automatic
    NetworkManager 使用 router advertisement (RA) 來獲取 IPv6 位址,這個方式必須搭配 Router 來指派,或是 raddvd 來使用.
  • Automatic, addresses only
    一樣 NetworkManager 使用 RA 來得到 automatic, stateless configuration, 但 DNS servers 以及 search domains 是會被忽略的不被指派的.
  • Automatic, DHCP only
    NetworkManager 不使用 RA 的方式,須透過 DHCPv6 來得到 IPv6 位址 (stateful configuration).
  • Manual
    手動設定 IPv6 位址.
  • Link-Local Only
    link-local address 是由 fe80::/10 prefix + Mac Address 所組合成的,預設就會產生,不須額外設定.

什麼是 Stateful Configuration 與 Stateless Configuration?

  • Stateless Configuration
    當 RA 核發 Prefix ,DNS 之後即不再管理這個位址的使用狀況,所以稱為 stateless.
  • Stateful Configuration
    與 Stateless 相反的是 stateful configuration,IPv6 位址的配置包括 Prefix, Host ID 以及 DNS 伺服器位址的狀態維護都還需要透過 DHCPv6 來負責.即是 stateful.

現在不管是透過 Automatic 或是 Automatic, addresses only 成功的話你會看到 IPv6 的位址.

root@ben-SIT:~# ifconfig eth0
eth0      Link encap:Ethernet  HWaddr 00:1a:64:22:04:83  
          inet addr:172.16.0.82  Bcast:172.16.0.255  Mask:255.255.255.0
          inet6 addr: fe80::21a:64ff:fe22:483/64 Scope:Link
          inet6 addr: 2001:db8:1:0:ad34:470b:cf97:5865/64 Scope:Global
          inet6 addr: 2001:db8:1:0:21a:64ff:fe22:483/64 Scope:Global
          UP BROADCAST RUNNING MULTICAST  MTU:1500  Metric:1
          RX packets:6248 errors:0 dropped:0 overruns:0 frame:0
          TX packets:2061 errors:0 dropped:0 overruns:0 carrier:0
          collisions:0 txqueuelen:1000 
          RX bytes:513184 (513.1 KB)  TX bytes:228669 (228.6 KB)
          Interrupt:17 
  • inet6 addr: fe80::21a:64ff:fe22:483/64 Scope:Link
    Link local
  • inet6 addr: 2001:db8:1:0:ad34:470b:cf97:5865/64 Scope:Global
    RA ??
  • inet6 addr: 2001:db8:1:0:21a:64ff:fe22:483/64 Scope:Global
    RA Profix + Mac address
root@ben:~# cat /etc/resolv.conf 
# Dynamic resolv.conf(5) file for glibc resolver(3) generated by resolvconf(8)
#     DO NOT EDIT THIS FILE BY HAND -- YOUR CHANGES WILL BE OVERWRITTEN

但以剛剛 radvd.con 的設定,都只會被指派 IPv6 的位址,至於 DNS 還需要額外設定 RDNSS (Recursive DNS Server), RDNSS 相關設定.

[root@benjr ~]# vi /etc/radvd.conf
# NOTE: there is no such thing as a working "by-default" configuration file. 
#       At least the prefix needs to be specified.  Please consult the radvd.conf(5)
#       man page and/or /usr/share/doc/radvd-*/radvd.conf.example for help.
#
#
interface eth1
{
	AdvSendAdvert on;
	MinRtrAdvInterval 30;
	MaxRtrAdvInterval 100;
	prefix 2001:db8:1:0::/64
	{
		AdvOnLink on;
		AdvAutonomous on;
		AdvRouterAddr off;
	};

};
RDNSS ip [ip] [ip] 
{    
    list of rdnss specific options
};

RHEL6 – NetworkManager

$
0
0

Red Hat Enterprise Linux 6 之前的網絡管理工具是 #system-config-network ,而 Red Hat Enterprise Linux 6 採用新的網路管理工具 #NetworkManager – http://www.gnome.org/projects/NetworkManager/ . NetworkManager 支援的網路介面相當多的介面 包含了有線網路 (Wired), 無線網路 (Wireless), 行動寬頻 (Mobile Broadband), VPN, ADSL 等設定,除了 IPv4 外還支援了 IPv6 及藍芽

開機後你可以先確認一下 NetworkManager 是否已經開啟.

# service NetworkManager status
NetworkManager (pid  2710) is running...

如果再工具列找不到他 ipv601 可以執行下面的指令.或是在 System / Preferences / Network Connection 這裡也可以找到.

# nm-applet &

我們來看一下 /etc/NetworkManager/NetworkManager.conf 的設定.

# vi /etc/NetworkManager/NetworkManager.conf
[main]
plugins=ifcfg-rh
[ifupdown]
managed=true
  • plugins=ifcfg-rh 代表 網路裝置的設定檔要參考 /etc/sysconfig/network-scripts/ifcfg-* , plugins=ifcfg-rh 詳細說明請參考 http://benjr.tw/94990 說明
  • 最後一行敘述 關於 [ifupdown] plugin 的 “managed" 當他設為 false 時,那麼在 /etc/network/interfaces 列出來的任何網路裝置將完全被忽略.

修改完成需要重新啟動服務.
RedHat 6

# service NetworkManager restart

RedHat / CenOS 7 使用 systemctl 來控制跟 upstart 所啟動的服務.請參考 http://benjr.tw/94315

# systemctl restart NetworkManager

在 RHEL7 下面提供了文字介面的 NetworkManager TUI #nmtui 可以使用,在文字介面下使用相當方便.

# nmtui

nmtui01

如果你還是習慣用傳統 network 服務來管理則,應該只需要關閉 NetworkManager 服務即可.因為透過 NetworkManager 的網卡設定檔皆是儲存在 /etc/sysconfig/network-scripts/ifcfg-*

Linux – NetworkManager 設定檔

$
0
0

RedHat Linux (RHEL) 從 RHEL6 開始就改成 #NetworkManager 為預設的 桌面網路管理工具 – http://www.gnome.org/projects/NetworkManager/ . NetworkManager 支援的網路介面相當多的介面 包含了有線網路 (Wired), 無線網路 (Wireless), 行動寬頻 (Mobile Broadband), VPN, ADSL 等設定,除了 IPv4 外還支援了 IPv6 及藍芽.
RHEL6

Ubuntu

不過一直沒有花時間去搞懂 NetworkManager 的設定檔 (其設定檔位於 /etc/NetworkManager/NetworkManager.conf) ,這邊花點時間來看看,主要是參考官方網頁的說明 https://wiki.gnome.org/Projects/NetworkManager/SystemSettings

這是 RHEL 6 的設定檔案,主要是 plugins 的不同.
最後一行敘述 關於 [ifupdown] plugin 的 “managed" 當他設為 false 時,那麼在 /etc/network/interfaces 列出來的任何網路裝置將完全被忽略.

# vi /etc/NetworkManager/NetworkManager.conf
[main]
plugins=ifcfg-rh
[ifupdown]
managed=true

NetworkManager 設定支援下面不同的 Plugins

  • keyfile
  • ifcfg-rh
  • iBFT (iSCSI)
  • ifupdown
  • ifcfg-suse

我常用的只有 Ubuntu , RedHat (RHEL),下面就只針對這兩個作業系統的設定檔做說明
RedHat (ifcfg-rh)

# vi /etc/NetworkManager/NetworkManager.conf
[main]
plugins=ifcfg-rh
[ifupdown]
managed=true

ifcfg-rh (使用在 Fedora 以及 Red Hat Enterprise Linux distributions 上)

  • Device configuration (網路裝置設定檔)
    存放在 /etc/sysconfig/network-scripts/ifcfg-* (跟傳統 network 管理一樣的位置)
  • Hostname
    存放在 /etc/hostname 如果沒有則是儲存在 /etc/sysconfig/network (我看到的地方也是在這裡)
  • Nameservers
    DNS 的 IP 位址儲存在 /etc/resolv.conf
  • Logging
    記錄儲存在 /var/log/messages

Ubuntu (ifupdown , keyfile)

$ sudo vi /etc/NetworkManager/NetworkManager.conf
[main]
plugins=ifupdown,keyfile
dns=dnsmasq
[ifupdown]
managed=false

ifupdown (使用在 Debian 以及 Ubuntu distributions 上)

  • Device configuration (網路裝置設定檔)
    存放在 /etc/network/interfaces. NetworkManager 的設定管理相關的是最後一行敘述 “managed" 當他設為 false (預設值)時,NetworkManager 會直接略過已經在 /etc/networks/interfaces 設定好的網路設備.
  • Hostname
    存放在 /etc/hostname

keyfile (ifupdown 會搭配 keyfile 一起使用)

  • Device configuration (網路裝置設定檔)
    存放在 /etc/NetworkManager/system-connections/
  • Hostname
    hostname 直接儲存在 NetworkManager.conf

Ubuntu 感覺有點亂,我看到目前我的設定檔是存放在 /etc/NetworkManager/system-connections/ 設定值如下(如果沒有看到可能需要去 NetworkManager 做一下 save 的動作).

# cat Wired\ connection\ 1
[802-3-ethernet]
duplex=full
mac-address=08:00:27:64:CC:37

[connection]
id=Wired connection 1
uuid=b9c7304a-4547-48d4-bb01-912928bc5664
type=802-3-ethernet
timestamp=1467880054

[ipv6]
method=auto

[ipv4]
method=auto

Linux – Network device eth0 , eth1

$
0
0

在 VMWare 下面的虛擬機器遇到一個怪問題,我的網路裝置不知怎麼回事,以前是 eth0 後來不知道為什麼變成 eth1 ,而且改不回來.一開始還以為是 NetworjManager 設定有問題,檢查了設定檔

  • /etc/NetworkManager/NetworkManager.conf
  • /etc/sysconfig/network-scripts/ifcfg-*

改了半天還是一樣.

那會不會是因為有設定 Biosdevname 或是 net.ifnames 仔細看應該不是,最後才想到 udev 的命名規則 http://benjr.tw/10626

udev 可以依據裝置特性來個別命名,設定檔存放在 /etc/udev/rules.d/ 系統已經有一個是專門為網路卡預設的檔案 “70-persistent-net.rules "

[root@benjr ~]# cd /etc/udev/rules.d/
[root@benjr rules.d]# ll 70-persistent-net.rules 
-rw-r--r-- 1 root root 630 2016-07-07 23:05 70-persistent-net.rules

設定已經有一筆 eth0 而且跟目前的 MAC 不符合.應該有人改過 這一台虛擬機的硬體裝置.

[root@benjr rules.d]# cat 70-persistent-net.rules 
# This file was automatically generated by the /lib/udev/write_net_rules
# program, run by the persistent-net-generator.rules rules file.
#
# You can modify it, as long as you keep each rule on a single
# line, and change only the value of the NAME= key.

# PCI device 0x15ad:0x07b0 (vmxnet3) (custom name provided by external tool)
SUBSYSTEM=="net", ACTION=="add", DRIVERS=="?*", ATTR{address}=="00:0c:29:1c:52:10", ATTR{type}=="1", KERNEL=="eth*", NAME="eth0"

# PCI device 0x15ad:0x07b0 (vmxnet3)
SUBSYSTEM=="net", ACTION=="add", DRIVERS=="?*", ATTR{address}=="00:0c:29:f6:4d:73", ATTR{type}=="1", KERNEL=="eth*", NAME="eth1"

直接註記掉最早的設定,並將後來的 eth1 修改成 eth0 , 重新開機即可.

[root@benjr rules.d]# vi 70-persistent-net.rules 
# This file was automatically generated by the /lib/udev/write_net_rules
# program, run by the persistent-net-generator.rules rules file.
#
# You can modify it, as long as you keep each rule on a single
# line, and change only the value of the NAME= key.

# PCI device 0x15ad:0x07b0 (vmxnet3) (custom name provided by external tool)
#SUBSYSTEM=="net", ACTION=="add", DRIVERS=="?*", ATTR{address}=="00:0c:29:1c:52:10", ATTR{type}=="1", KERNEL=="eth*", NAME="eth0"

# PCI device 0x15ad:0x07b0 (vmxnet3)
SUBSYSTEM=="net", ACTION=="add", DRIVERS=="?*", ATTR{address}=="00:0c:29:f6:4d:73", ATTR{type}=="1", KERNEL=="eth*", NAME="eth0"

IPV6 PXE boot

$
0
0

哪些網卡支援 PXE IPV6 Boot 呢!! 根據 Intel 官方網站 http://www.intel.com/support/network/sb/cs-028553.htm 說明了! “UEFI Drivers Compatible with IPv6″ 也就是說要支援 IPv6 PXE Boot 的網卡,環境必須在 UEFI 下.傳統的 Intel® Boot Agent for Legacy BIOS 就不在其支援列表中了.

什麼是 uEFI!! 什麼是 PXE!! 可以參考下列聯結~

  • uEFI
    Extensible Firmware Interface (EFI) 的功能就類似傳統 BIOS ,他是 OS 與硬體之間溝通介面. 不過相較於傳統的 BIOS EFI 他的架構更模組化,功能更強大.EFI 的架構是由 Intel 提出的, 目前是交由 Unified EFI Forum 來管理.也就是我們現在所稱的 Unified Extensible Firmware Interface (UEFI)
  • PXE
    PXE (Preboot eXecution Environment) 是透過網路來安裝作業系統,在網卡上有一塊 ROM(firmware) 裡面存放了一些基本的網路協定如:Internet Protocol (IP), User Datagram Protocol (UDP), Dynamic Host Configuration Protocol (DHCP) 以及 Trivial File Transfer Protocol (TFTP) 透過這一些協定使得 PXE 可以進行網路的存取進一步安裝作業系統.

IPv6 PXE Server 設定步驟 (實驗環境為 RHEL6)

  1. 設定固定 IPV6 位址
  2. 設定 DHCP6 , IPV6 Table (Firewall)
  3. 設定 RADVD , IPv6 Forwarding
  4. 設定 TFTP
  5. grub.efi 檔案

Q : 那 IPv6 PXE 開機時到底是用哪一種方式獲取 IPv6 位址??
A: 目前實驗的結果是 DHCPv6 與 RADVD 都需要開啟.

  1. 設定固定 IPV6 位址
    我們不能使用 IPV6 的 link-local address 所以要手動設定固定 ipv6 address (3ffe:501:ffff:100::1) ,我們可以透過修改 /etc/sysconfig/network-scripts/ifcfg-* (RHEL) 或是直接用 #NetworkManager ( http://benjr.tw/10728 ) 工具來設定.
    [root@benjr ~]# ifconfig eth0
    eth0      Link encap:Ethernet  HWaddr 00:0C:29:F6:4D:73  
              inet addr:192.8.1.1  Bcast:192.8.1.255  Mask:255.255.255.0
              inet6 addr: fe80::20c:29ff:fef6:4d73/64 Scope:Link
              inet6 addr: 3ffe:501:ffff:100::1/64 Scope:Global
              UP BROADCAST RUNNING MULTICAST  MTU:1500  Metric:1
              RX packets:1226688 errors:0 dropped:0 overruns:0 frame:0
              TX packets:1392610 errors:0 dropped:0 overruns:0 carrier:0
              collisions:0 txqueuelen:1000 
              RX bytes:102208468 (97.4 MiB)  TX bytes:7696863052 (7.1 GiB)
    
  2. 設定 DHCP6 , IPV6 Table (Firewall)
    DHCPv6 設定如下, DHCPv6 設定說明請參考 http://benjr.tw/10651
    [root@benjr ~]# cat /etc/dhcp/dhcpd6.conf
    #
    # DHCPv6 Server Configuration file.
    #   see /usr/share/doc/dhcp*/dhcpd6.conf.example
    #   see dhcpd.conf(5) man page
    #
    
      default-lease-time 2592000;
      preferred-lifetime 604800;
      option dhcp-renewal-time 3600;
      option dhcp-rebinding-time 7200;
      option dhcp6.bootfile-url code 59 = string;
      option dhcp6.name-servers 3ffe:501:ffff:100::1;
      option dhcp6.info-refresh-time 21600;
      dhcpv6-lease-file-name "/var/lib/dhcpd/dhcpd6.leases";
    
      subnet6 3ffe:501:ffff:100::/64 {
    	  range6 3ffe:501:ffff:100::10 3ffe:501:ffff:100::100;
    	  range6 3ffe:501:ffff:100:: temporary;
    	  prefix6 3ffe:501:ffff:100:: 3ffe:501:ffff:111:: /64;
    	  
    	  option dhcp6.bootfile-url "tftp://[3ffe:501:ffff:100::1]/grub.efi";
    	 }
    
    [root@benjr ~]# chkconfig dhcpd6 on
    [root@benjr ~]# service dhcpd6 start
    

    ip6tabels (firewall) 預設會擋到 port 546 與 547 (客戶端主要使用 UDP port 546 而服務器端使用 UDP port 547) 所以需要關閉 (或是開放這兩個埠來使用)

    [root@benjr ~]# chkconfig ip6tables off
    [root@benjr ~]# service ip6tables stop
    
  3. 設定 RADVD , IPv6 Forwarding
    RADVD 設定如下, RADVD 設定說明請參考 http://benjr.tw/94906
    [root@benjr ~]# cat /etc/radvd.conf
    # NOTE: there is no such thing as a working "by-default" configuration file. 
    #       At least the prefix needs to be specified.  Please consult the radvd.conf(5)
    #       man page and/or /usr/share/doc/radvd-*/radvd.conf.example for help.
    #
    #
    interface eth0
    {
    	AdvSendAdvert on;
    	MinRtrAdvInterval 30;
    	MaxRtrAdvInterval 100;
    	prefix 3ffe:501:ffff:100::/64
    	{
    		AdvOnLink on;
    		AdvAutonomous on;
    		AdvRouterAddr off;
    	};
    
    };
    
    [root@benjr ~]# chkconfig radvd on
    [root@benjr ~]# service radvd start
    

    啟動 radvd 需要把 ipv6 fordward 打開. ipv6 fordward 跟 ipv4 的設定檔一樣儲存在 /etc/sysctl.conf

    [root@benjr ~]# vi /etc/sysctl.conf
    # Uncomment the next line to enable packet forwarding for IPv6
    #  Enabling this option disables Stateless Address Autoconfiguration
    #  based on Router Advertisements for this host
    net.ipv6.conf.all.forwarding=1
        
    [root@benjr ~]# sysctl -p
    net.ipv4.ip_forward = 1
    net.ipv4.conf.default.rp_filter = 1
    net.ipv4.conf.default.accept_source_route = 0
    kernel.sysrq = 0
    kernel.core_uses_pid = 1
    net.ipv4.tcp_syncookies = 1
    error: "net.bridge.bridge-nf-call-ip6tables" is an unknown key
    error: "net.bridge.bridge-nf-call-iptables" is an unknown key
    error: "net.bridge.bridge-nf-call-arptables" is an unknown key
    net.ipv6.conf.all.forwarding = 1
    kernel.msgmnb = 65536
    kernel.msgmax = 65536
    kernel.shmmax = 68719476736
    kernel.shmall = 4294967296
    
  4. 設定 TFTP
    [root@benjr ~]# cat /etc/xinetd.d/tftp 
    # default: off
    # description: The tftp server serves files using the trivial file transfer \
    #	protocol.  The tftp protocol is often used to boot diskless \
    #	workstations, download configuration files to network-aware printers, \
    #	and to start the installation process for some operating systems.
    service tftp
    {
    	disable	= no
    	socket_type		= dgram
    	protocol		= udp
    	wait			= yes
    	user			= root
    	server			= /usr/sbin/in.tftpd
    	server_args		= -s /var/lib/tftpboot
    	per_source		= 11
    	cps			    = 100 2
    	flags			= IPv6
    }
    

    tftp 設定要多增加 flags = IPv6,如果你遇到 PXE 顯示 tftp 錯誤時,可以參考 tftp 常見的錯誤訊息 http://benjr.tw/94695

  5. UEFI – grub.efi 檔案
    關於 uEFI PXE Boot 有一個很大的關鍵是使用對的 開機 檔案.之前有使用過 IPv4 UEFI 的開機檔為 BOOTX64.efi 請參考 http://benjr.tw/16115,但 IPV6 UEFI 需要使用 grub.efi (位於 /boot/efi/EFI/redhat/ 目錄).
    [root@benjr ~]# cp /boot/efi/EFI/redhat/grub.efi /var/lib/tftpboot/grub.efi
    

    若 Client 可以得到 IPV6 Address 但 PXE 開機還是失敗,大概都是這個檔案造成的,需要上官方網站看是否有更新檔.grub.efi 這個檔案是由 grub-0.97-77.el6.x86_64 套件提供.解開時需要使用 rpm2cpio 與 cpio .

    [root@benjr ~]# find / -name grub.efi
    /boot/efi/EFI/redhat/grub.efi
    [root@benjr ~]# rpm -qf /boot/efi/EFI/redhat/grub.efi
    grub-0.97-77.el6.x86_64
    [root@benjr ~]# rpm2cpio grub-0.97-77.el6.x86_64 | cpio -div
    

    grub.efi 還要搭配 efidefault 設定檔一起使用

    [root@benjr ~]# vi /var/lib/tftpboot/efidefault
    #debug --graphics
    default=0
    timeout 5000
    #hiddenmenu
    title RHEL6.8-64
    root (nd)
    	kernel /rhel6.8/vmlinuz  
    	initrd /rhel6.8/initrd.img
    
    title RHEL6.5-64
    root (nd)
    	kernel /rhel6/vmlinuz  
    	initrd /rhel6/initrd.img
    

    將開機所需的 kernel 和 initrd 檔案複製到 “/tftpboot/linux-install/rhel6 目錄下

    上面的設定是 Redhat 環境,如果要設定 Ubuntu 的環境可以參考這一篇 http://blog.widodh.nl/2015/11/pxe-boot-over-ipv6-with-ipxe/

    至於 EFI + Legacy PXE Boot 在 IPv6 的環境是不是可以整合在一起,我不確定,可以試試看 ,之前試過 EFI + Legacy PXE Boot 在 IPv4 的環境 http://benjr.tw/16194

  6. Legacy – grub.efi 檔案
    設定請參考 http://benjr.tw/83

yum whatprovides

$
0
0

有時候某一個程式沒有安裝 ,我怎麼知道他是放在哪一個套件裡的, #apt-get install command 本身就會幫忙搜尋,不用特別的方式.

  • APT

    比如我要找 #ifconfig , #apt-get 會提示你的工具是放在哪一個套件裡.

    root@benjr:~# apt-cache search ifconfig
    iproute2 - networking and traffic control tools
    net-tools - The NET-3 networking toolkit
    gnome-nettool - network information tool for GNOME
    inetutils-tools - base networking utilities (experimental package)
    libnet-ifconfig-wrapper-perl - multiplatform Perl wrapper for ifconfig
    moreutils - additional Unix utilities
    wmifinfo - Dockapp that shows information for all interfaces
    

    或是透過 apt-file 去找,會有比較多的資訊可供查詢.不過 #apt-file 非預設安裝,需要額外安裝.安裝後的第一步就是先更新資料庫.

    root@benjr:~# apt-get install apt-file
    root@benjr:~# apt-file update
    root@benjr:~# apt-file find ifconfig |grep -i /sbin/
    linux-cloud-tools-common: /usr/sbin/hv_set_ifconfig
    linux-lts-vivid-cloud-tools-common: /usr/sbin/hv_set_ifconfig
    net-tools: /sbin/ifconfig
    python-ethtool: /usr/sbin/pifconfig
    

    安裝與 #ifconfig 相關的套件 net-tools – The NET-3 networking toolkit 後,一樣可以透過 #apt-file 檢查 net-tools – The NET-3 networking toolkit 套件內容為何.

    root@benjr:~# apt-file list net-tools |grep -i ifconfig
    net-tools: /sbin/ifconfig
    net-tools: /usr/share/man/de/man8/ifconfig.8.gz
    net-tools: /usr/share/man/fr/man8/ifconfig.8.gz
    net-tools: /usr/share/man/man8/ifconfig.8.gz
    net-tools: /usr/share/man/pt_BR/man8/ifconfig.8.gz
    
  • yum

    但是 yum 就沒有提供這一項功能了,我們可以透過 #yum whatprovides

    [root@benjr ~]# yum install ifconfig
    Loaded plugins: fastestmirror
    Loading mirror speeds from cached hostfile
     * base: mirror01.idc.hinet.net
     * extras: ftp.twaren.net
     * updates: ftp.twaren.net
    No package ifconfig available.
    Error: Nothing to do
    

    一樣是找 #ifconfig ,這結果比 #apt-get 提供的還要清楚,一看就知道是 net-tools (Filename : /sbin/ifconfig) 套件提供的.

    [root@benjr ~]# yum whatprovides "*ifconfig"
    Loaded plugins: fastestmirror
    Loading mirror speeds from cached hostfile
     * base: mirror01.idc.hinet.net
     * extras: ftp.twaren.net
     * updates: ftp.twaren.net
    hypervkvpd-0-0.26.20150402git.el7.x86_64 : HyperV key value pair (KVP) daemon
    Repo        : base
    Matched from:
    Filename    : /usr/libexec/hypervkvpd/hv_set_ifconfig
    
    net-tools-2.0-0.17.20131004git.el7.x86_64 : Basic networking tools
    Repo        : base
    Matched from:
    Filename    : /sbin/ifconfig
    
    python-ethtool-0.8-5.el7.x86_64 : Ethernet settings python bindings
    Repo        : base
    Matched from:
    Filename    : /usr/sbin/pifconfig
    
    zsh-5.0.2-14.el7.x86_64 : Powerful interactive shell
    Repo        : base
    Matched from:
    Filename    : /usr/share/zsh/5.0.2/functions/_ifconfig
    
    zsh-5.0.2-14.el7_2.2.x86_64 : Powerful interactive shell
    Repo        : updates
    Matched from:
    Filename    : /usr/share/zsh/5.0.2/functions/_ifconfig
    

VirtualBox – Networking

$
0
0

在 Virtualbox 虛擬機器的 設定值/網路 可以選擇

  • 未附加
    網路卡存在,但沒有連接,不清楚什麼時候會用到.
  • NAT
  • NAT 網路
    這兩個的差別是
    NAT 可以直接在 虛擬機器的 設定值/網路 介面卡# 設定 連接埠轉送
    而 NAT 網路則是需要在 檔案 / 喜好設定 / 網路 / NAT 網路 / NAT 網路詳細資料

    什麼是 NAT ,NAT 的全名就是 network address translation,最常應用在將 Private IP 轉換成 Public IP ,Private IP 只限制用於私人網路,此類的封包無法在 Internet 上傳送.
    如 10.0.0.0(subnet mask : 10.255.255.255) ,172.16.0.0(subnet mask : 172.31.255.255) 以及 192.168.0.0(subnet mask : 192.168.255.255) 唯有 Public IP 是在 Internet 可以被合法傳遞,
    所以 NAT 最主要的目的就是為了將內部的 Private IP 透過轉換將資料可以在 Internet 上傳送.使用這種方式的好處是外部無法直接和虛擬機器相連接,這樣間接的加強的系統的安全性.

    virtualbox-networking03

    我們可以自己新增 NAT 網路, 檔案 / 喜好設定 / 網路 / NAT 網路 / 加入新的 NAT 網路

    1. 網路名稱 : NatNetwork
    2. 網路 CIDR(Classless Inter-Domain Routing) : 10.0.2.0/24

    virtualbox-networking01
    而 “連接埠轉送(Port forwarding)" 是做什麼用的.

    因為 NAT 的特性,虛擬機器凡事都需要透過 NAT 偽裝 來轉送,所以外部的機器沒有辦法直接連接到虛擬機器,所以我們可以透過 “連接埠轉送(Port forwarding)" 來讓外部機器來連線.
    比如你需要讓這一台虛擬機器開放 SSH 給外部機器來連結.設定 連接埠轉送(Port forwarding) 方式.

    首先 Virtualbox 有一個預設定網路卡介面 192.168.56.1 (僅限主機介面卡 Host-only networking 後面解釋), 我們需要透過他來做轉送 .

    C:\Users\ben>ipconfig
    乙太網路卡 VirtualBox Host-Only Network:
    
       連線特定 DNS 尾碼 . . . . . . . . :
       連結-本機 IPv6 位址 . . . . . . . : fe80::603c:480a:6852:6393%15
       IPv4 位址 . . . . . . . . . . . . : 192.168.56.1
       子網路遮罩 . . . . . . . . . . . .: 255.255.255.0
       預設閘道 . . . . . . . . . . . . .:
    

    virtualbox-networking02

    1. 名稱 : SSH (自訂)
    2. 協定 : TCP
    3. 主機名稱 : 192.168.56.1
    4. 主機連接埠 : 2222 (自訂)
    5. 客體 IP : 10.0.2.5 (虛擬機器 NAT IP)
    6. 客體連接埠 : 22 (SSH port)

    外部的機器就可以透過 192.168.56.1 port 2222 連線到 10.0.2.5 虛擬機器 port 22 了.

  • 橋接介面卡 Bridged networking
    這個模式就是直接對應到實體的網路裝置.我通常用於讓虛擬機器可以透過手機來上網.
    virtualbox-networking04
  • 內部網路 Internal networking
    虛擬機器網路裝置設定成為 內部網路 Internal networking 就類似連接到一台 switch 所以使用這一種方式的虛擬機器都可以溝通,但僅限如此 無法去連接到 外部的網路.
    virtualbox-networking07
  • 僅限主機介面卡 Host-only networking
    僅限主機介面卡 Host-only networking 這個在安裝 VirtualBox 時就會預先設置的虛擬網路卡介面 192.168.56.1,我們可以檢查一下 ( HOST OS ) 作業系統會有一個 Virtualbox Host-Only Network 的虛擬網路裝置,接下來所有設定在 僅限主機介面卡 Host-only networking 的虛擬機器網路裝置就會像是 串接在一個有 DHCP 功能的 Switch 上.
    C:\Users\ben>ipconfig
    乙太網路卡 VirtualBox Host-Only Network:
    
       連線特定 DNS 尾碼 . . . . . . . . :
       連結-本機 IPv6 位址 . . . . . . . : fe80::603c:480a:6852:6393%15
       IPv4 位址 . . . . . . . . . . . . : 192.168.56.1
       子網路遮罩 . . . . . . . . . . . .: 255.255.255.0
       預設閘道 . . . . . . . . . . . . .:
    

    virtualbox-networking05

    需要修改設定可以到 檔案 / 喜好設定 / 網路 / 僅限主機網路 (H) / VirtualBox Host-only network Adapter 做修改.
    virtualbox-networking06

  • 通用驅動程式
  • 還沒用過..

更多關於 VirtualBox 網路設定請參考 https://www.virtualbox.org/manual/ch06.html

FreeBSD command – mdconfig

$
0
0

沒想到 FreeBSD 要掛載 ISO 檔要這麼複雜,在 Linux 下只要一行指令

 
# mount -o loop FreeBSD-10.3-RELEASE-amd64-bootonly.iso /mnt

# mdconfig 這個指令應該是 FreeBSD 特有的,主要功能是 產生,控制 memory disks .

# mdconfig -a -t vnode -f FreeBSD-10.3-RELEASE-amd64-bootonly.iso
# mount_cd9660 /dev/md0 /mnt
# mkdir /usr/local/pxeboot
# cp -R /mnt/ /usr/local/pxeboot
# umount /mnt
# mdconfig -d -u 0

上面一連串是為了將 FreeBSD-10.3-RELEASE-amd64-bootonly.iso 光碟內容複製下來.關於 mdconfig 可以參考 https://www.freebsd.org/cgi/man.cgi?mdconfig(8),參數說明如下:

  • -a
    Attach a memory disk.
  • -t vnode
    type, Select the type of the memory disk.
    vnode, A file specified with -f file becomes the backing store for this memory disk.
  • -f file
    Filename to use for the vnode type memory disk. The -a and -t vnode options are implied if not specified.
  • -d
    Detach a memory disk from the system and release all resources.
  • -u
    Request a specific unit number or device name for the md device instead of automatic allocation.

CentOS 7 支援 ARM 處理器

$
0
0

Ubuntu 16.04.1 LTS Server 支援 ARM 的處理器版本的安裝光碟 iso image 與 netboot (install Ubuntu over the network) ,現在看到 CentOS 7 也開始支援 ARM 處理器.

Ubuntu 16.04.1 LTS Server
iso image 與 netboot 下載點 http://www.ubuntu.com/download/server/arm

CentOS 7
iso image 下載點 – http://mirror.centos.org/altarch/7.2.1603/isos/aarch64/
套件 – http://mirror.centos.org/altarch/7.2.1603/os/aarch64/Packages/

目前給 ARM 處理器的套件就僅限於上面連結的部分,沒看到的可能就需要透過 cmake , make , make install 去編譯 source code.

CentOS 7 比較特別的是還有支援 BananaPi , CubieTruck , RaspberryPi2 , RaspberryPi3 開發版的 image 檔案.
image 下載點 – http://mirror.centos.org/altarch/7/isos/armhfp/

CentOS7 – Sysbench

$
0
0

作業平臺 CentOS 7 的 yum 沒有包含 sysbench 需要透過 git 下載並編譯原始碼.

[root@localhost ~]# git clone https://github.com/akopytov/sysbench
Cloning into 'sysbench'...
remote: Counting objects: 3313, done.
remote: Total 3313 (delta 0), reused 0 (delta 0), pack-reused 3313
Receiving objects: 100% (3313/3313), 2.33 MiB | 441.00 KiB/s, done.
Resolving deltas: 100% (2281/2281), done.
[root@localhost ~]# cd sysbench/
[root@localhost sysbench]# git status
# On branch 0.5
nothing to commit, working directory clean
[root@localhost sysbench]# git config --list
core.repositoryformatversion=0
core.filemode=true
core.bare=false
core.logallrefupdates=true
remote.origin.url=https://github.com/akopytov/sysbench
remote.origin.fetch=+refs/heads/*:refs/remotes/origin/*
branch.0.5.remote=origin
branch.0.5.merge=refs/heads/0.5

編譯 sysbench 時所需要的套件

[root@localhost sysbench]# yum install libtool
[root@localhost sysbench]# yum install mariadb mariadb-server mysql mysql-devel

開始編譯 sysbench GitHub – https://github.com/akopytov/sysbench

[root@localhost sysbench]# ./autogen.sh
[root@localhost sysbench]# ./configure
[root@localhost sysbench]# make
[root@localhost sysbench]# make install

sysbench 提供 File I/O, CPU , Memory , Threads , Mutx , OLTP 的測試,請參考 http://benjr.tw/8715 , OLTP 測試 (prepare , run , cleanup) 詳細說明請參考 http://benjr.tw/95251


NetworkManager – nmcli , nmtui

$
0
0

Red Hat Enterprise Linux 6 之前的網絡管理工具是 #system-config-network ,而 Red Hat Enterprise Linux 6 採用新的網路管理工具 #NetworkManager – http://www.gnome.org/projects/NetworkManager/ . NetworkManager 支援的網路介面相當多的介面 包含了有線網路 (Wired), 無線網路 (Wireless), 行動寬頻 (Mobile Broadband), VPN, ADSL 等設定,除了 IPv4 外還支援了 IPv6 及藍芽.

但有時候環境不許可使用桌面系統,只有文字介面那還有辦法用這個工具嗎? 有的可以用 nmcli , nmtui ,關於 桌面的 NetworkManager 請參考 http://benjr.tw/94970

測試環境為 CentOS 7

nmcli

nmcli 提供了一個存指令介面的方式來設定.但使用上我還是偏好 nmtui 可以有文字選單來做.

[root@localhost ~]# nmcli g
STATE   CONNECTIVITY  WIFI-HW  WIFI-HARDWARE  WWAN-HW  WWAN   
已連線  已滿          已啟用   已啟用         已啟用   已啟用 

g[eneral] NetworkManager’s general status and operations

nmtui

確定一下 nmtui (NetworkManager-tui) 已經安裝了.

[root@localhost ~]# yum install NetworkManager-tui
Dependencies Resolved

================================================================================
 Package                   Arch        Version               Repository    Size
================================================================================
Updating:
 NetworkManager-tui        x86_64      1:1.0.6-31.el7_2      updates      212 k
Updating for dependencies:
 NetworkManager            x86_64      1:1.0.6-31.el7_2      updates      2.0 M
 NetworkManager-libnm      x86_64      1:1.0.6-31.el7_2      updates      498 k
 NetworkManager-team       x86_64      1:1.0.6-31.el7_2      updates      132 k

Transaction Summary
================================================================================
Upgrade  1 Package (+3 Dependent packages)

確定一下 NetworkManager 的狀態.

[root@localhost ~]# systemctl status NetworkManager.service
● NetworkManager.service - Network Manager
   Loaded: loaded (/usr/lib/systemd/system/NetworkManager.service; enabled; vendor preset: enabled)
   Active: active (running) since 一 2016-10-03 12:05:46 CST; 14min ago
 Main PID: 907 (NetworkManager)
   CGroup: /system.slice/NetworkManager.service
           ├─907 /usr/sbin/NetworkManager --no-daemon
           └─951 /sbin/dhclient -d -q -sf /usr/libexec/nm-dhcp-helper -pf /var/run/dhclient-eno1677

[root@localhost ~]# nmtui

nmtui01

進入之後可以

  1. 編輯連線
  2. 啟用連線
  3. 設定系統的主機名稱

設定好可以確認一下 route table 是正確的.

[root@localhost ~]# route
Kernel IP routing table
Destination     Gateway         Genmask         Flags Metric Ref    Use Iface
default         gateway         0.0.0.0         UG    100    0        0 eno16777736
172.16.15.0     0.0.0.0         255.255.255.0   U     100    0        0 eno16777736

GPU (Graphics Processing Unit)

$
0
0

CPU 的五大單元,應該都學過

  • 輸入單元 (Input Unit)
  • 輸出單元 (Output Unit)
  • 算數邏輯單元 ((Arithmetic & Logic Unit)
  • 控制單元 (Control Unit)
  • 記憶單元 (Memory Unit)

其中的 算數邏輯單元 + 控制單元 是由 CPU 來負責.那 GPU 是什麼?

因為在處理圖形時需要大量的浮點運算,雖然 Intel 從 80486DX 的 CPU 已經內建 FPU (floating point unit) 浮點運算單元,但沒有辦法滿足大量的圖形運算,所以這一類型的運算會交由繪圖處理晶片來處理 (現行的 GPU 含有數千個的核心可以做平行運算).
那何謂平行運算呢!! 這是一種需要大量,密集而且需要在同一個時間內被完成計算的一種運算,重點是這些運算可以被切割成比較小的單元來分散運算.所以顯示卡有了 GPU (Graphics Processing Unit) 圖形處理器 的稱號 (這是由 NVIDIA 對繪圖處理晶片提出的).

現在你可以把 GPU 想像是由一堆浮點運算器組合而成的平行運算處理器,所以除了遊戲繪圖運算需要大量平行運算(Parallel Computing),其他程式需要平行運算的皆可以透過 GPU 來處理,如 AI ,VR/AR, 無人汽車自動駕駛 …等.

目前發展最好的 GPU 公司為 Nvidia  ,他的股價可以參考http://www.cnyes.com/usastock/history/NVDA.html

可以看看這影片 GPU versus CPU 的介紹.

擷取 NVIDIA http://www.nvidia.com.tw/object/what-is-gpu-computing-tw.html 對於CPU 與 GPU 的比較
比較 CPU 和 GPU 處理任務的方式,就可輕鬆瞭解兩者之間的差異.CPU 含有數顆核心,用來為循序的序列處理進行最佳化.GPU 則含有數千個更小型且更高效率的核心,專為同時處理多重任務進行最佳化.

如果要比 GPU 的效能應該看他的對於 單,雙精度(double 64 bits) 下浮點運算 的能力.

Linux 開機參數 intremap=no_x2apic_optout

$
0
0

這個 Linux 開機參數 intremap=no_x2apic_optout 是做什麼的?

裡面有 APIC (Advanced Programmable Interrupt Controller) 進階的 IRQ 管理器,那什麼是 x2apic ?

先來看一下什麼是 APIC,APIC 有兩種 local APIC (LAPIC) 以及 I/O APIC

  • local APIC (LAPIC)
    每一個 CPU 都有自己的 LAPIC,主要用於管理 SMP(Symmetric multiprocessing) 系統中某些特定處理器的所有外部中斷,此外,它們都能夠接受和產生LAPICs 之間的inter-processor interrupts (IPIs).
    處理器間中斷 (Inter-Processor Interrupt,IPI) 在多處理器系統中當一個處理器向另一個處理器發出的中斷行為即為 IPI
  • I/O APIC
    另外一種是 I/O 的 APIC 用來處理關於 I/O 設備引起的中斷,這 I/O APIC 存在主板上,包含 redirection table ,用來路由周邊設備中斷到一個或多個 Local APIC.

下面可以看到我的系統有一個 7500/5520/5500/X58 I/O Hub I/OxAPIC Interrupt Controller

root@benjr:~# lshw -short
H/W path        Device      Class      Description
==================================================
                            system     Server()
/0                          bus        Server
/0/0                        memory     64KiB BIOS
/0/4                        processor  Intel(R) Xeon(R) CPU           E5520  @ 2.27GHz
/0/100                      bridge     5500 I/O Hub to ESI Port
/0/100/1                    bridge     5520/5500/X58 I/O Hub PCI Express Root Port 1
/0/100/1/0      eth0        network    82575EB Gigabit Network Connection
/0/100/13                   generic    7500/5520/5500/X58 I/O Hub I/OxAPIC Interrupt Controller
/0/100/1e/3                 display    MGA G200eW WPCM450
/0/100/1f.2                 storage    82801JI (ICH10 Family) SATA AHCI Controller

那什麼是 xAPIC 與 x2APIC ,都類似於剛剛提到的 local APIC (LAPIC) 以及 I/O APIC
下面轉貼 http://www.intel.com/content/www/us/en/architecture-and-technology/64-architecture-x2apic-specification.html

  1. xAPIC
    The extension of the APIC architecture that includes messaged APIC interface over the system bus and expanding processor physical addressability from 4 bits to 8 bits.
  2. local xAPIC
    The processor component that implements the associated xAPIC functionalities. This is supported by Intel® Pentium® 4 processors,Pentium® M processors, Intel® CoreTM 2 Duo processors, and Intel® Xeon® processors based on Intel® NetBurst microarchitecture and Intel® CoreTM microarchitecture.
  3. x2APIC
    The extension of xAPIC architecture to support 32 bit addressability of processors and associated enhancements.
  4. local x2APIC
    The processor component that implements the associated x2APIC functionalities.

Linux intremap 開機可以使用的參數如下:
intremap – Format: { on (default) | off | nosid }

  • on
    Enable X2APIC AND IRQ remapping (Default).
  • off
    Disable X2APIC AND IRQ remapping.
  • nosid
    Disable Source ID checking.
  • no_x2apic_optout
    BIOS x2APIC opt-out request will be ignored, let X2APIC enabled with IRQ remapping.

Linux – vsftp

$
0
0

我的需求如下(測試環境 CentOS 6.8):

  1. 不允許 FTP 使用者登入到系統後觀看根目錄下的資料夾.
  2. FTP 使用者登入後皆到統一的目錄 (/var/ftp) 下.

可以透過 chroot (限制使用者目錄) 與 local_root (使用者登入後到統一的目錄) 來做限制.

  1. 不允許 FTP 使用者登入到系統後觀看到其他根目錄資料夾.
    修改 vsftp 的設定檔 /etc/vsftpd/vsftpd.conf , 透過 chroot 來限制使用者目錄.
    [root@localhost ~]# vi /etc/vsftpd/vsftpd.conf
    
    chroot_local_user=YES
    chroot_list_enable=YES
    chroot_list_file=/etc/vsftpd/chroot_list
    

    設定好之後所有的使用者都會被限制,如果你想讓某一些使用者可以例外,可以寫在 chroot 的使用者帳號列表,就算沒有要設定其他人為例外,這個檔案還是必須存在.

    [root@localhost ~]# touch /etc/vsftpd/chroot_list
    [root@localhost ~]# service vsftpd restart
    
  2. FTP 使用者登入後皆到統一的目錄 (/var/ftp) 下.
    修改 vsftp 的設定檔 /etc/vsftpd/vsftpd.conf , local_root 使用者登入後到統一的目錄.
    [root@localhost ~]# vi /etc/vsftpd/vsftpd.conf
    local_root=/var/ftp
    
    [root@localhost ~]# service vsftpd restart
    

vsftp01

Linux command – smartctl

$
0
0

之前有透過 #hdparm 或是 /sys/class/sas_phy/phy-0\:0/maximum_linkrate 是檢視 硬碟 SATA / SAS Link Speed http://benjr.tw/80914

root@ubuntu:~# cat /sys/class/sas_phy/phy-4\:0/maximum_linkrate
3.0 Gbit

同事推薦我可以用 smartctl 直接看更快,這是透過硬碟本身所提供的 S.M.A.R.T. (Self-Monitoring Analysis and Reporting Technology )技術 ,他可以根據檢測屬性的結果來決定該顆硬碟的使用是否快故障.

測試環境為 Ubuntu14.04 ,預設是沒有安裝 smart 的工具.

root@ubuntu:~# apt-get install smartmontools

常用的參數

  • -H, –health

    root@ubuntu:~# smartctl -H /dev/sdb
    smartctl 6.2 2013-07-26 r3841 [x86_64-linux-3.13.0-24-generic] (local build)
    Copyright (C) 2002-13, Bruce Allen, Christian Franke, www.smartmontools.org
    
    === START OF READ SMART DATA SECTION ===
    SMART Health Status: OK
    
  • -i, –info

    root@ubuntu:~# smartctl -i /dev/sdb
    smartctl 6.2 2013-07-26 r3841 [x86_64-linux-3.13.0-24-generic] (local build)
    Copyright (C) 2002-13, Bruce Allen, Christian Franke, www.smartmontools.org
    
    === START OF INFORMATION SECTION ===
    Vendor:               IBM-ESXS
    Product:              MBB2147RC
    Revision:             SB04
    User Capacity:        146,814,976,000 bytes [146 GB]
    Logical block size:   512 bytes
    Rotation Rate:        10025 rpm
    Logical Unit id:      0x500000e01d93f8c0
    Serial number:        BS59P8A04LRL
    Device type:          disk
    Transport protocol:   SAS
    Local Time is:        Tue Nov  1 15:37:24 2016 CST
    SMART support is:     Available - device has SMART capability.
    SMART support is:     Enabled
    Temperature Warning:  Enabled
    
  • -t TEST, –test=TEST

    這邊會列出可供測試的項目.

    root@ubuntu:~# smartctl -t /dev/sdb
    smartctl 6.2 2013-07-26 r3841 [x86_64-linux-3.13.0-24-generic] (local build)
    Copyright (C) 2002-13, Bruce Allen, Christian Franke, www.smartmontools.org
    
    =======> INVALID ARGUMENT TO -t: /dev/sdb
    =======> VALID ARGUMENTS ARE: offline, short, long, conveyance, force, vendor,N, select,M-N, pending,N, afterselect,[on|off] =======
    
    Use smartctl -h to get a usage summary
    

    來試試看 short , long 測試,測試會在背景執行,需要透過 -l selftest 來觀看目前的測試進度與結果.

    root@ubuntu:~# smartctl -t short /dev/sdb
    smartctl 6.2 2013-07-26 r3841 [x86_64-linux-3.13.0-24-generic] (local build)
    Copyright (C) 2002-13, Bruce Allen, Christian Franke, www.smartmontools.org
    
    Short Background Self Test has begun
    Use smartctl -X to abort test
    
    root@ubuntu:~# smartctl -t long /dev/sdb
    smartctl 6.2 2013-07-26 r3841 [x86_64-linux-3.13.0-24-generic] (local build)
    Copyright (C) 2002-13, Bruce Allen, Christian Franke, www.smartmontools.org
    
    Extended Background Self Test has begun
    Please wait 34 minutes for test to complete.
    Estimated completion time: Tue Nov  1 16:15:59 2016
    
    Use smartctl -X to abort test
    
    root@ubuntu:~# smartctl -l selftest /dev/sdb
    smartctl 6.2 2013-07-26 r3841 [x86_64-linux-3.13.0-24-generic] (local build)
    Copyright (C) 2002-13, Bruce Allen, Christian Franke, www.smartmontools.org
    
    === START OF READ SMART DATA SECTION ===
    Self-test execution status:		96% of test remaining
    SMART Self-test log
    Num  Test              Status                 segment  LifeTime  LBA_first_err [SK ASC ASQ]
         Description                              number   (hours)
    # 1  Background long   Self test in progress ...   -     NOW                 - [-   -    -]
    # 2  Background short  Completed                   -   19184                 - [-   -    -]
    Long (extended) Self Test duration: 2040 seconds [34.0 minutes]
    
  • -l TYPE, –log=TYPE

    -l 除了剛剛看到的 selftest 外還有不同的參數 error, selftest, selective, directory[,g|s], xerror[,N][,error], xselftest[,N][,selftest], background, sasphy[,reset], sataphy[,reset], scttemp[sts,hist], scttempint,N[,p], scterc[,N,M], devstat[,N], ssd, gplog,N[,RANGE], smartlog,N[,RANGE] 可以指定使用.

    root@ubuntu:~# smartctl -l /dev/sdb
    smartctl 6.2 2013-07-26 r3841 [x86_64-linux-3.13.0-24-generic] (local build)
    Copyright (C) 2002-13, Bruce Allen, Christian Franke, www.smartmontools.org
    
    =======> INVALID ARGUMENT TO -l: /dev/sdb
    =======> VALID ARGUMENTS ARE: error, selftest, selective, directory[,g|s], xerror[,N][,error], xselftest[,N][,selftest], background, sasphy[,reset], sataphy[,reset], scttemp[sts,hist], scttempint,N[,p], scterc[,N,M], devstat[,N], ssd, gplog,N[,RANGE], smartlog,N[,RANGE] <=======
    
    Use smartctl -h to get a usage summary
    

    -l error 可以檢測該顆硬碟的 Error count (Errors Corrected by ECC fast | delayed , Errors Corrected by rereads / rewrites , Total errors corrected , Correction algorithm invocations , Total uncorrected errors)

    root@ubuntu:~# smartctl -l error /dev/sdb
    smartctl 6.2 2013-07-26 r3841 [x86_64-linux-3.13.0-24-generic] (local build)
    Copyright (C) 2002-13, Bruce Allen, Christian Franke, www.smartmontools.org
    
    === START OF READ SMART DATA SECTION ===
    Error counter log:
               Errors Corrected by           Total   Correction     Gigabytes    Total
                   ECC          rereads/    errors   algorithm      processed    uncorrected
               fast | delayed   rewrites  corrected  invocations   [10^9 bytes]  errors
    read:          0        0         0         0          0     123263.011           0
    write:         0        0         0         0          0       5218.671           0
    verify:        0        0         0         0          0         24.721           0
    
    Non-medium error count:      148
    

    透過 -l sasphy 就可以檢視 SAS 硬碟 Link Speed (SATA 指令為 sataphy)

    root@ubuntu:~# smartctl -l sasphy /dev/sdb
    smartctl 6.2 2013-07-26 r3841 [x86_64-linux-3.13.0-24-generic] (local build)
    Copyright (C) 2002-13, Bruce Allen, Christian Franke, www.smartmontools.org
    
    === START OF READ SMART DATA SECTION ===
    Protocol Specific port log page for SAS SSP
    relative target port id = 1
      generation code = 0
      number of phys = 1
      phy identifier = 0
        attached device type: end device
        attached reason: unknown
        reason: unknown
        negotiated logical link rate: phy enabled; 3 Gbps
        attached initiator port: ssp=1 stp=1 smp=1
        attached target port: ssp=0 stp=0 smp=0
        SAS address = 0x500000e01d93f8c2
        attached SAS address = 0x5005076b06400f25
        attached phy identifier = 1
        Invalid DWORD count = 2686
        Running disparity error count = 473
        Loss of DWORD synchronization = 1
        Phy reset problem = 0
    relative target port id = 2
      generation code = 0
      number of phys = 1
      phy identifier = 1
        attached device type: no device attached
        attached reason: unknown
        reason: unknown
        negotiated logical link rate: phy enabled; unknown
        attached initiator port: ssp=0 stp=0 smp=0
        attached target port: ssp=0 stp=0 smp=0
        SAS address = 0x500000e01d93f8c3
        attached SAS address = 0x0
        attached phy identifier = 0
        Invalid DWORD count = 0
        Running disparity error count = 0
        Loss of DWORD synchronization = 0
        Phy reset problem = 0
    
  • -a, –all

    -a 對於 ATA 硬碟參數等同 , ‘-H -i -c -A -l error -l selftest -l selective’
    -a 對於 SCSI 硬碟參數等同 , ‘-H -i -A -l error -l selftest’

  • -x, –xall

    -x 對於 ATA 硬碟參數等同 , ‘-H -i -g all -c -A -f brief -l xerror,error -l xselftest,selftest -l selective -l directory -l scttemp -l scterc -l sataphy’.
    -x 對於 SCSI 硬碟參數等同 , ‘-H -i -A -l error -l selftest -l background -l sasphy’.

  • smartd

    我們可以透過 smartd Daemon 讓他自動監視硬碟的狀態.設定請參考 http://benjr.tw/96013

  • GSmartControl

    不習慣使用指令方式的還有圖形介面可以使用,須額外安裝 GSmartControl

Viewing all 145 articles
Browse latest View live